Website profiles · Technology insights · Alternatives

autoweeb.com

Anime Video Creator powered by AutoWeeb. Use our AI anime video generator to create anime videos with AI, animate characters with Seedance 2, and make anime videos online in minutes.

Paid content Multilingual
Visit website
Profile views 9 Outbound visits 0 Normal
AutoWeeb Full homepage screenshot

At a glance

Category
Video & Film
Language
English
Paid-content signal
Paid contentObserved
Registered
2023
Hosting
CloudflareInferred
HTTPS certificate trusted
PassedObserved
Last updated

Website review

This review may include AI-generated content and is not individually verified. Domain, certificate and other facts come from the observed data on this page.

What is AutoWeeb?

AutoWeeb is an online AI anime production tool. It combines several steps that usually require separate programs: designing characters, writing a storyboard, generating anime-style images, and animating them into video clips. Its pitch is speed and consistency — you describe a character or story in plain English, and the tool keeps that character looking the same across scenes and episodes.

What you can actually do with it

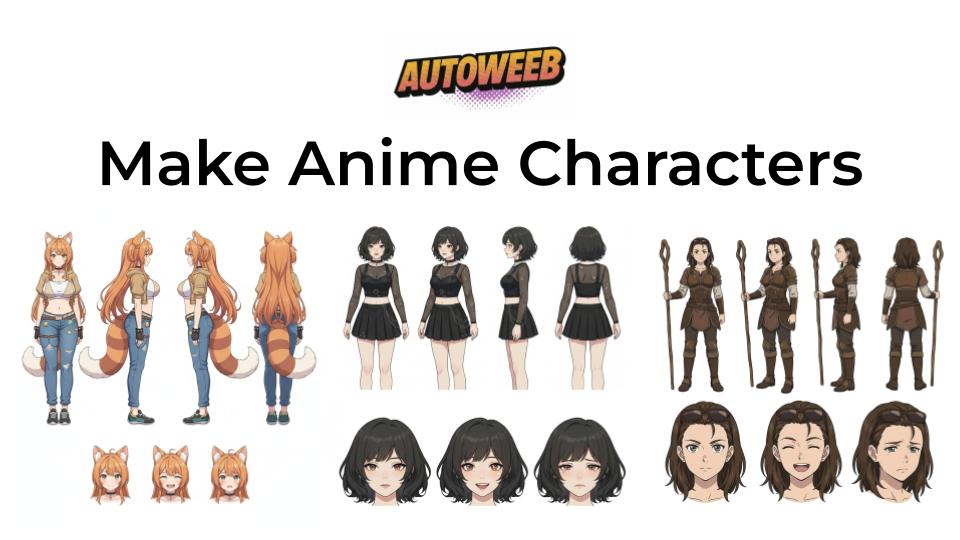
  • Create a character: Upload a photo or describe the character in words. AutoWeeb produces a design sheet with multiple poses and expressions.
  • Write an anime storyboard: Describe your idea in plain English and it generates a scene-by-scene storyboard with shot descriptions, character cues, and story beats.
  • Animate shots: Turn storyboard images into cinematic clips, with Seedance 2 handling animation and character consistency across shots.
  • Apply anime filters to photos: Upload a photo, pick a filter, and get a rendered anime portrait. No drawing skills or tablet needed, and the site says it takes under a minute.
  • Build concept art: Create character sheets, locations, and a reusable visual bible for a project.

Who it suits

If you are… AutoWeeb's fit
A first-time creator with a story idea but no drawing skill Strong — the storyboard and character tools lower the entry barrier
A solo animator wanting fast previsualization Useful for storyboards and concept art before committing to full production
Someone who just wants an anime-style portrait The photo filter path is the simplest entry point
A studio needing precise manual control Weaker — AI generation trades fine control for speed

A practical next step

Start with the smallest test that matches your goal. If you want a portrait, use the photo-to-anime filter; if you have a story, write one scene in plain English and see whether the generated storyboard matches your intent before building a full episode. Character consistency is the feature most worth stress-testing early, since it is the hardest thing to fix later. Plan details are listed at AutoWeeb.

How do I make an anime video with AutoWeeb?

AutoWeeb splits anime video creation into four connected steps, so you move from a character idea to animated clips without leaving the same workflow:

  1. Design your character. Upload a photo or describe the character in words. AutoWeeb generates a design sheet with multiple poses and expressions, which is what keeps the character recognisable later.
  2. Write the storyboard. Describe your idea in plain English and the AI drafts a scene-by-scene storyboard with shot descriptions, character cues and story beats.
  3. Animate each scene. Generate images and animate shots straight from the storyboard, using Seedance 2 for the animation and consistent characters across scenes and episodes.
  4. Apply filters if you want a specific look. Upload a photo, choose a named anime filter and get a rendered portrait in seconds — no drawing skills or tablet.

What that means in practice. The character sheet is the load-bearing part. If you skip it and generate each shot fresh, faces and outfits drift between scenes; if you build the sheet first, the storyboard and animation steps have something stable to reference. A short test is worth the time: design one character, storyboard three shots, animate them, and check whether the character still reads as the same person in shot three. If yes, scale up to a full episode.

Pick your entry point by goal:

Your goal Start with
A single anime-style portrait from a photo Anime filters or draw anime online
Original characters for a story Anime character creator
A script or episode plan Writing an anime / storyboard
A finished animated video The full studio workflow

If you only need a profile picture, the filter route takes under a minute and the character creator is overkill. If you are making a series, invest in the character sheet and storyboard first — they are what make later episodes cheaper to produce. Start at AutoWeeb and begin with the character creator, then work through the storyboard before animating anything.

Can I turn a photo into an anime character?

Yes. AutoWeeb is built around exactly that workflow: upload a photo, and the site says it produces a fully rendered anime portrait in seconds, with no drawing skills or tablet required. The same photo can also feed its character creator, which generates a design sheet with multiple poses and expressions so the character stays consistent across scenes and episodes.

What the process looks like

  1. Design your character — upload a photo or describe the character in words. AutoWeeb builds a full design sheet.
  2. Write your storyboard — describe an idea in plain English and the AI drafts a scene-by-scene storyboard with shot descriptions and character cues.
  3. Animate every scene — generate images and animate each shot from the storyboard, keeping the character consistent.

If you only want the portrait, step 1 plus an anime filter is enough. The storyboard and animation stages matter when you want the character to appear in a moving scene rather than a single still.

Filters versus character creation

Goal Better fit Trade-off
One stylised portrait from a photo Anime filter Fast, but the result is a single image and the character is not reusable
A character you can reuse across shots Character creator More setup, but you get a consistent sheet with poses and expressions
A short animated clip Full studio workflow Most control, most steps — character, storyboard, then animation

Choosing a style

AutoWeeb lists named filters spanning watercolour-style fantasy, action, cyberpunk neon, and several well-known anime looks. Named styles are convenient but they pull your photo toward that show's aesthetic; if the person's likeness matters to you, test a softer filter first and compare before committing to a full character sheet.

Practical notes

  • Real photos with clear, evenly lit faces generally convert better than group shots or heavy shadow.
  • A generated sheet is a starting point, not a locked asset — plan to regenerate if a pose or expression looks off.
  • One person in the source photo gives the cleanest character result.

Next step: run one photo through a filter to judge the style, then move to the character creator only if you want that character to reappear in a storyboard. Pricing tiers are listed at AutoWeeb. For a second opinion on photo-to-anime conversion, official tools from larger platforms such as OpenAI and Adobe can serve as a comparison point.

Do I need drawing skills to create anime characters?

No. AutoWeeb is built for people who can't draw: you either upload a photo or describe the character in words, and the tool generates a design sheet with multiple poses and expressions that it reuses across scenes. Its photo-filter path is explicitly pitched as "no drawing skills, no tablet required."

What you actually do instead of drawing

  • Character creation: upload a reference photo or write a description → get a design sheet (poses, expressions).
  • Storyboarding: describe your idea in plain English → the AI writes scene-by-scene shots, character cues and story beats.
  • Animation: generate and animate each shot from that storyboard, with the character kept consistent.
  • Photo conversion: upload a photo, pick a named anime filter, get a rendered portrait in under a minute.

Where skill still helps

The AI handles line work, rendering and consistency, but it doesn't decide what's good. Writing a clear character description (age, build, hair, outfit, personality) and specifying camera framing and mood per shot produces far more usable output than a one-line prompt. Judging whether a design sheet is on-model, or whether a shot reads well, is still an editorial skill — just not a drawing one.

Practical scenario: a writer with a story idea but no art background can go from concept to a storyboard and animated clips without hiring a character designer first. The trade-off is control: you're choosing from the styles and filters the platform offers rather than inventing a look from scratch, and consistency depends on how well your inputs are specified.

Next step: if you want to test the lowest-effort path first, try the photo-to-anime filter on a single picture before committing to a full character sheet and storyboard. If you'd rather see the full workflow, review plans at AutoWeeb and check the character-creator and storyboard features against your project.

How much does AutoWeeb cost?

AutoWeeb does not publish a single flat price. Its site lists three subscription tiers — AutoWeeb Creator, AutoWeeb Pro, and AutoWeeb Studio — with the actual figures on the pricing page at AutoWeeb. Treat those tiers as a rough ladder of capability rather than a simple good–better–best: Creator is likely aimed at someone making a first character or a short clip, Pro at a hobbyist producing regular episodes, and Studio at a small team or a creator who needs the full character-design-to-animation workflow.

Because the feature set spans several jobs — generating an anime character sheet, writing a scene-by-scene storyboard, animating shots, and applying photo-to-anime filters — the tier you need depends on which of those you actually use, not on how many videos you make.

A practical way to decide: check the pricing page, then match the cheapest tier that covers your main job. If you only want to turn photos into anime-style portraits, you probably do not need a higher animation-focused plan; if you need consistent characters across multiple scenes, that is the feature that will push you up a tier.

Can I create a full anime episode with consistent characters?

Yes, that's the core workflow AutoWeeb is built around: design a character once, then reuse that design across every scene so the character stays recognizable from shot to shot.

How the pipeline works

  1. Character design — Upload a photo or describe the character in words. The tool produces a design sheet with multiple poses and expressions.
  2. Storyboard — Describe your idea in plain English; the AI drafts a scene-by-scene storyboard with shot descriptions and character cues.
  3. Animation — Generate and animate each shot from the storyboard, with characters held consistent across scenes and episodes.

The page also advertises a "concept art" mode for building reusable visual bibles (character sheets, locations), which is what actually keeps a longer project coherent.

What "full episode" realistically means

Goal Fit
Short episode, consistent cast, fast turnaround Strong fit — this is the advertised use case
Feature-length, hand-tuned animation Weak fit — expect per-shot regeneration and cleanup
Photo-to-anime portrait only Overkill; the filter tool alone covers it

Practical next step

Before committing to a full episode, run a one-minute test: design two characters, storyboard three connected shots, and animate them. If the faces and outfits hold across those three shots, scale up. If they drift, fix the character sheet first — consistency problems compound over episode length, and re-animating later is the expensive part.

A concrete scenario: a solo creator making a 3–5 minute short for YouTube can plausibly go idea → storyboard → animated scenes in one sitting, then spend the real time on re-rolls and editing. A team producing a serialized series should treat the storyboard and character bible as locked assets and only animate after those are approved.

For pricing tiers (Creator, Pro, Studio), check the plans page directly: AutoWeeb.

Related questions

More questions →
What to Look for in a Video Platform Beyond Hosting and Sharing

If you're evaluating a video platform for a small business or marketing team, hosting and sharing are just the entry point. The features that actually determine whether a platform fits your workflow fall into four areas: privacy and playback control, collaboration and review tools, marketing and analytics capabilities, and practical limits like storage and mobile support. Most general-purpose tools (cloud storage, social networks, free hosts) cover hosting well but leave gaps in the other three. This guide walks through what each area means in practice, so you can map features to your own situation instead of comparing endless checklists.

Start by separating three jobs: hosting, editing, and marketing

Video platforms tend to bundle three distinct functions, and confusion usually comes from mixing them up:

  • Hosting — storing a file, generating a player, delivering it reliably to viewers. This is the baseline.
  • Editing — trimming, assembling, adding captions or branding. Some platforms include basic editors; others expect you to edit elsewhere and upload the result.
  • Marketing and business features — privacy controls, lead capture, calls to action, analytics, team review workflows. These are what separate a "video host" from a "video platform."

A useful exercise: write down your last five video tasks (a product demo, a client pitch, a social clip, an internal training, a landing page embed). For each one, note which of the three jobs it required. If most of your tasks stop at hosting, a lighter tool may be enough. If several involve review cycles, gated access, or measuring viewer behavior, a fuller platform earns its cost.

Privacy and playback control: the business-vs-social divide

On social platforms, everything is public by default and wrapped in ads and recommendations. For business use, that's often the opposite of what you want. Look for:

  • Granular privacy settings — can you restrict a video to specific people, a password, a domain, or an embed location? Can you make it unlisted but still embeddable?
  • Ad-free playback — your product demo shouldn't end with a competitor's ad or an unrelated recommendation.
  • Customizable embeds — control over player color, logo, and whether related videos appear. This matters when the video sits on your own site and represents your brand.
  • Domain-level restrictions — the ability to limit playback to your own website prevents your content from being re-embedded elsewhere.

If your videos are purely promotional and public, these controls matter less. If you share client work, internal training, or pre-release material, they become the deciding factor.

Collaboration and review: the most common gap

This is where general-purpose tools most often fall short. A shared drive lets people comment on a file, but it doesn't give you a structured review process. A dedicated platform typically offers:

  • Timestamped comments — feedback attached to a specific moment in the video, so "the logo looks off" points to an exact frame.
  • Versioning — uploading a new cut while keeping the old one, so reviewers can see what changed.
  • Approval status — a clear "approved" or "needs changes" state rather than a scattered email thread.
  • Role-based access — reviewers who can comment but not download or reshare.

When this becomes relevant: as soon as more than two people need to sign off on a video, or when you're producing videos on a recurring schedule. For a solo operator publishing once a month, a simple comment thread may be sufficient.

Analytics and lead capture: beyond view counts

A raw view count tells you almost nothing actionable. Business-oriented platforms go further:

Feature What it tells you When it matters
Watch time / engagement graph Where viewers drop off Improving content or editing
Viewer identity Who watched (when gated) Sales follow-up, internal training
Lead capture forms Email collected before or during playback Demand generation
Calls to action Click-through to a page or booking link Converting viewers
Embed/domain reports Where your video is being watched Tracking campaign performance

If your goal is brand awareness, basic view counts may be fine. If you're using video to generate leads or train staff, the deeper metrics are the reason to choose a platform over a free host.

Practical limits that affect daily use

Feature lists rarely mention the constraints that cause friction later. Check these before committing:

  • Storage and bandwidth limits — how much you can upload, and whether high viewership triggers overage fees.
  • Upload size and length caps — relevant if you work with long recordings or high-resolution footage.
  • Mobile app support — can you upload, review, and respond to comments from a phone? For teams that shoot on mobile, this is a real workflow factor.
  • Export and portability — can you download your originals and embed codes if you leave? Lock-in is a hidden cost.
  • Integrations — does it connect to the tools you already use (your website builder, CRM, or project tracker)?

Deciding between a full platform and a lighter tool

Use these rough conditions as a starting point:

A lighter tool (free host, cloud storage, social platform) is likely enough if:

  • You publish occasionally and mostly to public channels.
  • One person handles video end to end.
  • You don't need gated access or viewer-level analytics.

A dedicated platform is worth evaluating if:

  • Multiple people review or approve videos.
  • You need privacy controls, ad-free playback, or branded embeds.
  • You're using video for lead generation, training, or client delivery.
  • You publish frequently enough that manual workarounds cost more than a subscription.

Pricing and plan details change often, so check the platform's current plans page directly rather than relying on secondhand comparisons. The right approach is to list your actual requirements first, then match them against what each option offers — not the other way around.

How to Make an Anime Character with AI and Keep It Consistent Across Scenes

You can make an anime character with AI by describing it in words or uploading a photo, then letting the tool generate a full design sheet with multiple poses and expressions. That sheet becomes your reference for every later scene, which is what keeps the character from changing appearance between shots. This works for short clips, multi-episode stories, or just a single portrait — as long as you build the character sheet before you start animating.

Step 1: Generate the character design sheet

AutoWeeb's character creator takes either a text description or an uploaded photo and returns a design sheet rather than a single image. The sheet matters more than any one picture: it gives you several poses and expressions of the same character, which is exactly what you need when that character has to appear in different shots.

What to put in the input:

  • Physical anchors — hair color and length, eye color, build, and one or two distinctive features (a scar, a hair clip, a jacket). These are the traits most likely to drift between generations, so state them explicitly.
  • Outfit — describe it once, in detail, and reuse the same wording later.
  • Vibe or role — "quiet student," "cyberpunk mercenary," "fantasy healer." This steers the model's default styling choices.

Expected result: a sheet showing the same character across multiple angles and expressions. Check it before moving on — if two poses look like different people, regenerate or tighten the description now rather than after you've built a storyboard around it.

Step 2: Understand why consistency is the whole problem

A single good anime portrait is easy. The hard part is the second shot. Image and video models generate each frame independently, so without a fixed reference they will re-interpret "black hair, red eyes" slightly differently every time — different face shape, different hair volume, different outfit details.

The character sheet solves this by acting as a reusable visual reference. AutoWeeb's workflow is built around this: the same character design carries through every scene and every episode. If you skip the sheet and just re-describe the character in each prompt, expect drift.

Step 3: Write the storyboard with the character locked in

Once the design exists, describe your story idea in plain English. AutoWeeb's AI turns it into a scene-by-scene storyboard with shot descriptions, character cues, and story beats.

At this stage, keep the character reference attached to every scene rather than re-describing the character from scratch. The storyboard is where you decide what happens; the character sheet decides who it happens to. Mixing those two jobs into one prompt is a common cause of inconsistent results.

Step 4: Animate the scenes

Generate images and animate each shot directly from the storyboard. AutoWeeb uses Seedance 2 for animation and states the setup is ready in under five minutes. The character stays consistent because each shot inherits the same design reference instead of starting fresh.

Practical checkpoints:

  • Animate one scene first and compare it against the character sheet before committing to the rest.
  • If a shot drifts, the fix is usually the reference, not the animation settings — reattach or regenerate the character sheet.
  • Keep the same art style selected across all scenes (see below).

Step 5: Pick an art style and apply it consistently

AutoWeeb offers named anime filters and styles, including Studio Ghibli-style watercolors, Demon Slayer-style action, and cyberpunk neon, alongside references to Spy x Family, My Hero Academia, Solo Leveling, Pokémon, Evangelion, and others. You can also upload a photo and get a rendered anime portrait in seconds without drawing skills.

Two rules that prevent style mismatch:

  1. Choose the style before generating the character sheet, not after. A sheet made in a watercolor style will not match scenes animated in a neon action style.
  2. Apply the same named style to every scene. Switching styles mid-project is the most common reason a character suddenly looks like a different person.

Common problems and what to check

Problem Likely cause Fix
Character looks different in each shot No fixed character sheet, or re-described per prompt Generate a design sheet first and reference it in every scene
Style shifts between scenes Different filters applied per shot Lock one named style for the whole project
Result doesn't match the description Description too vague on hair, eyes, or outfit Add specific physical anchors and reuse the exact wording
Poses look like different characters Sheet generated from an under-specified prompt Regenerate the sheet and re-check before storyboarding

When this workflow fits

Use the character-sheet-first approach if your character appears in more than one shot, or if you plan multiple episodes. If you only need a single anime portrait from a photo, you can skip straight to the photo-to-anime filter — that path takes under a minute and needs no drawing skills. The full character-to-animation pipeline is worth the extra setup only when consistency across scenes actually matters to you.

What Is an AI Anime Character Creator and How Does It Work?

An AI anime character creator is a tool that turns a photo or a written description into a reusable character design — typically a sheet with multiple poses and expressions — rather than a single stylized image. It's the right tool when you need the same character to appear across several scenes, shots, or episodes. If you only want to restyle one photo, a plain anime filter is faster and cheaper. AutoWeeb's character creator sits inside a larger anime video workflow, so the design you generate can feed directly into storyboarding and animation.

Character creator vs. anime filter: the practical difference

Both take an image or prompt as input, but they produce different things.

Anime filter AI anime character creator
Input One photo Photo or text description
Output One restyled image Design sheet: multiple poses and expressions
Reusability Low — each photo is a one-off High — the same design is reused across scenes
Consistency across shots Not applicable The core purpose
Typical next step Share the image Storyboard, then animate

The filter path is described on AutoWeeb as: upload a photo, pick a filter, get a rendered anime portrait in seconds, with no drawing skills or tablet required. That's a good fit for a profile picture or a quick visual experiment.

The character path is different. Per AutoWeeb's workflow, you upload a photo or describe your character in words, and the tool generates a full design sheet with multiple poses and expressions, "ready to appear in every scene of your story." That last part is the whole point: the sheet is a reference asset, not a finished artwork.

How the generation flow works

AutoWeeb lays out a three-step sequence, and it's a useful mental model for any tool in this category:

  1. Design your character. Input is either a reference photo or a text description. Output is a design sheet covering multiple poses and expressions.
  2. Write your storyboard. You describe your idea in plain English; the AI produces a scene-by-scene storyboard with shot descriptions, character cues, and story beats.
  3. Animate every scene. Images are generated and shots animated directly from the storyboard, with characters intended to stay consistent "through every scene, every episode."

The important structural detail is that step 1 produces an artifact that steps 2 and 3 consume. If your tool generates a character but can't carry that character forward, you're doing the consistency work manually.

What "consistency" actually means here

Consistency is the difference between a character and a costume. A consistent character keeps the same face shape, hair, eye color, outfit, and proportions whether they're standing in a wide shot or a close-up, in scene one or scene twelve. AutoWeeb frames this as characters staying consistent across every scene and episode, and it's the main reason to use a character creator instead of generating images one at a time.

If you're evaluating any tool, this is the first thing to test: generate a character, then generate two scenes with that character in different framing, and compare.

What you get out of it

Based on AutoWeeb's feature set, the outputs cluster into a few categories:

  • Character design sheets — multiple poses and expressions for one character.
  • Concept art — character sheets, locations, and what AutoWeeb calls a "reusable visual bible."
  • Storyboards — scene-by-scene shot descriptions with character cues.
  • Animated clips — storyboard shots animated into cinematic clips, using Seedance 2 for animation with consistent characters.

The "visual bible" idea is worth stealing even if you use a different tool: keep your character sheets and location references in one place so every later generation has something to match against.

Art style options

AutoWeeb lets you pick named anime filters and art styles rather than only describing a style in words. The listed references span Studio Ghibli-style watercolors, Demon Slayer-style action, and cyberpunk neon, with named filters including Demon Slayer, Spy x Family, My Hero Academia, Solo Leveling, Pokémon, Evangelion, Rascal Does Not Dream of Bunny Girl Senpai, and The Apothecary Diaries.

Named styles are easier to reproduce than free-text style prompts, because the same label tends to produce the same look across sessions. If you're building a multi-scene project, pick one and stay with it.

How to choose a tool

Judge candidates on these points, in roughly this order:

  • Does it produce a design sheet, or only single images? Sheets are what make reuse possible.
  • Does the character carry into storyboard and animation? If the pipeline stops at image generation, consistency becomes your job.
  • Can you input both a photo and a text description? Photo input helps when you have a reference; text input helps when you don't.
  • Are styles named and repeatable? Free-text style prompts drift between generations.
  • What's the output format? A sheet you can re-upload as a reference is more useful than a gallery you can only view.

AutoWeeb publishes plan tiers (Creator, Pro, Studio) on its pricing page; check current terms there rather than assuming what each tier includes.

Common failure modes

  • Result doesn't match the description. Text prompts are lossy. Fix by adding a reference photo, or by iterating on the description rather than regenerating the same prompt.
  • Character drifts between scenes. Usually caused by not reusing the design sheet, or by changing style labels mid-project. Lock the sheet and the style before generating scenes.
  • Style inconsistency across a series. Same cause. One named style, applied throughout.
  • Treating a filter output as a character. A single restyled photo has no poses, no expressions, and nothing to match against later.

Where to start

If you want a quick test of the concept, the filter path takes under a minute and needs no drawing skill. If you actually need a character for a story, start with the character step: upload a reference or write a description, generate the sheet, and confirm the sheet looks right before writing the storyboard. Everything downstream inherits whatever you lock in at that point.

What Is an AI Anime Character Maker and How Does It Work?

An AI anime character maker is a tool that turns either a text description or an uploaded photo into a reusable anime character design — typically a "design sheet" with multiple poses and expressions — and then keeps that character visually consistent when you place it into scenes. It differs from a general image generator in one key way: a general generator produces a one-off picture, while a character maker produces a persistent identity you can reuse across shots, scenes, and episodes. AutoWeeb is one example, combining a character creator with storyboarding and video animation in a single workflow.

The Two Input Paths

Most AI anime character makers accept one of two starting points, and the choice affects how much control you have.

Describe in words. You type a plain-language description — hair color, outfit, personality cues, art style — and the tool generates a full design sheet. This path is best when the character is original and you have a clear mental image.

Upload a photo. You provide an existing image and the tool renders it into an anime portrait or character. AutoWeeb describes this path as taking "under 60 seconds" with "no drawing skills, no tablet required." This is best when you want to anime-fy a real person or an existing design.

Both paths converge on the same output: a character asset the rest of the workflow can reference.

What a "Design Sheet" Actually Gives You

The output isn't a single image. AutoWeeb generates "a full design sheet — multiple poses and expressions — ready to appear in every scene of your story." That matters because consistency problems usually appear when a character needs to do something the original image didn't show: turn their head, react, or appear from a different angle.

A design sheet front-loads those variations so the tool has reference material for each new shot, rather than improvising a face from scratch every time.

How Consistency Is Maintained Across Scenes

This is the part that separates a character maker from a filter. The mechanism, based on how AutoWeeb describes its workflow:

  1. Design the character once — the design sheet becomes the fixed reference.
  2. Write the storyboard — you describe your idea in plain English, and the AI produces a scene-by-scene storyboard with "shot descriptions, character cues, and story beats."
  3. Animate from the storyboard — each shot is generated with the character reference attached, so "your characters stay consistent through every scene, every episode."

The storyboard step is what makes consistency practical at scale. Instead of re-describing your character in every prompt, the character cue is carried through the shot list automatically. AutoWeeb pairs this with Seedance 2 for animating storyboard shots into clips.

What to Check Before Committing to a Tool

Consistency is the hardest problem in this category, so test it directly rather than trusting a demo.

Check Why it matters
Does it output a multi-pose design sheet, or just one image? A single image gives the tool nothing to reference when your character turns or emotes.
Can the character survive a full scene change? Test the same character in two very different settings — lighting and angle shifts expose weak consistency.
Does it carry the character through to video, or stop at stills? Some tools make characters but can't animate them; you'd need a second tool and re-establish consistency.
What art styles are available? AutoWeeb offers named filters spanning Studio Ghibli watercolors, Demon Slayer action, and cyberpunk neon, plus references to Spy x Family, My Hero Academia, Solo Leveling, Pokémon, Evangelion, and others. Style range tells you how flexible the tool is.
Is there a free entry point to test? AutoWeeb offers a free anime filter trial that takes under 60 seconds, which lets you judge output quality before paying.

Where the Workflow Fits Together

AutoWeeb frames its tools as steps rather than separate products: an AI anime video generator (animate storyboard shots with Seedance 2), an anime character creator (design consistent characters), a storyboard writer (turn a story idea into scenes), a photo-to-anime converter (upload a photo, get a rendered portrait), and concept art tools for building a reusable visual bible of characters and locations.

If your goal is a single anime-style portrait, the photo path is enough. If your goal is a character that appears across multiple scenes or episodes, you need the design-sheet-plus-storyboard path — that's where the "maker" distinction actually pays off.

How to Create an Anime Character with AI and Keep It Consistent Across Scenes

You can create an anime character with AI by describing it in words or uploading a photo, generating a full design sheet with multiple poses and expressions, then reusing that sheet as the reference for every scene. AutoWeeb's Anime Character Creator is built for exactly this: it produces "consistent sheets across every scene," and its storyboard step lets the AI write shot descriptions and character cues that point back to the same design. The consistency depends less on the tool and more on how tightly you lock the character's key visual traits before you start generating scenes.

Step 1: Generate the character design sheet

Start with one of two inputs:

  • Text description — describe the character in plain language (hair, outfit, build, color palette, distinguishing marks).
  • Uploaded photo — use a photo as the basis and let the tool render it into an anime design.

AutoWeeb generates a full design sheet with multiple poses and expressions, which is the asset you'll reuse. This sheet is the anchor for everything downstream, so review it before moving on.

What to lock in before you continue

Pick the traits that must never change and write them down in fixed wording:

  • Hair color, length, and style
  • Outfit and any accessories
  • Core color palette
  • One or two distinctive features (a scar, a hair clip, an eye color)

Reusing identical wording for these traits is what keeps the AI from drifting. If you describe the hair differently in scene 3 than in scene 1, expect a different character.

Step 2: Turn your idea into a storyboard

Describe your story idea in plain English. AutoWeeb's AI writes a complete scene-by-scene storyboard — shot descriptions, character cues, and story beats — in seconds. The character cues are where your locked traits should appear, so check that each scene references the same character rather than re-describing them loosely.

If you're new to structuring an anime story, AutoWeeb points to a full guide on writing an anime from its "From Idea to Storyboard" section.

Step 3: Animate each scene with the same character

Generate images and animate every shot directly from the storyboard. AutoWeeb states that characters stay consistent through every scene and every episode, using Seedance 2 for animation. The workflow is: storyboard shot → generated image → animated clip, with the character sheet carried through.

Checking consistency as you go

After generating each scene, compare against the design sheet:

Check If it's off
Hair color or style changed Re-add the exact trait wording from your locked list
Outfit details drifted Re-reference the design sheet for that scene
Face shape or proportions shifted Regenerate with the sheet as the explicit reference
Palette looks different Restate the color palette in the scene prompt

Fix drift at the scene level rather than regenerating the whole storyboard — the earlier scenes are still valid.

Step 4: Export and reuse the character sheet

The design sheet is reusable. Keep it for:

  • Later episodes of the same story
  • New scenes that weren't in the original storyboard
  • Concept art and a visual bible (AutoWeeb's Anime Concept Art feature builds character sheets, locations, and a reusable visual bible)

Because the sheet holds multiple poses and expressions, you can pull the pose that matches a new scene instead of regenerating the character from scratch.

Related AutoWeeb features you may need

  • AI Anime Video Generator — animates storyboard shots into cinematic clips with consistent characters
  • Draw Anime Online — upload a photo and get a rendered anime portrait in seconds, useful for quick character references
  • Apply AI Anime Filters — photo plus a named filter (Ghibli-style watercolors, Demon Slayer action, cyberpunk neon, and others); AutoWeeb says no drawing skills or tablet are required and it takes under 60 seconds

Common pitfalls

  • Changing trait wording between scenes — the most common cause of a character "changing" mid-story. Keep the locked list and paste from it.
  • Skipping the design sheet — generating scenes without a fixed reference gives you a different character each time.
  • Over-describing in scene prompts — adding new details the sheet doesn't have invites the AI to invent features.
  • Not checking after each generation — catching drift at scene 3 is cheaper than discovering it at scene 10.

Pricing and plan details for AutoWeeb Creator, Pro, and Studio are listed on its pricing page; check there for current terms before committing to a workflow.

Website Overview

An active inbound-mail setup with incomplete authentication may leave the domain more open to impersonation. Provider hosting alone does not close that gap.

Domain and Registration

Transfer-protection status is present, helping reduce the risk of unauthorized domain transfers. The domain has about 2 years of registration history; its current configuration provides more context than age alone. The registrar is NameCheap, Inc., a widely used domain service provider. The domain uses the common .com extension, which is not an independent safety signal.

DNS and Email

MX records exist, but SPF, DKIM and DMARC were not detected. Protection against domain impersonation may be incomplete. Nameservers are provided by Cloudflare, indicating managed DNS hosting. MX records point to the Google Workspace email service. No CNAME was found; the observed records resolve directly to addresses. TXT records include verification markers for Google. Such markers may also remain after a service stops being used.

TLS and Certificates

The public key uses EC with 256 bits. The server supplied a complete certificate chain. No organization name is present in the certificate; the available fields are consistent with domain validation. The certificate was issued within the Google Trust Services cloud or CDN ecosystem. The certificate's total validity is about 90 days, consistent with a short renewal cycle.

HTTP and Browser Security

The checked browser-security headers were not detected, leaving fewer explicit browser-side safeguards. No X-Powered-By header was found, reducing one common source of backend fingerprinting information. The cf-ray response header indicates a CDN or caching proxy in the delivery path. No obvious internal addresses or debug information were found in the headers. The Server header identifies cloudflare without an exact version.

Technology Stack Analysis

The public page identifies Google Analytics, Cloudflare without precise versions, leaving fewer clues for version-specific scanning.

Search and Social Sharing

The meta description has 182 characters and may be shortened in search results. Twitter Card metadata is configured. JSON-LD includes Organization data, helping describe the organization as an entity. The page declares 6 language or regional alternatives using hreflang. The title has 60 characters, within a common display range.

Hosting and Email

DNSCloudflare
HostingCloudflare
EmailGoogle Workspace
Approximate IP geolocation (inferred; a CDN or proxy may differ from the origin server) Location unknown Inferred 104.21.22.50

Registration details

RDAP / WHOIS

RegistrarNameCheap, Inc.
Registered2023-12-11
Expires2026-12-11
Domain statusclient transfer prohibited
Nameserversdamon.ns.cloudflare.com、suzanne.ns.cloudflare.com
DNSSECunsigned

DNS records

DNS

TypeNameValueTTLPriority
Aautoweeb.com104.21.22.50300—
Aautoweeb.com172.67.202.241300—
AAAAautoweeb.com2606:4700:3031::6815:1632300—
AAAAautoweeb.com2606:4700:3032::ac43:caf1300—
MXautoweeb.comsmtp.google.com3001
NSautoweeb.comdamon.ns.cloudflare.com86400—
NSautoweeb.comsuzanne.ns.cloudflare.com86400—
TXTautoweeb.comgoogle-site-verification=8V1UQv2Bat5PSrr67lIvlkKeAKYOWThYqTD1KXKMBBY300—

TLS and certificates

TLS / SSL

AssessmentNormal configuration
Supported protocolsTLSv1.2、TLSv1.3
Negotiated protocolTLSv1.3
Certificate subjectautoweeb.com
IssuerGoogle Trust Services
Valid until2026-11-24T19:44 · Remaining when checked: 54 days
Verification detailsCertificate trust: Passed · Hostname match: Passed

HTTP response headers

HTTP

HeaderValue
content-typetext/html
servercloudflare

Identified technologies

Google AnalyticsCloudflare

Pages, Search and Sharing

Meta descriptionAnime Video Creator powered by AutoWeeb. Use our AI anime video generator to create anime videos with AI, animate characters with Seedance 2, and make anime videos online in minutes.
Canonical URLhttps://autoweeb.com/
LanguageEnglish (default) · Multilingual
Twitter Cardsummary_large_image
All bots 1 allowed · 0 disallowed
  • Allow/

User reviews (0)

  • No reviews yet.