Website profiles · Technology insights · Alternatives

evaligo.com

Visual drag-and-drop AI workflow builder with built-in A/B testing. Run a flow on several AI models, score every output with blind AI judges, train a per-input model router on the results, and deploy any flow as an API. Free plan, no credit card.

Paid content
Visit website
Profile views 5 Outbound visits 0 Normal
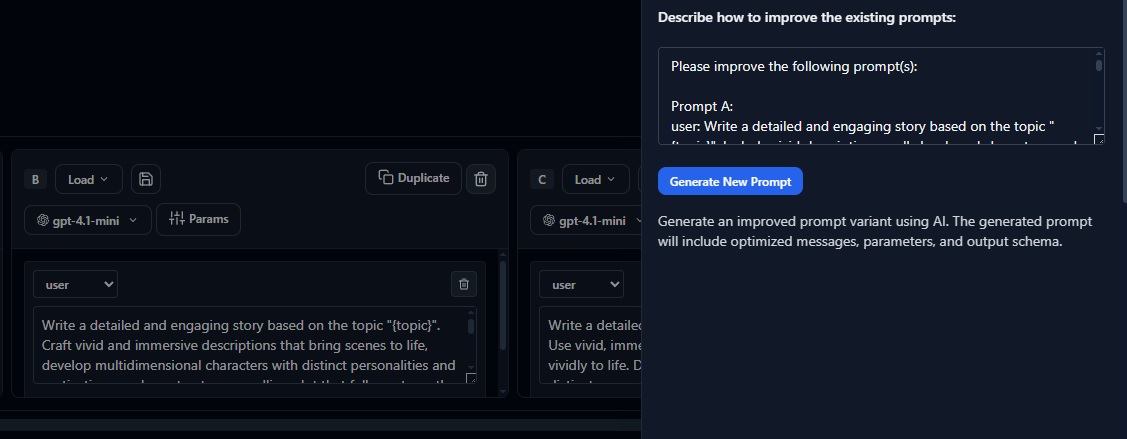
Evaligo Full homepage screenshot

At a glance

Category
Artificial Intelligence
Language
English
Paid-content signal
Paid contentObserved
Registered
2025
Hosting
Amazon CloudFrontInferred
HTTPS certificate trusted
PassedObserved
Last updated

Website review

This review may include AI-generated content and is not individually verified. Domain, certificate and other facts come from the observed data on this page.

What is Evaligo?

Evaligo is a visual AI workflow builder with built-in A/B testing. You assemble a flow of prompts, agents and tools on a drag-and-drop canvas, run the same flow across several AI models, and compare the results on quality, cost and speed before deploying the winner as an API. It is aimed at teams who need to choose between models or prompt versions on evidence rather than reputation.

How a test works

  • Build the flow. Describe it in a sentence and Evaligo generates the nodes — prompts, web scraping, data extraction, tools, agents — which you then edit on the canvas or by instruction.
  • Run variants. Each model becomes a variant, covering OpenAI, Google, Anthropic and open-source options such as DeepSeek, MiniMax, Kimi and Qwen through a single OpenRouter key.
  • Score blind. AI judge panels grade every output without knowing which model produced it, which reduces the bias toward familiar names.
  • Read the scoreboard. Results show score alongside cost and latency per output.
  • Route and deploy. A per-input model router can be trained on the results, so easy inputs go to a cheap model and harder ones to a stronger one. Any flow can be published as an API.

What the published experiments suggest

Evaligo's own write-ups are the most concrete illustration of why this matters. Across three experiments, price rarely tracked quality:

  • On language detection over 129 texts, every model scored 0.99 or better, yet the most expensive cost 32 times the cheapest without scoring higher.
  • On listing localization, the top model beat a cheaper rival by only 0.006 while costing about twenty times more per listing.
  • On writing-level grading, a cheaper Flash model outscored the Pro model in the same family.

These are Evaligo's own findings on its own workflows, so treat them as illustrations of a pattern rather than independent benchmarks. The practical reading is that a defensible model choice usually comes from testing on your inputs, not from a leaderboard.

Who it suits

Teams shipping LLM features who keep asking "should we switch models, and is the expensive one worth it?" It fits less well if you only ever call one model with one prompt, or if you need a full production observability stack rather than pre-deployment comparison.

A reasonable first step

Take 30 real inputs from your own workload, run them through two or three models at very different price points, and have the blind judges score the outputs. If the cheap model lands within a small margin, route to it and reserve the expensive one for the inputs where it actually wins. The free plan lets you run that first comparison without a credit card.

Evaligo is the product covered here; for background on the models it tests, the vendors' own documentation is the better source.

How do I run an A/B test comparing multiple AI models on the same inputs?

Build a single flow that takes your inputs, then attach each model you want to compare as a variant of that flow. Evaligo is designed around exactly this pattern: one flow, several models, the same inputs, and a scoreboard that lines up quality against cost and speed. In practice, the work splits into four steps.

1. Define the task and the inputs

Write down the job in one sentence (for example, "classify the language of each support message" or "localize this product listing for the target market"). Then assemble a fixed input set. The page's own experiments used 30, 63 and 129 items, which is enough to expose differences that a handful of examples would hide. Keep the same set for every model — that is what makes the comparison fair.

2. Build the flow and add model variants

Evaligo's editor is drag-and-drop: prompts, web scraping, data extraction, tools and agents appear as connected nodes, and you can describe a flow in a sentence to have it drafted, then edit on the canvas or by instruction. Add each model you want to test as a variant, including open-source options such as DeepSeek, MiniMax, Kimi and Qwen via one OpenRouter key alongside OpenAI, Google and Anthropic models.

3. Score with blind judges

Rather than eyeballing outputs, use blind AI judge panels, or score against a gold answer set when one exists. The published experiments show why this matters: on language detection, six models all scored 0.99 or better, but the most expensive cost 32× the cheapest without scoring higher. On listing localization, the top model led by 0.006 while costing about twenty times more per listing. A judge panel or reference set turns "this looks better" into a number you can act on.

4. Read the scoreboard, then decide

Compare three columns, not one:

Signal What it tells you Risk if ignored
Quality score Whether the output is good enough Paying more for no gain
Cost per output What each call costs at volume A cheap model that fails your bar
Speed Latency your users feel A slow winner in a chat UI

Price is a weak predictor of quality. In the writing-level experiment, a Flash model outscored the Pro model of the same family and cost less per text. So treat the scoreboard as the decision, not the price tag.

A practical decision rule

If the top two models are within a small margin, take the cheaper one and route only the hard cases to the expensive one. Evaligo supports per-input model routing trained on your test results, which is the natural next step once you see that most inputs do not need the premium model. Then deploy the flow as an API.

For background on the models themselves, see OpenRouter, OpenAI, Anthropic and DeepSeek.

Next step: pick your ten hardest real inputs, run them through two or three models with a blind judge, and look at the cost column before the score column.

How does Evaligo's blind AI judge scoring work and how do I read the scoreboard?

Evaligo's blind AI judge scoring is an evaluation layer that sits on top of your workflow: instead of trusting a single model's self-reported confidence, you run the same inputs through competing model or prompt variants and let a panel of judges grade the outputs without knowing which variant produced them. The scoreboard then turns those grades into a comparison of quality, cost and speed per output.

How the blind judging works

Based on the page evidence, the mechanics are:

  • Same inputs, multiple variants. A flow runs on several AI models at once, so every variant sees identical inputs. This is what makes the scores comparable — differences come from the model or prompt, not from the data.
  • A judge panel, not a single judge. Evaligo describes "blind AI judge panels" and "three blind judges" in its own experiments. Blind means the judges are not told which model or variant produced a given output, which reduces the tendency to favor a well-known or expensive model.
  • Scores are recorded per output. Each output gets a score, and the platform also records cost per output. In the published experiments, scoring was also checked against a gold answer set or reference answer set, which gives an external anchor beyond the judges' opinion.
  • The result is a scoreboard, not a verdict. Because the panel is made of AI judges, treat scores as a strong signal for ranking variants, not as ground truth. If a decision is high-stakes, spot-check a sample of outputs yourself.

How to read the scoreboard

Read each column as answering a different question:

Column What it tells you What to watch for
Score Relative quality on this task, per the blind judges Small gaps may not be meaningful; look at the spread across judges
Cost per output What that quality costs at your volume Compare ratios, not absolute cents — a 20× or 32× gap is the real story
Speed Latency per output Relevant when the flow is user-facing rather than batch
Per-input routing Which model wins for which kind of input The basis for training a router instead of picking one model globally

The published Evaligo experiments illustrate the pattern well. In a language-detection test on 129 texts, every model scored 0.99 or better, but the most expensive cost 32 times the cheapest without scoring higher. In a listing-localization test across 63 listings and 7 languages, the top model led by only 0.006 while costing about twenty times more per listing than the runner-up. In a writing-level test on 87 texts, a cheaper Flash model outscored the Pro model in the same family. The consistent lesson: price did not predict quality, and near-identical scores often hid large cost differences.

A practical way to use it

Start with the cheapest variant that is within a defensible margin of the top score — often a few thousandths of a point. If your inputs are heterogeneous, let the per-input model router pick between a cheap and an expensive model rather than forcing one global choice. For broader context on model comparisons, see OpenRouter, which Evaligo names as the single key used to reach open-source models such as DeepSeek, MiniMax, Kimi and Qwen.

Can Evaligo help me reduce AI costs by routing inputs to cheaper models without losing quality?

Yes. Evaligo is built around exactly that loop: run the same inputs across several models, score the outputs blind, then train a per-input router on the results and deploy the winning flow as an API. The routing decision comes from measured quality on your own inputs rather than from price lists or general benchmarks.

How the cost saving actually appears

The page's own experiments show the pattern to expect. In a language-detection test on 129 texts, every model scored 0.99 or better, yet the most expensive cost 32 times the cheapest without scoring higher. In a localization test on 63 listings across 7 languages, the top model beat a cheaper one by only 0.006 in score while costing about 20 times more per listing. A writing-level test on 87 texts found a Flash model outscoring the Pro model of the same family at lower cost per text.

The practical reading: on many tasks, quality differences between tiers are small enough that price, not capability, is the deciding factor — but you can only know which tasks those are by testing them.

What to check before trusting it

  • Where the savings are real. Routing helps when a cheap model is close to the best on your inputs. It helps little when the cheap model is far behind, because the router will keep sending hard inputs to the expensive one.
  • Whether your inputs are representative. The router learns per-input behavior, so it needs the mix of easy and hard cases you actually see in production.
  • Cost accounting. Compare cost per output, not per token, since output length and retries change the picture.
  • Judging quality. Blind AI judges are the scoring mechanism here; if your definition of quality is unusual, verify that the judge agrees with your own reviewers on a sample.

A concrete first test

Take one task you run at volume — classification, extraction, short rewriting. Export 50–100 real inputs with known good answers, run them through two or three models spanning a wide price range, and score each output. If the cheapest model lands within a small margin of the best, route the easy majority of inputs to it and keep the strong model for the residue. That split is where most of the saving lives.

For a broader view of how evaluation tooling fits together, OpenRouter is the gateway Evaligo uses for multi-model access, and Langfuse covers tracing and prompt management if you want observability alongside testing.

How do I deploy an Evaligo workflow as an API?

Deploying an Evaligo workflow as an API is the final step in its build-test-ship loop: you design a flow on the visual canvas, run it as a variant against competing models or prompts, score the outputs, and then expose the version you trust as an endpoint. The page describes a single flow that combines prompts, agents, web scraping, data extraction, and tools as connected nodes, so "deploy as an API" means wrapping that whole assembled pipeline, not just one prompt.

What the deployment step involves

  • Pick the winning variant. Evaligo's workflow is compare → judge → deploy. You run the same inputs through several models or prompt versions, score each output, read the scoreboard, and then deploy the flow configuration that performed best.
  • Deploy the flow, not a single call. Because a flow can chain multiple nodes (a scrape node feeding an extraction node feeding a model call), the API endpoint reflects the full sequence. Callers send an input; the flow executes end to end.
  • Routing can be part of the deployed logic. The page describes training a per-input model router on your test results, so the deployed API can send different inputs to different models rather than locking in one model for everything.

A concrete scenario

Suppose you have a localization flow that takes an English listing and returns a translated, localized version. You test it across several models and find one that scores within a hair of the top model at a fraction of the cost per listing. You deploy that flow as an API, and your product backend calls the endpoint whenever a new listing is created. The routing layer decides which model handles each listing based on its characteristics, and the cost and quality trade-off you validated in testing carries over into production.

How to approach it in practice

  1. Finalize the flow on the canvas and confirm it behaves correctly on a representative set of inputs.
  2. Run a comparison across the models or prompt variants you're considering, with blind judging enabled so scores aren't biased by model identity.
  3. Review quality, cost, and speed together — the page's own experiments show price and quality often diverge, so pick on measured results rather than assumptions.
  4. Deploy the selected flow as an API, then monitor real traffic; if quality drifts, return to the canvas, adjust, and re-test before redeploying.

For step-by-step instructions and endpoint details, the documentation linked from the product page is the right place to start: Evaligo. If your flow depends on external models through a single aggregator key, as the page describes for open-source options, confirm that integration is configured before you deploy, since a broken upstream call will surface as API errors in production.

What does Evaligo's free plan include and how does pricing work?

Evaligo’s free plan is presented as a way to build and test AI workflows without a credit card, and its pricing page is the place to check current plan details. The public page evidence does not list free-plan limits, paid tiers or exact prices, so treat any specific quota or dollar figure as something to verify on Evaligo.

What the free plan is for

The free plan is aimed at getting a first A/B test running. You can build a visual flow of prompts, agents and tools, run it across multiple AI models, and compare outputs. The page also advertises a “Get Started Free” path with no credit card, which suggests you can evaluate the product before committing to a paid plan.

How pricing is likely structured

Evaligo’s pricing appears to be tied to usage rather than a flat seat fee. The page repeatedly reports cost per output, per text and per listing, and it compares models on quality, cost and speed. That points to a model where your bill depends on how much you run and which models you choose.

The practical trade-off is clear: a workflow that scores almost as well on a cheaper model can cost a fraction of a premium model. In Evaligo’s own published experiments, the highest-scoring model was not always the most expensive, and a cheaper model sometimes graded better.

What to check before choosing a plan

  • Whether the free plan includes A/B testing, blind AI judges and API deployment, or only the builder.
  • How usage is counted: per flow run, per model call, per input or per output.
  • Whether open-source models through OpenRouter are billed the same way as OpenAI, Google and Anthropic models.
  • Whether the model router, which picks a model per input, is available on the free plan.

A sensible next step is to run one small test on the free plan with the same inputs across two or three models, then compare score against cost. That tells you more about your real usage than any plan comparison.

Related questions

More questions →
What Is an LLM Judge and How Do You Use One to Score Model Outputs?

An LLM judge is a model that grades another model's output against criteria or a reference answer instead of a human doing it by hand. You use one when you need to compare models, prompts, or whole workflows on your own inputs and can't eyeball every result — for example, scoring 30 outputs across six models. The catch is that a single judge can be biased toward its own family or writing style, so the more reliable setup is a blind panel of judges plus a reference answer set, with scores read alongside cost and speed rather than on their own.

What an LLM judge actually does

A judge takes three things as input:

  • The task input (the prompt, text, or listing being processed)
  • The candidate output (what the model under test produced)
  • A grading target — either explicit criteria ("is the language correctly detected?") or a gold/reference answer set

It returns a score, usually on a 0–1 scale or a small rubric. That score is what lets you rank models on your data instead of a public leaderboard that may not resemble your traffic.

This is different from a benchmark you download. A judge is the scoring mechanism; the benchmark is the input set you run through it.

Why blind judging and panels matter

A judge that knows which model produced an output can favor familiar phrasing, longer answers, or its own family's style. Blind judging hides the source so the score reflects the output, not the label.

A single judge still carries its own preferences, so Evaligo's published experiments use a blind three-judge panel — multiple judges score the same output and the results are combined. That reduces the chance one model's quirks decide your ranking.

You can see the effect in their own numbers. In a listing-localization experiment (63 listings, 7 languages, scored by a blind three-judge panel):

Model Score Cost per listing
claude-sonnet-5 0.914 $0.00906
gpt-5.6-luna 0.908 $0.00045
gemini-3.7-flash 0.897 $0.00328
deepseek-v4-flash 0.893 $0.00021

The top score and a near-tie 0.006 below it differ by roughly 20× in cost. A judge score alone would pick the winner; the judge score plus cost picks the model you'd actually ship.

Setting up judging criteria and reference answers

  1. Define the input set. Use real tasks, not toy prompts. Evaligo's language-detection run used 129 texts; the writing-level run used 87 texts. Small but representative beats large and generic.
  2. Write or collect a reference answer set where the task has a correct answer. The language-detection and writing-level experiments were "scored against a gold answer set" and "graded against a reference answer set" respectively — that's what makes 0.99 meaningful rather than arbitrary.
  3. State the criteria explicitly for open-ended tasks (tone, accuracy, format compliance). Vague criteria produce noisy scores.
  4. Run every variant on the same inputs. This is the fairness rule: same inputs, same judge panel, same scale. Evaligo's flow builder runs a flow on several models as variants so each one sees identical inputs.
  5. Score blind, with more than one judge, then combine.

Practical pitfalls

  • Self-preference. A judge tends to rate outputs that resemble its own. Blind panels dilute this; a single unblinded judge amplifies it.

  • Price ≠ quality. In Evaligo's writing-level experiment (87 texts), the cheaper Flash model scored higher than the Pro model of the same family:

    Model Score Cost per text
    gemini-3.5-flash 0.977 $0.00648
    gemini-3.1-pro 0.948 $0.00774
    gemini-3-flash 0.937 $0.00175
    gemini-2.5-pro 0.845 $0.01151

    If you assume the pricier model wins, you overpay for worse output.

  • Ceilings hide differences. In the language-detection run, every model scored 0.99 or better on the same 129 texts — the most expensive cost 32× the cheapest and did not score higher. When scores cluster at the top, the judge has stopped discriminating and cost becomes the deciding factor.

  • Judging costs money too. Every judge call is a model call. A three-judge panel triples that. Budget for it before scaling the input set.

  • Validate the judge. Before trusting scores, check that the judge agrees with a handful of human-labeled examples. If it doesn't, fix the criteria or the reference set first.

From scores to a decision

Judge scores are one column, not the answer. Read them next to cost and speed per output, then decide per input type:

  • Scores tied, costs far apart → take the cheapest that clears your quality bar.
  • Small score gap, large cost gap → the cheaper model is usually the right default; reserve the top scorer for inputs where the gap matters.
  • Scores clustered near the ceiling → the task is easy for every model; optimize on cost and latency.

Evaligo's flow builder supports this directly: run a flow on several models, score each output with blind AI judges, compare quality, cost, and speed, then train a per-input model router on the results and deploy the flow as an API. The router is the payoff — instead of one model for everything, each input type gets the model that scored well enough at an acceptable cost.

Quick checklist

  • Same inputs for every variant
  • Reference answer set or explicit criteria
  • Blind scoring, multiple judges
  • Scores reported with cost and speed, not alone
  • Judge validated against human labels before you trust it
  • Decision made per input type, not globally
How Do You Compare AI Models on Your Own Tasks Instead of Public Benchmarks?

Run the same inputs through every model you're considering, score the outputs blind or against a reference answer set, and record quality, cost, and speed per output. Public leaderboards tell you how models perform on someone else's tasks; this method tells you which model wins on yours. It's worth doing whenever your workload is specific enough that a general ranking might not transfer — for example, language detection, listing localization, or grading writing level.

Why public benchmarks aren't enough

A model that tops a general leaderboard can lose on your task, and a cheaper model can tie or beat an expensive one. Evaligo's own published experiments show this pattern clearly:

Experiment Inputs What happened
Language detection 129 texts Every model scored 0.99 or better. The most expensive cost 32× the cheapest and did not score higher.
Listing localization 63 listings, 7 languages Claude Sonnet 5 scored highest (0.914), but gpt-5.6-luna came within 0.006 (0.908) for a twentieth of the price per listing.
Writing level 87 texts The cheaper Flash model outscored the Pro model of the same family and cost less per text.

The takeaway across all three: price did not predict quality. That's the reason to test on your own inputs rather than trust a ranking.

The core method: same inputs, multiple models, one scoreboard

The fair-comparison rule is simple — every model must see identical inputs, and every output must be scored the same way. Evaligo's flow builder is built around this: you build a flow of prompts, agents, and tools, then run it on several models as variants.

Step 1 — Build the flow

Describe the flow in one sentence and the builder assembles it: prompts, web scraping, data extraction, tools, and agents as connected nodes. You can drag nodes on the canvas to edit, or change the flow by instruction. The point is that the flow stays constant while the model changes — that's what makes the comparison valid.

Step 2 — Pick models as variants

Select the models you want to compare. This includes OpenAI, Google, and Anthropic models, plus open-source options such as DeepSeek, MiniMax, Kimi, and Qwen, reachable through a single OpenRouter key. Each model becomes a variant of the same flow.

Step 3 — Score every output blind

Use blind AI judge panels, or grade against a gold/reference answer set. Blind judging reduces the bias you'd get from knowing which model produced which output. In the localization experiment, a blind three-judge panel produced the scores.

Step 4 — Read the scoreboard

For each output you get quality, cost, and speed together — not just a score. This is what lets you catch the "same score, 32× the price" case, which a quality-only view would hide.

Step 5 — Route and deploy

Once you know which model wins for which input type, you can train a per-input model router on the results, then deploy the flow as an API. Routing matters when no single model wins everywhere — you send each input to the model that performs best on that kind of input.

What to record, and why each metric matters

Metric Why it changes your decision
Score (blind or vs. reference) Tells you whether a cheaper model is actually good enough.
Cost per output The deciding factor when scores are close — a 0.006 gap rarely justifies 20× the price.
Speed Matters for interactive or high-volume flows even when quality ties.

A model that ties on score but costs a fraction as much is usually the right default; keep the expensive model only for input types where it measurably wins.

Common pitfalls

  • Different inputs per model. If models don't see identical inputs, the comparison is meaningless.
  • Unblinded scoring. Knowing which model produced an output biases the judgment.
  • Quality-only evaluation. You'll miss cases where a cheap model ties an expensive one.
  • Assuming price predicts quality. The writing-level experiment showed the opposite.
  • Picking one model for everything. Per-input routing often beats a single global choice.

Getting started

Evaligo offers a free plan with no credit card, and you can run your first A/B test free. If you want to see the method in action before building your own, the published benchmarks (six models, the same 30 inputs, three blind judges) are available as a full write-up.

What Is OpenAPI-Generated API Documentation and How Does It Work?

OpenAPI-generated API documentation is reference documentation that is produced automatically from an OpenAPI description file rather than written by hand. You write (or generate) a machine-readable specification of your API — endpoints, parameters, request bodies, responses, schemas, and auth — and a documentation tool reads that file and renders a browsable, often interactive reference site. The spec becomes the single source of truth; the docs become a build artifact.

This differs from manually written docs in one fundamental way: with hand-written docs, the prose is the source of truth and the API is described separately. With spec-driven docs, the API description is the source, and every page, table, and code sample is derived from it.

How the workflow actually runs

A typical spec-driven documentation pipeline has five stages:

  1. Author or generate the spec. You either write an OpenAPI document by hand (YAML or JSON), or generate it from code annotations, framework metadata, or a design-first editor. Design-first means the spec is written before implementation; code-first means it is extracted from existing code.
  2. Validate and lint. The spec is checked against the OpenAPI schema and against style rules — consistent naming, required descriptions, no undocumented 4xx responses, no orphaned schemas.
  3. Bundle and transform. Multi-file specs are combined, $ref pointers are resolved, and the document is optionally split into per-tag or per-version outputs.
  4. Render. A documentation tool converts the spec into HTML: an endpoint list, a sidebar of operations, parameter tables, response schemas, and a "try it" console.
  5. Publish and version. The rendered site is deployed, and each API version gets its own snapshot so consumers can read docs matching the version they call.

Steps 2 through 5 are usually automated in CI. If the spec fails validation, the docs build fails — which is the point.

Spec-driven vs. hand-written documentation

Dimension OpenAPI-generated Hand-written
Source of truth The spec file The prose
Consistency with the API High, if the spec is accurate Drifts as the API changes
Effort per endpoint Low after setup Repeated for every endpoint
Narrative and tutorials Weak; needs separate pages Strong
Code samples Generated per language from schemas Written and maintained manually
Customization Bounded by the tool's templates Unlimited
Failure mode Accurate spec, poor docs, or stale spec Beautiful docs that describe an API that no longer exists

The practical conclusion most teams reach: generate the reference, write the guides. Reference material is repetitive and mechanical, which is exactly what generation is good at. Conceptual explanations, migration notes, and tutorials carry judgment that a spec cannot express.

What you get out of the box

Generated reference pages commonly include:

  • An operation list grouped by tag or path, with HTTP method and path.
  • Parameter tables showing name, location (path, query, header, cookie), type, required flag, and description.
  • Request and response schemas rendered as expandable trees, including nested objects and arrays.
  • Authentication details pulled from the securitySchemes section.
  • Interactive request consoles that let a reader send a real call from the browser.
  • Generated code samples in several languages, derived from the same schemas.
  • Multiple output formats, such as a static site, a single HTML file, or a mock server.

Because all of these come from one document, changing a field name in the spec updates the parameter table, the schema tree, and every code sample at once.

Where spec-driven documentation breaks down

Generation is not free. The trade-offs are real:

Spec quality becomes documentation quality. A field with no description produces a table row with an empty cell. A vague summary produces a vague heading. Tools can enforce presence of descriptions via linting, but they cannot enforce that the description is useful.

Customization has limits. If you need a page that does not map to an OpenAPI concept — a conceptual overview, a pricing explanation, a comparison of two endpoints — you write it outside the generator and link to it.

Not everything is expressible. Webhooks, streaming responses, long-polling behavior, and complex multi-step flows are awkward or impossible to describe fully in OpenAPI. Those need prose.

The spec can go stale. If the spec is maintained separately from the implementation, it drifts just like hand-written docs. The mitigation is to generate the spec from code, or to test the implementation against the spec in CI.

Interactive consoles need care. A "try it" button that hits a production API with real credentials is a security and rate-limit problem. Point it at a sandbox, or disable it.

Deciding whether to adopt it

Adopt spec-driven reference documentation if most of these are true:

  • Your API has more than a handful of endpoints, or changes frequently.
  • You ship client SDKs or code samples in more than one language.
  • Multiple teams consume the API and need a consistent, always-current reference.
  • You already have, or are willing to maintain, an OpenAPI description.

Stay with hand-written docs, or a hybrid, if:

  • Your API is small and stable, and the reference fits on one page.
  • Your documentation is mostly conceptual and contains little endpoint-level detail.
  • You cannot commit to keeping the spec in sync with the implementation.

A reasonable middle path: generate the reference from the spec, and hand-write the getting-started guide, authentication walkthrough, and error-handling page. Link the two directions so readers can move from concept to endpoint and back.

A minimal starting checklist

  1. Produce one valid OpenAPI document for a single API version.
  2. Add a linter with rules for descriptions, operation IDs, and error responses.
  3. Wire the docs build into CI so a failing spec fails the build.
  4. Render the reference and review it as a reader, not as the author.
  5. Write the two or three conceptual pages the generator cannot produce.
  6. Version the published docs alongside the API version.

The core idea is simple: describe the API once, in a format both machines and humans can read, and let the reference documentation fall out of that description. Everything else — tooling, hosting, interactivity — is a detail on top of that decision.

What Is an AI Workflow Builder and What Can You Actually Do With One?

An AI workflow builder is a visual canvas where you connect prompts, tools, agents, and data steps into a single flow, then run that flow across multiple AI models to compare quality, cost, and speed before deploying it as an API. You'd use one when a task needs more than a single prompt call—for example, scraping a page, extracting fields, and grading the result—and when you want evidence, not guesswork, about which model to run in production.

The core loop: build, compare, score, deploy

Most prompt tools stop at "write a prompt and pick a model." A workflow builder adds three things on top of that:

  1. A flow, not a prompt. Prompts, web scraping, data extraction, tools, and agents become connected nodes on a canvas. You can drag nodes to edit them or describe the flow in one sentence and have it built for you.
  2. The same inputs across many models. Each model becomes a variant of the flow, so every variant sees identical inputs. That's what makes a comparison fair.
  3. Scoring and deployment. Outputs get scored, you read a scoreboard, and any flow can ship as an API.

The loop is: build a flow → run it on several models with the same inputs → score every output → read the results → deploy the winner.

Running the same inputs across models

This is the step that separates a builder from a chat interface. You pick the models you want to compare—OpenAI, Google, and Anthropic, plus open-source options like DeepSeek, MiniMax, Kimi, and Qwen through one OpenRouter key—and each one runs as a variant on the same inputs.

Because inputs are held constant, differences in the output come from the model, not from the test. That's the condition you need before any cost or quality claim means anything.

Blind AI judges and why "blind" matters

Scoring is done by blind AI judge panels: the judges don't know which model produced which output. This removes the most common source of bias in model comparison—knowing the brand behind an answer and grading it accordingly.

Evaligo's own published experiments show why this matters. In a language-detection test on 129 texts, six models all scored 0.99 or better, but the most expensive cost 32× the cheapest without scoring higher:

Model Score Cost per text
gpt-5.4-mini 1.000 $0.00015
claude-sonnet-4-6 1.000 $0.00063
claude-haiku-4-5 0.992 $0.00023
gemini-3.5-flash 0.992 $0.00485

Two other experiments point the same way. In listing localization (63 listings, 7 languages, blind three-judge panel), Claude Sonnet 5 scored highest at 0.914, but gpt-5.6-luna came within 0.006 for a twentieth of the price per listing. In a writing-level test on 87 texts, the cheaper Flash model outscored the Pro model of the same family and cost less per text.

The takeaway across all three: price did not predict quality. You can't pick a model from a price list—you have to measure it on your own inputs.

From scoreboard to production: per-input model routing

A scoreboard tells you which model won on average. Per-input model routing goes further: the builder trains a router on the comparison results so each individual input is sent to the model that performs best for that kind of input. Instead of one model for everything, you route by input.

This is the practical payoff of running the same inputs across many models—the results become a routing policy, not just a report.

Deploying a flow as an API

Once a flow is built and tested, you can deploy it as an API. That means the flow you validated in the builder is the same thing you call from your own application, rather than a re-implementation that drifts from what you tested. The comparison work stays attached to the thing you ship.

A concrete example

Say you need to localize product listings into seven languages. Build a flow: extract the listing fields, generate the localized copy, and score the output. Run it on four or five models with the same 60 listings. A blind judge panel scores each output, and you see quality and cost per listing side by side. If a mid-priced model lands within a few thousandths of the top scorer at a fraction of the cost, route to it—or let per-input routing decide case by case—then deploy the flow as an API.

What to check before choosing a builder

  • Does it hold inputs constant across models? Without this, comparisons are noise.
  • Are judges blind? Brand-aware grading inflates known models.
  • Does it report cost and speed per output, not just quality? All three decide production fit.
  • Can results become routing, or only a report? Per-input routing is what turns a test into a decision.
  • Can you deploy the tested flow directly as an API? Otherwise you re-build and lose the validation.
  • Does it cover open-source models? The cheapest winner is often not a frontier model.

Evaligo offers a free plan with no credit card, so the build-compare-score loop is something you can run before committing.

What Is an AI Model Benchmark and How Do You Run One on Your Own Tasks?

An AI model benchmark is a repeatable test that scores model outputs against a known standard. A public benchmark scores every model on the same fixed dataset that someone else chose; a benchmark on your own tasks scores the models you're considering on inputs from your actual workflow, judged against answers you trust. The second kind is what tells you which model to ship. You can run one whenever you can assemble a set of representative inputs and a way to grade the outputs — either reference answers or blind judges.

Public leaderboards vs. your own benchmark

Public leaderboards answer "how do these models do on a shared, generic task set?" That's useful for narrowing a shortlist, but it rarely matches your inputs, your prompt style, or your quality bar. A model that tops a leaderboard can lose on your data, and a cheaper model can tie it.

The difference comes down to four things:

Dimension Public benchmark Benchmark on your own tasks
Inputs Fixed dataset chosen by someone else Your real inputs, sampled
Grading Standard metric or hidden labels Reference answers or blind judges
What it predicts General capability Performance on the job you're shipping
Cost/speed Usually not the point Measured per output, alongside quality

The practical move is to use public results to build a shortlist, then run your own benchmark to pick the winner.

What a fair benchmark requires

Four conditions separate a real comparison from a vibe check:

  1. Same inputs for every model. If model A sees 30 examples and model B sees 12 different ones, you've measured the inputs, not the models.
  2. Same prompt and flow. Changing the prompt between models confounds the result — you won't know whether the score moved because of the model or the instructions.
  3. Blind scoring. The judge shouldn't know which model produced which output. This is the main defense against a judge favoring a familiar name or a longer answer.
  4. Quality measured next to cost and speed. A score alone doesn't tell you whether the extra quality is worth the extra spend.

Evaligo's own published experiments follow this shape: every model runs the same inputs, and each output gets a score and a cost figure. In one language-detection test, six models ran the same 129 texts and every one scored 0.99 or better — but the most expensive cost 32× the cheapest without scoring higher. That result is only visible because cost was recorded per output next to the score.

How to run one, step by step

1. Collect representative inputs

Pull a sample of real inputs from the task you care about — support tickets, product listings, user messages, documents. Aim for enough variety that a model can't win by luck on a narrow slice. The published Evaligo experiments used sets like 129 texts, 63 listings across 7 languages, and 87 texts; small sets are fine to start, but a handful of examples won't separate close models.

2. Define your grading standard

Pick one of two approaches:

  • Reference answer set — you have known-correct outputs to score against. Good for tasks with a defensible right answer (language detection, structured extraction).
  • Blind judge panel — one or more AI judges score each output without seeing which model made it. Good for open-ended quality (writing level, localization tone).

A panel of several judges reduces the chance that one judge's quirks drive the result. Evaligo's localization experiment used a blind three-judge panel.

3. Build the flow and add model variants

In a workflow builder, you describe the flow — prompts, scraping, extraction, tools, agents as connected nodes — and then attach each model you want to test as a variant. Evaligo supports OpenAI, Google, and Anthropic models plus open-source options such as DeepSeek, MiniMax, Kimi, and Qwen through a single OpenRouter key. The point of variants is that the flow stays identical while only the model changes.

4. Run and read the scoreboard

Each run produces a score per output plus cost and speed. Read it in this order:

  • Filter by quality floor. Drop any model below the score you need.
  • Among survivors, compare cost per output. This is where the surprises live.
  • Check speed if latency matters to your users.

In the localization test, Claude Sonnet 5 scored highest at 0.914, but gpt-5.6-luna came within 0.006 at a twentieth of the cost per listing. In the writing-level test, a Flash model outscored the Pro model of the same family and cost less per text — price did not predict quality.

5. Decide: one model, or routing

If one model wins on both quality and cost, deploy it. If different models win on different input types, you can train a per-input router on the benchmark results so each input goes to the model that handles it best. Either way, the flow can be deployed as an API once you've chosen.

Common pitfalls

  • Too few inputs. A 5-example test can't distinguish models that differ by a few points. The published experiments used 63–129 inputs per task.
  • A single judge. One judge's bias becomes your result. Use a panel when grading is subjective.
  • Different prompts per model. You'll attribute a prompt difference to the model. Keep the flow fixed and vary only the model.
  • Ignoring cost. A 32× price gap for an identical score is a real finding, and it only shows up if you record cost per output.
  • Trusting price as a proxy for quality. The writing-level experiment found the cheaper model graded better than the pricier one in the same family.
  • Benchmarking once and never again. Models and prompts change; re-run when you swap either.

What you get out of it

A benchmark on your own tasks replaces "this model seems good" with a scoreboard: which model clears your quality bar, what each output costs, and how fast it runs. From there you either pick a single model or route inputs to the best one per case, and deploy the flow as an API. Evaligo offers a free plan with no credit card to run a first A/B test, and its published benchmarks are available to read as worked examples of the method.

Website Overview

The available information shows a mix of normal operation and configuration gaps. Depending on how the website is used, these gaps may affect secure access or the consistency of its public presentation.

Domain and Registration

Transfer-protection status is present, helping reduce the risk of unauthorized domain transfers. The domain has about 1 years of registration history; its current configuration provides more context than age alone. The domain uses the common .com extension, which is not an independent safety signal.

DNS and Email

The lowest TTL is 60 seconds, supporting rapid record changes at the cost of more frequent lookups. Nameservers are provided by Amazon Route 53, indicating managed DNS hosting. MX records point to the IONOS Mail email service. No CNAME was found; the observed records resolve directly to addresses. SPF and DMARC are configured. DKIM status is unknown.

TLS and Certificates

The certificate uses an RSA 2048-bit public key, offering broad client compatibility. The server supplied a complete certificate chain. No organization name is present in the certificate; the available fields are consistent with domain validation. The certificate was issued within the Amazon cloud or CDN ecosystem. The certificate is valid for about 197 days in total, with 116 days remaining.

HTTP and Browser Security

The checked browser-security headers were not detected, leaving fewer explicit browser-side safeguards. No X-Powered-By header was found, reducing one common source of backend fingerprinting information. The x-cache, via response header indicates a CDN or caching proxy in the delivery path. No obvious internal addresses or debug information were found in the headers. The Server header contains the custom value AmazonS3.

Technology Stack Analysis

The public page identifies Next.js, Google Analytics, Amazon CloudFront without precise versions, leaving fewer clues for version-specific scanning.

Search and Social Sharing

The meta description has 246 characters and may be shortened in search results. Twitter Card metadata is configured. JSON-LD includes Organization data, helping describe the organization as an entity. The title has 57 characters, within a common display range. The observed directives allow indexing and link following.

Hosting and Email

DNSAmazon Route 53
HostingAmazon CloudFront
EmailIONOS Mail
Approximate IP geolocation (inferred; a CDN or proxy may differ from the origin server) United States flagUnited States Inferred 108.138.85.10

Registration details

RDAP / WHOIS

RegistrarIONOS SE
Registered2025-08-17
Expires2027-08-17
Domain statusclient transfer prohibited
Nameserversns-1290.awsdns-33.org、ns-1793.awsdns-32.co.uk、ns-61.awsdns-07.com、ns-995.awsdns-60.net
DNSSECunsigned

DNS records

DNS

TypeNameValueTTLPriority
Awww.evaligo.com108.138.85.1060—
Awww.evaligo.com108.138.85.11960—
Awww.evaligo.com108.138.85.3760—
Awww.evaligo.com108.138.85.7260—
MXevaligo.commx00.ionos.com30010
MXevaligo.commx01.ionos.com30010
NSevaligo.comns-1290.awsdns-33.org172800—
NSevaligo.comns-1793.awsdns-32.co.uk172800—
NSevaligo.comns-61.awsdns-07.com172800—
NSevaligo.comns-995.awsdns-60.net172800—
TXTevaligo.combrevo-code:8ba8d1cd76d6a2422647229075631801300—
TXTevaligo.comgoogle-site-verification=NVT72coTSnsBm4uD0fwBuBIAUmAq4l5X70bXuNXoUGw300—
TXTevaligo.comv=spf1 include:_spf-us.ionos.com ~all300—
DMARC_dmarc.evaligo.comv=DMARC1; p=none; rua=mailto:[email protected]300—

TLS and certificates

TLS / SSL

AssessmentNormal configuration
Supported protocolsTLSv1.2、TLSv1.3
Negotiated protocolTLSv1.3
Certificate subject*.evaligo.com
IssuerAmazon
Valid until2027-01-31T23:59 · Remaining when checked: 116 days
Verification detailsCertificate trust: Passed · Hostname match: Passed

HTTP response headers

HTTP

HeaderValue
content-typetext/html; charset=utf-8
cache-controlpublic, max-age=3600, must-revalidate
serverAmazonS3

Identified technologies

Next.jsGoogle AnalyticsAmazon CloudFront

Pages, Search and Sharing

Meta descriptionVisual drag-and-drop AI workflow builder with built-in A/B testing. Run a flow on several AI models, score every output with blind AI judges, train a per-input model router on the results, and deploy any flow as an API. Free plan, no credit card.
Canonical URLhttps://www.evaligo.com
LanguageEnglish (default)
Twitter Cardsummary_large_image
All bots 1 allowed · 5 disallowed
  • Allow/
  • Disallow/login
  • Disallow/private/
  • Disallow/admin/
  • Disallow/api/
  • Disallow/dashboard/
gptbot 1 allowed · 5 disallowed
  • Allow/
  • Disallow/login
  • Disallow/private/
  • Disallow/admin/
  • Disallow/api/
  • Disallow/dashboard/
oai-searchbot 1 allowed · 5 disallowed
  • Allow/
  • Disallow/login
  • Disallow/private/
  • Disallow/admin/
  • Disallow/api/
  • Disallow/dashboard/
chatgpt-user 1 allowed · 5 disallowed
  • Allow/
  • Disallow/login
  • Disallow/private/
  • Disallow/admin/
  • Disallow/api/
  • Disallow/dashboard/
claudebot 1 allowed · 5 disallowed
  • Allow/
  • Disallow/login
  • Disallow/private/
  • Disallow/admin/
  • Disallow/api/
  • Disallow/dashboard/
claude-searchbot 1 allowed · 5 disallowed
  • Allow/
  • Disallow/login
  • Disallow/private/
  • Disallow/admin/
  • Disallow/api/
  • Disallow/dashboard/
claude-user 1 allowed · 5 disallowed
  • Allow/
  • Disallow/login
  • Disallow/private/
  • Disallow/admin/
  • Disallow/api/
  • Disallow/dashboard/
perplexitybot 1 allowed · 5 disallowed
  • Allow/
  • Disallow/login
  • Disallow/private/
  • Disallow/admin/
  • Disallow/api/
  • Disallow/dashboard/
perplexity-user 1 allowed · 5 disallowed
  • Allow/
  • Disallow/login
  • Disallow/private/
  • Disallow/admin/
  • Disallow/api/
  • Disallow/dashboard/
google-extended 1 allowed · 5 disallowed
  • Allow/
  • Disallow/login
  • Disallow/private/
  • Disallow/admin/
  • Disallow/api/
  • Disallow/dashboard/
applebot-extended 1 allowed · 5 disallowed
  • Allow/
  • Disallow/login
  • Disallow/private/
  • Disallow/admin/
  • Disallow/api/
  • Disallow/dashboard/

Recent Updates

  • Website images
  • Screenshots
  • Network details
  • Website Technologies
  • Pages and Search Information
  • TLS and certificates

User reviews (0)

  • No reviews yet.