Website profiles · Technology insights · Alternatives

htmlcheatsheet.com

Online interactive HTML Cheat Sheet contains useful code examples and web developer tools, markup generators and more.

No paid content found
Visit website
Profile views 5 Outbound visits 0 Normal
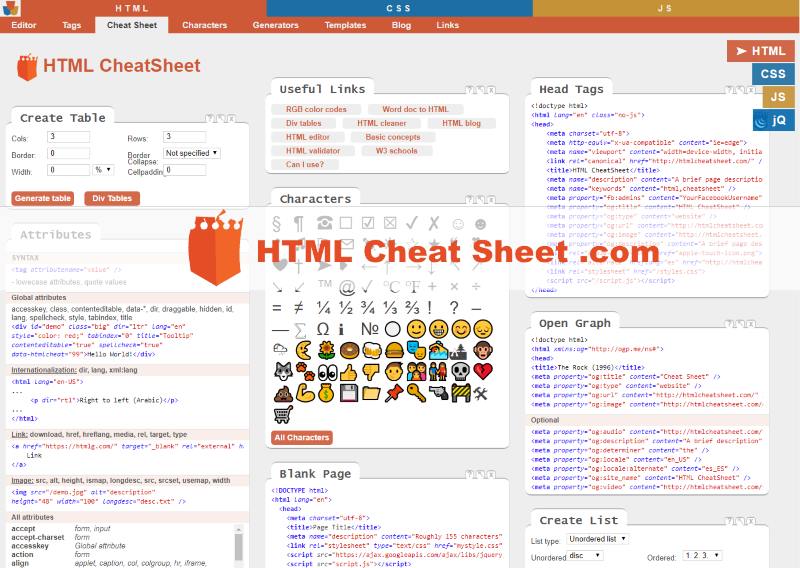
Free Online Interactive HTML Cheat Sheet Full homepage screenshot

At a glance

Category
Development
Language
English
Paid-content signal
No paid content foundObserved
Registered
2016
Hosting
CloudflareInferred
HTTPS certificate trusted
PassedObserved
Last updated

Website review

This review may include AI-generated content and is not individually verified. Domain, certificate and other facts come from the observed data on this page.

What is the Free Online Interactive HTML Cheat Sheet?

The Free Online Interactive HTML Cheat Sheet at Free Online Interactive HTML Cheat Sheet is a single-page reference and toolkit for people who already know the basics of HTML and want fast lookups plus small code generators. It gathers tag examples, character codes, and web developer tools in one place, and it includes a live HTML/CSS editor at the bottom of the page that previews your code as you type. The stated aim is quick access, so bookmarking it for repeat use fits how it is meant to work.

What you can do on the page

  • Look up tags and structures. Common HTML tags appear with examples, and blocks that are always used together — tables, lists, definition lists, and forms — are grouped as structures. Attributes are covered separately since they add information to elements.
  • Generate markup without typing boilerplate. Generators cover iframe, table, link (anchor), image, and list markup. You set options such as dimensions, target URL, link text, tooltip, or whether a link opens in a new tab, then copy the result.
  • Handle characters and text. A character reference covers common codes and a larger categorized list of thousands of characters; a filler-text generator produces Lorem ipsum and similar placeholder content.
  • Prepare site-level files. Examples include .htaccess rules for forcing HTTPS, redirects, link rewrites, and IP blocking; a robots.txt sample for allowing or banning crawlers; head tag guidance; Open Graph markup for social sharing; and an HTML5 page structure demo.
  • Pick colors. A color picker returns Hex and RGB values plus a styling snippet.

Who gets the most from it

This suits a developer, student, or marketer who needs a snippet mid-task and does not want to open a full documentation site or an editor. A concrete case: you are building a pricing table, need the correct table markup and a matching color value, then want to preview it — you can generate the table, grab a Hex code, and test the result in the live editor without leaving the page. Beginners can use it too, but the page describes itself as a quick guide for those who already know how to work with these languages, so it is better as a memory aid than as a first course in HTML.

Trade-offs to weigh

The convenience of one page is also its limit: it favors the most common tags and patterns, so unusual elements, accessibility details, or current browser behavior may not be covered. Generated code is a starting point — you still need to check semantics, labels, alt text, and responsive behavior yourself. For deeper questions, compare with broader references such as MDN Web Docs for element-by-element documentation, or WebAIM when the markup touches accessibility.

As a next step, decide by task: if you need a quick snippet, a character code, or a color value, use this page first; if you need to understand why an element behaves a certain way or confirm current support, move to a full documentation source.

How can I generate HTML code for an iframe, table, link, image, or list using this site?

The site bundles a set of single-purpose markup generators onto one page, so you fill in a short form and copy the resulting HTML rather than writing the tags by hand. According to the page, the HTML editor at the bottom shows a live preview as you edit, and the general workflow is to set your preferences, generate the code, then highlight and copy the snippet into your project.

The generators and what each one asks for

  • Iframe generator — you set the URL to be embedded, the dimensions, and other attributes, and it returns the <iframe> code.
  • Table generator — you specify the grid dimensions and other attributes, and it produces the table markup.
  • Link generator — you define the target destination, the link text, and a tooltip, with an option to open the link in a new tab.
  • Image generator — you supply the image URL plus some style properties to get an <img> tag.
  • List generator — you pick the list type and it creates a demo list containing two items.

Practical use and trade-offs

These are convenience tools for people who already know HTML and want to skip repetitive typing — the page itself describes them as a quick guide for those who already work with these languages. The output is a starting point, not a finished component: a generated table has the dimensions you asked for but no styling, and a generated list contains placeholder items you will replace. For an iframe, the important decision is whether the embedded page permits framing at all; no generator can fix a source that blocks it, so test the embed after pasting. For images, remember the generator handles the tag and inline style, while alt text and responsive sizing remain your responsibility.

A concrete scenario

If you are assembling a contact or documentation page, a sensible order is: generate the iframe for an embedded map or video, generate the table for a comparison of options, then generate the links and image that sit around them. Paste each snippet into the live editor to confirm the preview before moving it into your real file.

For the surrounding markup the generators do not cover — head tags, Open Graph metadata, page structure, .htaccess and robots.txt examples — the same site lists reference blocks you can copy. If you want a second reference for tag syntax and browser behaviour, MDN Web Docs is the standard documentation source, and Free Online Interactive HTML Cheat Sheet is the page described here.

How can I use the color picker to get hex and RGB codes for styling?

Open the Color Picker panel on HTML Cheat Sheet, choose a color in the input field, and read the resulting Hex and RGB values plus a ready-to-paste styling snippet. The tool is built for quick copy-paste, so the practical workflow is: pick, copy, paste into your CSS.

A concrete example

Suppose you need a muted teal for a button. You nudge the picker until the swatch looks right, then copy the Hex value into a rule like background-color: #3a7d7d; or use the RGB form where you need per-channel control, such as in rgba() for transparency. The snippet the page generates saves you from transcribing digits by hand.

When each format helps

  • Hex — compact and conventional for stylesheets, design tokens and handoff notes.
  • RGB — easier to reason about when you want to adjust one channel or add an alpha value for overlays and hover states.

Practical checks before you commit

  • Paste the value into your project and view it on both a light and dark background; screen rendering and surrounding colors change how a hue reads.
  • Confirm text contrast against the chosen background rather than trusting the swatch alone.
  • Keep one naming convention for your color variables so repeated picks stay consistent.

If you also need character entities or markup scaffolding, the same page groups those panels alongside the picker, so you can gather several values in one visit.

How can I find HTML character codes for special symbols and entities?

Use the Characters panel on Free Online Interactive HTML Cheat Sheet to look up HTML character codes. It lists common character codes and a larger categorized list of thousands of characters, so you can search or browse for symbols and entities, then copy the code into your markup.

How to use it in practice

  1. Open the Characters panel.
  2. Find the symbol you need — for example, a currency sign, arrow, mathematical symbol, or punctuation mark.
  3. Copy the entity code or numeric character reference it provides.
  4. Paste it into your HTML where the symbol should appear.

For example, if you need a copyright symbol, a non-breaking space, or an em dash, the panel gives you the exact code rather than making you remember it.

What to check before copying

  • Named entity vs. numeric code: Named entities are easier to read, but numeric codes are more universally supported for less common symbols.
  • Context: Some characters render differently depending on the font and document encoding. If you are working with a non-Latin script or uncommon symbols, test the result in the browser.
  • Encoding: Character codes are not a substitute for declaring the correct character encoding, such as UTF-8, in your page.

When this is useful

This kind of lookup is most helpful when you are hand-editing HTML, writing documentation, or building a page that needs a specific symbol without relying on an image. If you already use a code editor with autocomplete or a framework that handles entities, you may only need it occasionally.

As a next step, copy one entity from the Characters panel into a small test page and view it in the browser to confirm it renders as expected.

How can I use the live HTML editor with preview to test code snippets?

Use the live editor as a scratchpad: type or paste HTML and CSS into the editor at the bottom of the page, and the preview updates as you edit. It is built for quick verification, not for saving or sharing projects, so treat it as a disposable test bench.

A practical workflow:

  1. Open HTML Cheat Sheet and scroll to the editor at the bottom.
  2. Clear whatever sample markup is there, then paste only the snippet you want to test.
  3. Put any styling in the CSS area rather than inline styles, so you can change one value and see the effect immediately.
  4. Change one thing at a time — a tag, an attribute, a property — and watch what moves in the preview.
  5. When it behaves correctly, copy the snippet back into your own file.

Worked example

Suppose you want to check how an image behaves inside a link. Build it in stages: first an <img> tag pointing at a placeholder image, then wrap it in an <a> tag, then add width and border styling in the CSS pane. Each step is small enough that if the preview looks wrong, you know which change caused it. The generator panels for links, images, tables, lists and iframes can produce a starting snippet you then paste into the editor and modify — useful when you cannot remember the exact attribute order.

When the live editor is the right tool

Situation Live editor Your own project
Checking one tag or attribute Fast, no setup Slower
Testing CSS on a single element Good Fine
Working with local files, images or fonts Not possible Required
Saving work between sessions Not designed for it Required
Debugging JavaScript behaviour Not its focus Required

The key limitation is context: the preview shows an isolated fragment, not your real page, so layout that depends on a parent container, an external stylesheet or a framework will not reproduce faithfully. Verify anything structural in your actual project before trusting it.

Next step

Pick one snippet you keep looking up — a table row, an iframe, a meta tag — and rebuild it once in the editor from memory, checking the tags panel when you get stuck. That turns the cheat sheet from a reference you read into a habit that sticks.

What are common .htaccess and robots.txt codes and how can I use them?

For everyday site maintenance, the two files do different jobs: .htaccess controls how an Apache web server handles requests, while robots.txt tells compliant crawlers which paths they may request. The cheatsheet at Free Online Interactive HTML Cheat Sheet lists common snippets for both, alongside generators for links, tables and forms, so it works best as a quick copy-paste reference rather than a tutorial.

Common .htaccess snippets and their uses

  • Force HTTPS — redirect all HTTP requests to HTTPS, so visitors and search engines consistently use the secure version.
  • Redirects — send an old URL or an entire old domain to a new destination, useful after renaming pages or moving sites.
  • URL rewriting — turn clean, human-readable paths into the query strings your application actually reads.
  • Block IP addresses — deny access from specific addresses, a blunt but fast way to stop repeated abuse.

The trade-off is that .htaccess applies per directory and is read on every request unless the server is configured otherwise, so it is convenient for shared hosting but can be slower and harder to audit than main server configuration. A redirect rule also needs testing: a mistake can loop requests or take the whole site offline.

Common robots.txt snippets and their uses

  • Allow everything — the default, letting crawlers index the whole site.
  • Ban everything — disallow all crawlers, appropriate for staging sites or while a redesign is unfinished.
  • Block specific paths — keep crawlers out of admin areas, search result pages or duplicate content.
  • Target specific crawlers — apply different rules to named bots.

Remember that robots.txt is a request, not enforcement. It stops well-behaved search engine crawlers from requesting a page, but it does not protect private data; anything sensitive needs authentication or server-side access control. To keep a page out of search results while still allowing it to be crawled, use a noindex directive instead.

A practical next step

If you run a small site on shared hosting, start with two changes: an HTTPS redirect in .htaccess and a robots.txt that allows normal crawling while disallowing your admin or login paths. Test the redirect with a private browser window and check the robots file with a crawler testing tool before relying on it. For a fuller reference, the official Apache documentation at Apache HTTP Server and Google's guidance at Google Search Central explain the directives and how major crawlers interpret them.

Related questions

More questions →
What Is a Developer Cheat Sheet and When Should You Use One?

A developer cheat sheet is a condensed quick-reference for syntax, commands, shortcuts, or snippets — not a tutorial. Use one when you already understand the concept and just need the exact form: the right flag, the correct method signature, the keyboard shortcut, or a copy-paste snippet. Skip it when you're learning a topic from scratch, because a cheat sheet assumes context it doesn't teach.

What a cheat sheet actually contains

Cheat sheets trade explanation for density. A typical one packs several of these into a single page or screen:

  • Syntax patterns — how a loop, function, or query is written in a specific language
  • Command flags — options for a CLI tool like git, docker, or grep
  • Keyboard shortcuts — editor, terminal, or OS bindings
  • Snippets — short reusable blocks you can paste and adapt
  • Code tables — HTTP status codes, regex tokens, ASCII values, operators

CheatSheets.zip, for example, describes itself as a place to "share quick reference and cheat sheet for developers," covering areas like Linux, commands, and shortcuts. That scope tells you what to expect: breadth of recall material, not depth of teaching.

When a cheat sheet saves you time

Reach for one in these situations:

  1. You know the concept but not the exact syntax. You understand Python list comprehensions but forget the ordering of the if clause.
  2. You're scanning options. You want to see all the flags for a command at once rather than reading prose.
  3. You're refreshing a familiar tool. You used tmux six months ago and need the pane-splitting keys again.
  4. You're context-switching. Moving between languages or shells and need to re-anchor on the local conventions.
  5. You want a starting snippet. You'll adapt a short block rather than write it from a blank file.

When a cheat sheet is the wrong tool

You need… Use instead
To understand why something works Documentation or a tutorial
To build a full feature end to end A course, guide, or project docs
To learn a new language's idioms Structured learning material
Generated, runnable code for your exact case An AI assistant or code generator
Authoritative, version-specific behavior Official docs for that version

A cheat sheet is a memory aid, not a teacher. If you can't yet read the snippet and predict what it does, you're in the wrong resource.

How to read one effectively

Don't read a cheat sheet top to bottom. Use it like a lookup table:

  1. Scan the categories or headings to find the section matching your task.
  2. Locate the single line or block you need — ignore the rest.
  3. Copy only the relevant snippet, not the whole section.
  4. Adapt names and values to your variables and environment.
  5. Run it in a real environment before trusting it.

That last step matters. A snippet that looks right can fail because of a version difference, a missing dependency, or a typo introduced when the sheet was transcribed.

Verify before you rely on it

Treat every snippet as a hypothesis. Test it in a scratch file, a REPL, or a throwaway branch:

  • Run it once with known inputs and check the output matches your expectation.
  • Check the version. A command that worked in one release may be deprecated or renamed in another.
  • Confirm side effects. Some snippets delete, overwrite, or push — read before you run.

For example, if a sheet shows a git command to undo a commit, verify whether it preserves your working changes before using it on real work.

Signs a cheat sheet is outdated or too vague

  • No version or date. You can't tell which release it targets.
  • Bare snippets with no context. A line like config.set(x) with no indication of what config is.
  • Deprecated syntax. Patterns you know were replaced years ago.
  • No examples of output. You can't tell what "correct" looks like.
  • Overly broad categories. A single "Linux" section covering everything usually means shallow coverage.
  • Broken or missing links to the source it was derived from.

If a sheet fails two or more of these, find a maintained alternative or fall back to official documentation.

The bottom line

Use a cheat sheet to recall, not to learn. It's fastest when you already know the concept and need the exact form, and it's a liability when you copy without verifying. Keep one or two trusted, version-labeled references handy, test snippets before depending on them, and switch to real documentation the moment you need to understand rather than remember.

What Does a Postal Code API Return? Fields, Formats, and Common Use Cases

A postal code API returns structured location data for a given ZIP Code or Canadian postal code. A typical response includes the code itself, city, state or province, county, latitude/longitude, and — where available — ZIP+4 detail. More complete services add time zone, area codes, boundary geometry, and demographic fields. You send a code (or an address), and the API sends back a machine-readable record you can store, validate, or display.

This article explains what those responses contain, how requests are usually shaped, and where postal code data fits into real applications.

First, clear up the word "code"

The keyword "code" is overloaded, and that causes real confusion for developers:

  • Postal code — the ZIP Code (U.S.) or postal code (Canada) that identifies a delivery area.
  • API key — the credential you use to authenticate your requests. It is not postal data.
  • Source code — the program you write to call the API.

When someone searches for "postal code API code," they usually want example request/response code for a postal code service. The rest of this article treats it that way.

What a postal code API actually returns

Response fields vary by provider and endpoint, but the core set is fairly consistent. A single-code lookup commonly returns:

Field Example Notes
Postal code 90210 The code you queried
City Beverly Hills May be one of several acceptable place names
State / Province CA Two-letter abbreviation
County Los Angeles Useful for tax, territory, and reporting logic
Latitude / Longitude 34.0901, -118.4065 Usually the centroid of the area
ZIP+4 90210-1234 Present only when a specific delivery segment is known
Time zone America/Los_Angeles Helps with scheduling and display
Area codes 310, 424 Regional phone context

Richer datasets add 90+ fields: boundaries, population, income, elevation, and more. You rarely need all of them — request only what your application uses.

A representative JSON response

{
  "postal_code": "90210",
  "city": "Beverly Hills",
  "state": "CA",
  "county": "Los Angeles",
  "latitude": 34.0901,
  "longitude": -118.4065,
  "timezone": "America/Los_Angeles",
  "area_codes": ["310", "424"]
}

XML responses carry the same information in tag form. Choose based on what your stack parses most easily; JSON is the common default.

Common request patterns

Most postal code APIs support four patterns. Knowing which one you need prevents wasted calls.

1. Lookup by code

You have a code and want its details. This is the simplest and fastest call.

GET /lookup?code=90210

2. Reverse lookup by address

You have a street address and want to confirm or complete the code. This is the pattern behind checkout address validation.

GET /validate?street=...&city=...&state=...

3. Radius search

You have a center point and want all codes within a distance. Useful for store locators and delivery zones.

GET /radius?code=90210&miles=10

4. Batch validation

You have a file of addresses and want them cleaned in bulk. Batch endpoints trade latency for throughput and usually have their own limits.

Handling missing and ambiguous matches

Real data is messy. Plan for these cases:

  • No match — the code doesn't exist or the address is malformed. Return a clear error rather than a silent empty object.
  • Multiple matches — a city name may map to several codes, or a code may span several acceptable city names. Decide whether to pick the primary or return a list.
  • Partial match — the street is valid but the ZIP+4 isn't. Fall back to the 5-digit code.
  • Stale data — codes are added, retired, and reassigned. Refresh your dataset on a regular schedule.

A practical rule: validate at the point of entry, store the normalized result, and never re-derive it later from raw user input.

Practical use cases

  • Checkout address validation — catch typos before shipping, reduce failed deliveries.
  • Shipping zone lookup — map a code to a zone, carrier route, or rate table.
  • Data enrichment — append county, coordinates, or demographics to existing records.
  • Store and service locators — radius search to find nearby branches or coverage areas.
  • Territory and tax logic — county and boundary data drive jurisdiction rules.

Licensing and data-source considerations

Postal code data originates with national authorities — USPS in the United States and Canada Post in Canada. Providers license and repackage it, which is why accuracy, update frequency, and field coverage differ between services. Before committing:

  • Confirm the data source and how often it refreshes.
  • Check whether ZIP+4 and boundary data are included or sold separately.
  • Review usage limits and whether batch processing is allowed.
  • Read the license terms for redistribution and storage.

Pricing and plan details change, so check the provider's current documentation rather than relying on secondhand figures.

Getting started

  1. Decide which request pattern you need (lookup, reverse, radius, or batch).
  2. Pick the fields you'll actually store.
  3. Write a small test call and inspect the raw response.
  4. Add error handling for no-match and ambiguous cases.
  5. Cache results where the same codes repeat.

A postal code API is ultimately a translation layer: you give it a code or an address, and it gives back structured location facts. Understand the fields, match them to your use case, and handle the messy edges — that's most of the work.

What Is HTML and How Does It Structure a Web Page?

HTML (HyperText Markup Language) is the markup language that gives a web page its structure and content. It tells a browser what each piece of a page is — a heading, a paragraph, a link, an image — rather than how it should look. If you want to understand how any website is built, HTML is the starting point: it's the skeleton that CSS styles and JavaScript animates. This explainer covers what HTML is, how tags and attributes work, how a browser turns it into a visible page, and where you can see it in the wild.

What HTML actually does

HTML is not a programming language. It doesn't perform calculations, make decisions, or run loops. It's a markup language: you wrap content in labels that describe its meaning and role.

That distinction matters. When you write <h1>Welcome</h1>, you're not saying "make this big and bold." You're saying "this is the top-level heading of the page." The browser decides the default appearance, and CSS can override it later. This separation — structure in HTML, presentation in CSS, behavior in JavaScript — is the core organizing principle of the modern web.

Elements, tags, and attributes

An element is the complete unit: an opening tag, the content, and a closing tag. A tag is the label itself, written between angle brackets. An attribute is extra information placed inside the opening tag.

Here's a simple example:

<h1 class="page-title">Welcome to My Site</h1>
<p>This is a paragraph of text with a <a href="https://example.com">link</a> inside it.</p>
<img src="photo.jpg" alt="A description of the photo">

Breaking that down:

Part Example What it does
Opening tag <h1> Marks where the element begins
Attribute class="page-title" Adds extra info the browser or CSS can use
Content Welcome to My Site The actual text or media
Closing tag </h1> Marks where the element ends

A few things to notice. The <a> element uses an href attribute to say where the link points. The <img> element has no closing tag — it's a void element, because it holds no text content. And the alt attribute on the image provides a text alternative, which matters for accessibility and for when the image fails to load.

How a browser reads HTML and renders a page

When you visit a URL, the browser receives the HTML as plain text and works through it in a defined sequence:

  1. Parsing — The browser reads the markup top to bottom and builds a tree structure called the DOM (Document Object Model). Each element becomes a node in that tree.
  2. Applying CSS — Stylesheets are matched against the DOM to determine how each element should look.
  3. Layout — The browser calculates where each element sits and how much space it takes.
  4. Painting — Pixels are drawn to the screen.

The key insight is that the HTML you write is not the page you see. It's a set of instructions the browser interprets. Two browsers given identical HTML will produce nearly identical structure, but their default styling and rendering details can differ slightly — which is one reason developers test across browsers.

How HTML, CSS, and JavaScript divide the work

A typical site uses all three languages, each with a distinct job:

  • HTML — structure and content. "This is a heading. This is a list. This is a form field."
  • CSS — presentation. "Headings are dark blue, 32px, with 16px of space below."
  • JavaScript — behavior. "When the user clicks this button, load more content."

You can build a perfectly readable page with HTML alone. Add CSS and it becomes visually designed. Add JavaScript and it becomes interactive. The same HTML can be restyled completely without touching its structure — which is why the separation is worth respecting rather than inlining styles and scripts everywhere.

Where to see HTML in practice

You don't need any tools to inspect a page's HTML:

  • View source — Right-click anywhere on a page and choose "View Page Source" (or press Ctrl+U on Windows/Linux, Cmd+Option+U on Mac). This shows the raw HTML the server sent.
  • Developer tools — Right-click an element and choose "Inspect." This opens the live DOM, which may differ from the raw source because JavaScript can modify it after the page loads.

Comparing the two is instructive. The raw source is what the server delivered; the inspected DOM is what the browser actually built. On a JavaScript-heavy site, they can look quite different.

A note on where this fits

HTML is the entry point to web work, but it's rarely used in isolation. If you're learning to build for the web, expect to pick up CSS and JavaScript alongside it. If you're simply trying to understand how a site you admire is put together, viewing its source and inspecting elements will show you the HTML structure directly — and that's often the fastest way to connect the abstract markup to a real page.

How to Use Ahrefs for Your First SEO Audit: A Step-by-Step Tutorial

If you're new to Ahrefs and want to run your first SEO audit, the fastest path is: open Site Explorer, enter your target URL, review the Overview for a health snapshot, then dig into Organic Keywords, Top Pages, and Site Audit to find specific problems. From there, build a short prioritized to-do list instead of trying to fix everything at once.

This tutorial walks through that workflow using a realistic starting scenario, explains what the numbers mean, and shows how to turn findings into actions.

Before You Start: Pick a Narrow Scope

A common beginner mistake is auditing an entire large website on day one. The reports become overwhelming, and you can't tell which issues matter.

Instead, choose one of these starting points:

  • A single important page (your homepage or a key product/service page)
  • A small site (under ~50 pages, e.g., a personal blog or small business site)
  • One section of a bigger site (e.g., /blog/)

For this tutorial, assume you're auditing a small business site with about 30 pages. The same steps scale up later.

You'll need an Ahrefs account to follow along. Ahrefs offers paid plans, and pricing and feature limits change over time, so check the current Pricing page for what's included in each tier before committing.

Step 1: Enter Your Target in Site Explorer

Site Explorer is Ahrefs' core tool for analyzing any website or URL.

  1. Open Site Explorer from the top navigation.
  2. In the search box, paste your domain (e.g., example.com).
  3. Choose the Exact URL or Domain mode depending on scope. For a full-site view, use Domain or Prefix; for a single page, use Exact URL.
  4. Press Enter.

You'll land on the Overview report. Don't try to absorb everything — focus on four numbers first.

Reading the Overview Snapshot

Metric What it tells you How to use it
Ahrefs Rank (AR) Relative strength of the site's backlink profile vs. others in the database Useful for comparing against competitors, not as a standalone goal
Organic traffic Estimated monthly visits from search A rough trend indicator, not exact analytics
Organic keywords Estimated number of keywords the site ranks for Shows breadth of visibility
Backlinks / Referring domains Total links and unique sites linking to you Referring domains matter more than raw backlink count

Important caveat: Ahrefs' traffic and keyword numbers are estimates based on its own data. They won't match Google Search Console or your analytics exactly. Treat them as directional, not absolute.

Step 2: See What You Already Rank For

Go to Organic Keywords in the left sidebar. This shows queries where your site appears in search results.

Sort by Traffic (descending) to see which pages bring the most estimated visitors. Then look for:

  • Keywords ranking in positions 4–15 — these are often the easiest wins. A small content or on-page improvement can push them onto page one.
  • Keywords with high volume but low position — potential opportunities if the topic is relevant.
  • Irrelevant keywords — if you rank for something off-topic, it may signal thin or mismatched content.

Write down 5–10 of the position 4–15 keywords. These become your first optimization targets.

Step 3: Find Your Best and Weakest Pages

Open Top Pages. This ranks your URLs by estimated organic traffic.

Look for two things:

  1. Your top performers — understand what topics and formats work. Can you create more content like this?
  2. Pages with traffic but poor rankings — these may need on-page fixes (title, headings, internal links).

If a page gets zero traffic and targets a topic you care about, it's a candidate for a rewrite or consolidation.

Step 4: Run a Technical Site Audit

Now move to Site Audit. This crawls your site and flags technical and on-page issues.

  1. Click Site Audit → New project.
  2. Enter your domain and set crawl settings (default is usually fine for a small site).
  3. Start the crawl and wait for it to finish.

Once complete, you'll see a Health Score and a list of issues grouped by category.

Which Issues to Fix First

Not all issues are equal. Prioritize in this order:

Priority Issue type Why it matters
1 Broken links (404s) Bad for users and crawl efficiency
2 Pages blocked from indexing They can't rank at all
3 Missing or duplicate title tags Directly affects click-through and relevance
4 Slow-loading pages Affects experience and rankings
5 Thin content Low value to users and search engines

Ignore low-impact warnings (like minor meta description length) until the big items are handled.

Step 5: Turn Findings Into a To-Do List

You now have raw data. Convert it into a short, actionable list. Example:

  1. Fix 3 broken links found in Site Audit.
  2. Rewrite title tags on 5 pages with duplicate titles.
  3. Improve 4 pages ranking in positions 6–12 by adding missing subtopics and internal links.
  4. Remove or update 2 thin pages with no traffic.

Keep the list to 5–10 items max for your first audit. Finishing a short list beats starting a long one.

Common Beginner Mistakes

  • Chasing every red flag. Site Audit flags many minor issues. Fix what affects rankings and users first.
  • Trusting estimates as exact numbers. Ahrefs data is modeled, not measured from your analytics.
  • Auditing a huge site too early. Start small to learn the interface.
  • Ignoring search intent. A page can be technically perfect but still fail if it doesn't match what searchers want.
  • Forgetting to re-crawl. After fixes, run Site Audit again to confirm improvements.

Where to Go Next

Once your first audit is done:

  • Compare with competitors using Site Explorer's Competing Domains and Content Gap reports.
  • Track keyword rankings over time with Rank Tracker.
  • Explore backlink opportunities in the Backlinks and Link Intersect reports.
  • Set up recurring Site Audit crawls so new issues surface automatically.

Your first audit isn't about perfection — it's about building a repeatable habit: enter a target, read the key reports, pick the highest-impact fixes, and act. Do that once a month and your site's health compounds.

Website Overview

An established domain and managed infrastructure suggest continuity of operations and may support dependable delivery, although neither guarantees service quality. Page metadata, canonical configuration and social previews work together to provide more consistent search and sharing presentation.

Domain and Registration

Registered in 2016, this domain has about 9 years of history. That suggests continuity, although ownership and purpose may have changed. Transfer-protection status is present, helping reduce the risk of unauthorized domain transfers. The registrar is GoDaddy.com, LLC, a widely used domain service provider. The domain uses the common .com extension, which is not an independent safety signal.

DNS and Email

Nameservers are provided by Cloudflare, indicating managed DNS hosting. MX records point to the htmlcheatsheet.com email service. No CNAME was found; the observed records resolve directly to addresses. SPF and DMARC are configured. DKIM status is unknown. DNSSEC signatures were not detected, so this additional DNS authenticity protection is not confirmed.

TLS and Certificates

The public key uses EC with 256 bits. The server supplied a complete certificate chain. No organization name is present in the certificate; the available fields are consistent with domain validation. The certificate was issued within the Google Trust Services cloud or CDN ecosystem. The certificate's total validity is about 90 days, consistent with a short renewal cycle.

HTTP and Browser Security

The checked browser-security headers were not detected, leaving fewer explicit browser-side safeguards. No X-Powered-By header was found, reducing one common source of backend fingerprinting information. The cf-ray response header indicates a CDN or caching proxy in the delivery path. No obvious internal addresses or debug information were found in the headers. The Server header identifies cloudflare without an exact version.

Technology Stack Analysis

The public page identifies jQuery, Google Analytics, Cloudflare without precise versions, leaving fewer clues for version-specific scanning.

Search and Social Sharing

The title has 40 characters, within a common display range. A meta description is present, with 118 characters. The observed directives allow indexing and link following. No Generator meta tag is publicly exposed. A viewport declaration is present, providing a basis for mobile layout.

Hosting and Email

DNSCloudflare
HostingCloudflare
Emailhtmlcheatsheet.com
Approximate IP geolocation (inferred; a CDN or proxy may differ from the origin server) Location unknown Inferred 104.21.35.167

Registration details

RDAP / WHOIS

RegistrarGoDaddy.com, LLC
Registered2016-11-19
Expires2028-11-19
Domain statusclient delete prohibited、client renew prohibited、client transfer prohibited、client update prohibited
Nameserversmichelle.ns.cloudflare.com、simon.ns.cloudflare.com
DNSSECunsigned

DNS records

DNS

TypeNameValueTTLPriority
Ahtmlcheatsheet.com104.21.35.167300—
Ahtmlcheatsheet.com172.67.177.173300—
AAAAhtmlcheatsheet.com2606:4700:3036::6815:23a7300—
AAAAhtmlcheatsheet.com2606:4700:3037::ac43:b1ad300—
MXhtmlcheatsheet.commail.htmlcheatsheet.com3000
NShtmlcheatsheet.commichelle.ns.cloudflare.com86400—
NShtmlcheatsheet.comsimon.ns.cloudflare.com86400—
TXThtmlcheatsheet.comv=spf1 a mx ptr include:secureserver.net ~all300—
DMARC_dmarc.htmlcheatsheet.comv=DMARC1; p=quarantine; adkim=r; aspf=r; rua=mailto:[email protected];300—

TLS and certificates

TLS / SSL

AssessmentNormal configuration
Supported protocolsTLSv1.2、TLSv1.3
Negotiated protocolTLSv1.3
Certificate subjecthtmlcheatsheet.com
IssuerGoogle Trust Services
Valid until2026-11-30T14:14 · Remaining when checked: 52 days
Verification detailsCertificate trust: Passed · Hostname match: Passed

HTTP response headers

HTTP

HeaderValue
content-typetext/html
cache-controlmax-age=2592000
servercloudflare

Identified technologies

jQueryGoogle AnalyticsCloudflare

Pages, Search and Sharing

Meta descriptionOnline interactive HTML Cheat Sheet contains useful code examples and web developer tools, markup generators and more.
Canonical URLhttps://htmlcheatsheet.com/
LanguageEnglish (default)
Twitter CardNot detected
All bots 0 allowed · 1 disallowed
  • Disallow/getawayfromhere/

User reviews (0)

  • No reviews yet.