Website profiles · Technology insights · Alternatives

ihancer.com

ihancer is an AI photo enhancer app to enhance photo quality, upscale image resolution, restore old photos, fix pixelated and blurry photos in just a few taps

No paid content found
Visit website
Profile views 7 Outbound visits 12 Normal
ihancer Full homepage screenshot

At a glance

Category
Artificial Intelligence
Language
English
Paid-content signal
No paid content foundObserved
Registered
2022
Hosting
DigitalOcean, LLCInferred
HTTPS certificate trusted
PassedObserved
Last updated

Website review

This review may include AI-generated content and is not individually verified. Domain, certificate and other facts come from the observed data on this page.

What is ihancer?

ihancer is an AI photo enhancement app that improves image quality automatically. According to its page, you import a photo from your gallery or take one with your camera, tap a button, wait briefly, and receive an enhanced version. It handles tasks such as upscaling small images, restoring old photos, fixing pixelated or blurry images, and improving facial detail.

Who it suits

  • Anyone with low-resolution phone photos who wants a quick cleanup before sharing.
  • People digitizing or restoring older family photos who need a simple first pass.
  • Casual users who prefer one-tap results over manual editing in software like Photoshop.

Practical details from the page

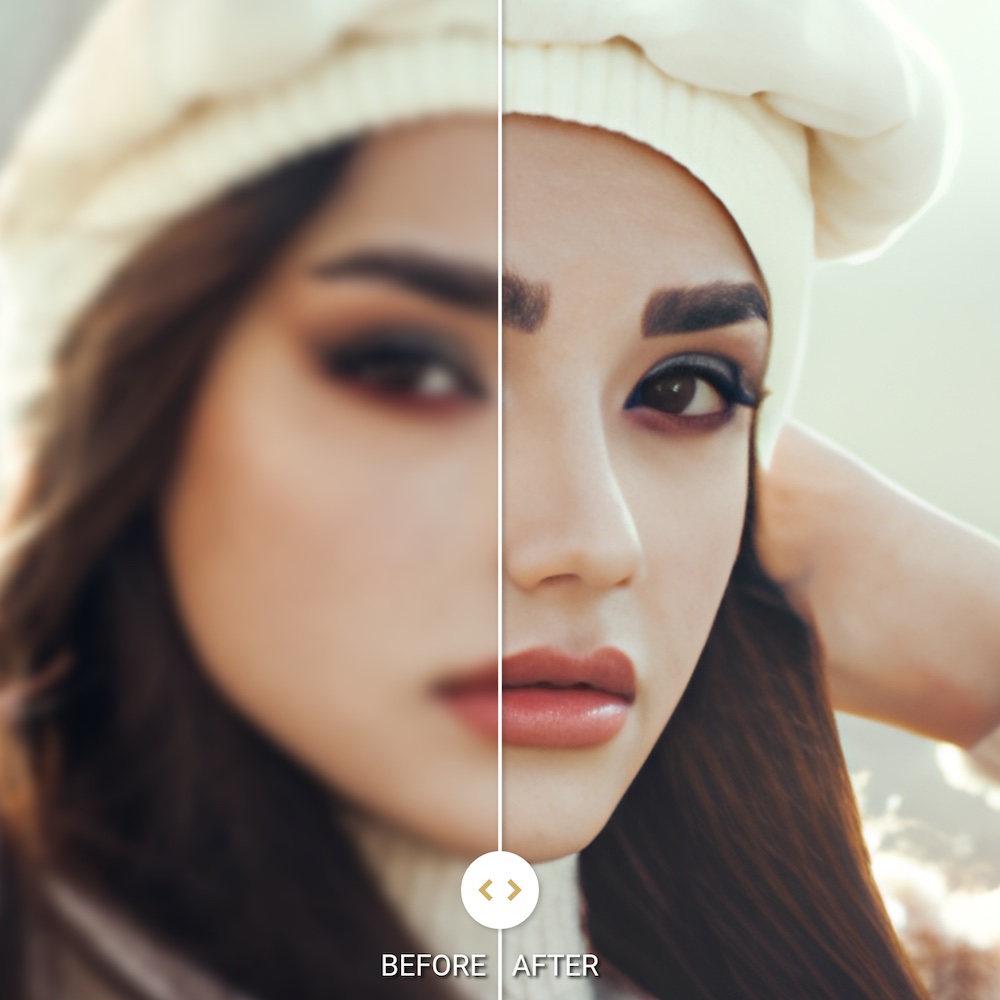
  • Before/after slider and zoom let you inspect the result closely.
  • Several enhancement methods produce different outcomes; separate tabs let you compare them and pick the best.
  • The underlying technology is tuned for faces but also works on general photos.
  • You can share results to social networks, messengers, or other editors, or save to your gallery.
  • It offers a simple UI, dark mode, and localization in several languages.
  • It is described as free to download on mobile.

Trade-offs to consider

Automatic enhancement is fast and accessible, but it gives you less control than manual retouching. For professional color grading or precise restoration work, you may still need a dedicated editor. Since the page does not list pricing beyond "free to download," check the app store listing for current in-app purchase details before committing.

Next step: Try it on one blurry or low-resolution photo you already have, compare the enhancement tabs side by side, and judge whether the result meets your needs before using it on a larger batch.

How does ihancer enhance photo quality and increase image resolution?

ihancer uses machine learning to enhance image quality and increase resolution automatically. According to the app's description, you import a low-quality photo from your gallery or take a new one with your camera, tap a single button, wait briefly, and receive an improved photo. The process is designed to work with just a few taps, without manual editing steps.

What it actually does

The app targets common image problems:

  • Enhancing overall photo quality
  • Restoring old photos
  • Increasing image resolution
  • Fixing pixelated and blurry photos
  • Improving image details
  • Enhancing facial photos
  • Removing image resize artifacts

The underlying technology is optimized for images containing faces, but the page states it also works with other kinds of photos.

How you control the result

Rather than one fixed output, ihancer offers several enhancement options that produce different results. After processing, you can compare outcomes in multiple tabs to see how the same photo looks under different enhancement methods, then pick the one you prefer. A before-and-after slider lets you compare the original and enhanced versions in real time, and a zoom feature lets you inspect details closely.

Practical scenario

Imagine you have a small, blurry group photo from an old phone. You import it, tap enhance, and then switch between the available enhancement methods to find the version where faces look sharpest and background noise is least distracting. You can then share the result to a social network, messenger, or photo editor, or save it to your gallery.

What to keep in mind

Because enhancement is automated, results will vary by source image. Photos that are extremely low-resolution or heavily compressed may improve but cannot recover detail that was never captured. The page does not specify maximum output resolution or supported file formats, so if those matter for your use case, test with a representative photo first. The app is described as free to download on mobile, with localized languages, a simple interface, and dark mode support.

Next step

Try ihancer on one problematic photo and use the tab comparison to judge which enhancement method suits that image type. If you need higher resolution for printing, check the output dimensions after enhancement rather than assuming a fixed multiplier.

Can ihancer restore old photos and fix pixelated or blurry images?

Yes. ihancer lists restoring photos, increasing image resolution, and fixing pixelated or blurry photos among its typical use cases, and its page describes the workflow as importing a photo, tapping one button, waiting, and receiving an enhanced result. The technology is optimized for images containing faces but is also described as working with other kinds of photos.

What it's good for

  • Old or low-quality photos you want to clean up before sharing or printing small.
  • Small images you want to enlarge without the usual resize artifacts.
  • Blurry or pixelated shots, especially portraits and group photos where faces are the focus.
  • Quick touch-ups on a phone: the page notes free download for mobile, a simple interface, and dark mode.

What to expect

The app offers several enhancement options rather than one fixed result, and you can compare them in tabs to pick the best. A before/after slider and a zoom view let you inspect details before saving. You can save to your gallery or share directly to social apps, messengers, or photo editors.

Practical limits

Automatic enhancement can invent detail rather than recover it, so heavily damaged or very low-resolution originals may look smoother but not truly sharper. Facial photos tend to benefit most; landscapes, text, and fine patterns are more likely to show artifacts. Compare the available methods at 100% zoom before deciding, and keep the original file.

If you want to try it, start with one portrait and one non-portrait photo, run both through each enhancement option, and judge at full zoom. For alternatives with similar goals, see Topaz Labs and Removal.AI — though note that ihancer's own page does not state pricing, so check the app store listing for current terms.

What types of photos does ihancer work best with, such as facial photos?

ihancer is optimized for photos containing faces, but it also works on other kinds of photos. The page states the technology is "optimized to work with images with faces, but also works fine with all other kinds of photos."

That means the strongest results are likely for portraits, selfies, group shots and older family photos where faces are the main subject. For non-face images, it still targets the same general problems: low quality, small resolution, pixelation, blur and resize artifacts.

A practical way to decide whether it fits your case:

  • Best fit: facial photos that are blurry, pixelated, low-resolution or scanned from old prints.
  • Good fit: general photos where you want more detail, higher resolution or fewer resize artifacts.
  • Less certain: highly technical images where fine, non-facial detail matters most, such as text documents, product labels or architectural shots, since the page does not claim special handling for those.

Next step: try one facial photo and one non-facial photo of the same type you care about, then use the before/after slider and zoom to compare the enhancement options and pick the method that suits that image best.

Is ihancer free to download and use on mobile devices?

Yes, ihancer is free to download on mobile devices, and the page describes its core enhancement as happening automatically in a few taps. You import a photo from your gallery or take a new one, tap a button, wait briefly, and get an improved result.

What "free" covers here

  • Download: the app is described as free to download on your mobile device.
  • Use: enhancement is presented as a simple automatic process rather than a paid, manual editing workflow.
  • Extra tools included at no stated cost: before/after comparison slider, zoom to inspect detail, several enhancement options, and sharing or saving to your gallery.

Where to be careful The page does not publish pricing details, in-app purchase information, or subscription terms. "Free to download" is not the same as "everything is free forever" — many photo apps monetize through optional upgrades, watermarks, or usage limits. Check the app store listing for the current price label and any in-app purchase notes before relying on it.

Practical decision criterion If you only need occasional cleanup — sharpening a blurry phone photo, restoring an old scan, or enlarging a small image — a free download with automatic enhancement is a reasonable first try. If you need bulk processing, commercial licensing, or guaranteed no watermarks, confirm those terms in the app store listing first.

For a quick test, pick one imperfect photo with a face, run the default enhancement, and compare the before/after slider at full zoom. If the result holds up, the free tier likely covers your everyday needs; if you hit a paywall or quality limit, that is your signal to look at alternatives.

You can find the app at ihancer.

How can I compare different enhancement methods in ihancer before saving?

Open a photo in ihancer, run the enhancement, then use the app's multiple result tabs to switch between the different enhancement methods applied to the same image. Each tab shows how that method treated your photo, so you can make a side-by-side judgment rather than guessing from a single output.

To judge the results properly, use the built-in comparison tools together:

  • Before/after slider — drag it to see exactly what changed versus the original, especially in skin texture, edges and background detail.
  • Zoom — inspect small areas (eyes, text, fine patterns) where over-sharpening or artificial smoothing usually shows up first.
  • Method tabs — compare the same crop across methods, not just the full-frame view.

A practical test: pick a photo with a face plus some fine detail, zoom into both, and note which method keeps facial features natural while still cleaning up blur or pixelation. ihancer's technology is tuned for images with faces but also works on other photo types, so a method that looks good on a portrait may not be the best choice for a landscape or a scanned document.

Then save or share only the version you selected — the app lets you export to the gallery or send the result to social networks, messengers and photo editors.

For a second opinion on the same image, you can also try Upscayl (free, desktop-based) and compare its output with your chosen ihancer method before committing.

Related questions

More questions →
How to Compress Images for the Web Without Losing Visible Quality

You can cut most images to a fraction of their original file size without any visible quality loss by doing three things in the right order: resize the image to the dimensions it will actually display at, pick the right format for the content, then apply compression at a quality level that survives a side-by-side check. The single biggest mistake is skipping step one — an oversized image compressed at maximum quality is still far heavier than a correctly sized one.

Why file size and quality are a trade-off, not a fixed setting

Every compressed image is a negotiation between three variables: how many pixels you keep, how precisely each pixel is described, and how much the format is allowed to guess.

  • Dimensions decide how many pixels exist at all. Halving width and height removes 75% of the pixel data before any compression happens.
  • Quality level decides how aggressively the encoder discards detail it thinks you won't notice.
  • Format decides the kind of discarding allowed — some formats throw away color precision, others only remove redundancy.

Because these interact, "quality 80" means something different on a 4000px photo than on a 600px thumbnail. Tune dimensions first, then quality.

Pick the format before you touch the quality slider

Format Best for Compression type Transparency Notes
JPEG Photographs, gradients, complex scenes Lossy No Smallest for photos; artifacts appear around sharp edges and text
PNG Logos, icons, screenshots, flat color, anything needing transparency Lossless (or lossy via quantization) Yes Often 5–10× larger than JPEG for photos; excellent for flat graphics
WEBP Almost everything, as a modern default Both lossy and lossless Yes Typically 25–35% smaller than JPEG at comparable quality; broad browser support
SVG Logos, icons, diagrams, charts Vector (resolution-independent) Yes Stays crisp at any size; not suitable for photos
GIF Short simple animations only Lossless, 256 colors Yes (1-bit) Superseded by WEBP/MP4 for animation in nearly all cases

Practical rule: photos → JPEG or lossy WEBP; flat graphics and transparency → PNG or lossless WEBP; anything vector → SVG.

The four levers, in the order you should pull them

1. Resize to display size (biggest win, zero quality cost)

If your layout renders an image at 800px wide, serving a 2400px original wastes roughly 89% of the pixels. Resize to the largest size it will ever be displayed at, and add a 2× version only if you need retina sharpness.

2. Choose the format

Match the format to the content type using the table above. Converting a photographic PNG to JPEG or WEBP alone can shrink it by 80% or more.

3. Set the quality level

For JPEG and lossy WEBP, most photographs hold up well between quality 70 and 85. Below ~60, banding appears in skies and blur around text. Above ~90, file size climbs steeply for gains nobody can see.

4. Strip metadata

EXIF data, camera info, and embedded thumbnails can add tens of kilobytes. Remove them unless you specifically need copyright or orientation data — and note that stripping orientation can rotate an image, so verify after export.

When lossy compression is fine, and when it isn't

Lossy is acceptable when:

  • The image is a photograph or has natural texture.
  • It's decorative or below the fold.
  • Slight softening won't be noticed at final display size.

Use lossless or vector instead when:

  • The image contains text, UI elements, or thin lines (lossy creates ringing artifacts).
  • It's a logo, icon, or diagram — SVG or PNG keeps edges clean.
  • It will be edited again later; repeated lossy saves compound degradation.
  • It's a screenshot of code or a chart where color accuracy matters.

Compressing vs. resizing: don't confuse them

Compressing reduces the bytes needed to describe the same pixels. Resizing reduces the number of pixels. They're independent, and resizing usually delivers the larger saving. A 3000×2000 photo at quality 95 might be 2 MB; the same photo resized to 1200×800 at quality 80 might be 180 KB. Doing only the quality reduction gets you maybe 40% off; doing both gets you over 90%.

A repeatable workflow

  1. Determine the maximum display width in your layout (inspect the element or check your CSS).
  2. Export at that width (plus a 2× variant if needed).
  3. Convert to the right format — WEBP as a modern default, JPEG as a fallback, PNG/SVG for graphics.
  4. Apply quality 75–85 for lossy formats and compare against the original.
  5. Strip metadata and re-check orientation.
  6. Verify before publishing (see below).
  7. Serve the right file with srcset so small screens don't download the large variant.

How to verify quality before you publish

  • View at 100% at final display size, not zoomed in — artifacts you can't see at real size don't matter.
  • Toggle between original and compressed in a viewer or an online compressor's before/after preview.
  • Check the worst-case areas: skies, smooth gradients, sharp edges, and any text.
  • Compare file sizes and ask whether the extra kilobytes buy visible improvement. If not, go smaller.
  • Test on a mid-range phone, where banding and blur are often more obvious than on a desktop monitor.

Common mistakes

  • Compressing a full-resolution image and calling it optimized.
  • Using PNG for photographs.
  • Setting quality to 100 "to be safe" — it inflates size with no visible benefit.
  • Re-saving a JPEG repeatedly, stacking artifacts each time.
  • Forgetting that GIF animations are usually better as WEBP or video.
  • Ignoring metadata, which can silently add weight.

Quick reference

Goal Do this
Photo on a webpage Resize to display width → WEBP (fallback JPEG) → quality 75–85
Logo or icon SVG; fall back to PNG if vector isn't possible
Screenshot with text PNG or lossless WEBP
Transparent photo cutout Lossy WEBP or PNG
Short animation WEBP or MP4, not GIF

The order matters more than any single setting: resize, then choose format, then tune quality, then strip metadata, then verify at real display size. Follow that sequence and you'll routinely land at 10–20% of the original file size with no quality your visitors can detect.

Is ihancer Free and What Languages Does It Support?

ihancer can be downloaded for free on your mobile device, and the app is localized in several languages. The site does not list which specific languages are available, so you'll need to check the app store listing for your region to confirm your language is included. Beyond language, the app has a simple UI and supports dark UI mode.

What "free" means here

The only pricing information on the ihancer site is that the app "can be downloaded for free on your mobile device." That statement covers the download, not the full feature set. The site does not publish a price list, subscription tiers, or payment details, so treat "free" as "free to download" rather than "everything is free forever." If cost matters to you, verify in-app purchase options in the store listing before installing.

Language support

The site states the app "is localized in several languages" but does not name them. To find out whether your language is supported:

  1. Open the ihancer listing in your device's app store.
  2. Scroll to the "Languages" or "Information" section of the listing.
  3. Compare the listed languages against your preferred one.

If your language isn't listed, the app may still work for you — the core flow is a few taps on a single button — but menus and labels would appear in a fallback language.

What the app does, in short

ihancer is an AI photo enhancer. You import a photo from your gallery or take a new one with the camera, tap one button, wait briefly, and get an enhanced result. It's built for:

  • Enhancing overall photo quality
  • Restoring old photos
  • Increasing image resolution
  • Fixing pixelated and blurry photos
  • Improving image details
  • Enhancing facial photos
  • Removing image resize artifacts

The underlying technology is optimized for images with faces but also works with other kinds of photos.

Comparing and sharing results

Two features matter if you want to judge the output before keeping it:

  • Before/after slider — compare the original and enhanced versions in real time.
  • Zoom — inspect enhancement results in detail.
  • Multiple enhancement options — the app offers several methods that produce different results, and the results appear in multiple tabs so you can compare how the same photo looks under each method and pick the best one.

Once you're satisfied, you can share the enhanced photo to other apps — social networks, messengers, photo editors — or save it to your gallery.

Quick answers

Question Answer
Is it free? Free to download on mobile; the site doesn't detail any pricing beyond that.
Which languages? "Several languages" per the site, but none are named — check your app store listing.
Dark mode? Yes, dark UI mode is supported.
Where can I use it? Mobile device (the site also labels it a "Web app").
Can I try before saving? Yes — before/after slider, zoom, and multiple result tabs.
How to Use ihancer to Enhance a Photo

ihancer enhances a photo automatically with a few taps: import a low-quality image from your gallery or take a new one with the camera, tap the enhancement button, wait briefly, and get a higher-quality result. It is built for photos with poor quality, small resolution, pixelation, blur, or resize artifacts, and the underlying technology is optimized for images that contain faces while still working on other kinds of photos.

Before You Start

  • Have the photo you want to improve ready in your device gallery, or be prepared to take a new one with the camera.
  • Install the ihancer app on your mobile device. The app can be downloaded for free.
  • Expect the enhancement to take a short wait rather than being instant.

Step-by-Step

  1. Import or capture the source photo. Open the app and either import a bad-quality photo from your gallery or take a new photo with the camera. This is the image the app will work on.
  2. Start the enhancement. Tap the single enhancement button. The app processes the image automatically using machine learning technology — you do not set manual parameters.
  3. Wait for processing to finish. The app needs a bit of time to produce the good-quality photo.
  4. Review the result. Use the before-and-after slider to compare the original and enhanced versions in real time, and use the zoom feature to inspect the enhancement in detail.
  5. Compare enhancement options if needed. The results have multiple tabs, so you can see how the same photo is enhanced by different enhancement methods and pick the one that suits you best. The app offers several enhancement options that produce different results.
  6. Save or share. Save the enhanced photo to your gallery, or share it with other apps such as social networks, messengers, or photo editors.

What You Can Use It For

Use case What it addresses
Enhance photo quality General improvement of a poor-quality image
Restore photos Bringing back older photos
Increase image resolution Making a small photo larger
Fix pixelated and blurry photos Sharpening visibly degraded images
Improve image details Bringing out finer detail
Enhance facial photos Best fit, since the technology is optimized for faces
Remove image resize artifacts Cleaning up distortion from prior resizing

Common Points to Check

  • Face photos get the best results. The technology is optimized for images with faces, but it also works fine with all other kinds of photos.
  • Not sure which result is best? Switch between the tabs in the results view and compare the same photo across enhancement methods before saving.
  • Want to judge quality closely? Rely on the zoom feature rather than the slider alone, since the slider gives a quick overall comparison.
  • Interface preferences. The app has a simple UI and supports dark UI mode, and it is localized in several languages.

For terms and data handling, the app provides its own Terms & Conditions and App Privacy Policy.

What features does ihancer offer for comparing and sharing enhanced photos?

ihancer includes built-in comparison tools so you can judge an enhancement before you keep it, and standard sharing options so you can move the result into other apps. The comparison side is the more distinctive part: a before/after slider, a zoom view, and multiple enhancement methods you can switch between on the same photo.

Comparing results before you commit

The app is built around the idea that you should see the difference, not just trust it.

  • Before/after slider — after an enhancement finishes, you can drag a slider to compare the original and the enhanced version in real time. This is the fastest way to spot whether detail was genuinely recovered or just sharpened.
  • Zoom — you can zoom into the result to inspect fine detail. This matters most on faces, text, and edges, where over-processing tends to show up first.
  • Multiple enhancement options — the app offers several enhancement methods that produce different results. You pick the one that suits the photo rather than accepting a single fixed output.
  • Multiple result tabs — the enhancement results are organized into tabs, so you can compare how the same photo looks under different enhancement methods side by side and choose the best one.

That last point is the practical difference between ihancer and a one-button filter: you are choosing among outputs, not just accepting or rejecting one.

A realistic comparison workflow

  1. Import a low-quality photo from your gallery, or take a new one with the camera.
  2. Tap the enhancement button and wait for processing to finish.
  3. Open the result tabs and switch between enhancement methods on the same photo.
  4. Use the before/after slider to check overall improvement, then zoom in on the areas you care about — a face, a logo, fine texture.
  5. Keep the version that holds up under zoom, not the one that looks sharpest at thumbnail size.

The zoom step is where most people change their mind. An enhancement that looks impressive at full-frame size can introduce smearing or artificial texture when magnified, and the slider alone won't always reveal that.

Sharing and saving the enhanced photo

Once you've picked a result, you have two routes out of the app:

  • Share to other apps — social networks, messengers, and photo editors are all supported targets, so you can post directly or hand the file to another editor for further work.
  • Save to the gallery — keeps the enhanced version on your device.

If your goal is a specific platform, saving to the gallery first and uploading from there gives you more control over cropping and format than sharing straight out of the app.

What kinds of photos this works on

The enhancement technology is optimized for images containing faces, but it also works on other kinds of photos. The listed use cases are:

Use case What it addresses
Enhance photo quality General low-quality images
Restore photos Older or degraded images
Increase image resolution Small photos you want to enlarge
Fix pixelated and blurry photos Compression and focus problems
Improve image details Fine texture and definition
Enhance facial photos The optimized case
Remove image resize artifacts Damage from earlier resizing

Because faces are the optimized case, portrait and group photos are where the comparison tools pay off most — you can zoom straight to a face and check whether the enhancement looks natural.

Practical notes

  • The app is described as downloadable for free on mobile devices. The available material does not state whether any enhancement options, export limits, or features are restricted behind payment, so treat pricing as unconfirmed rather than assuming everything is free.
  • The interface is simple and supports dark mode, and the app is localized in several languages.
  • The core flow is short by design: import or capture a photo, tap once, wait, then compare and export.

If your main question is whether an enhancement is worth keeping, the tabs plus slider plus zoom combination is the feature set that answers it. If your main question is where the file goes afterward, sharing to another app or saving to the gallery covers both.

What Is ihancer and What Does It Do?

ihancer is an AI photo enhancer app that automatically improves image quality, increases resolution, restores old photos, and fixes pixelated or blurry images. It works on mobile devices and is positioned as a simple, tap-based tool: you import a photo or take a new one, tap a button, wait briefly, and get an enhanced result. If your goal is to rescue a low-quality photo without learning professional editing software, this app is aimed at that use case.

What problems it solves

According to the app's own description, ihancer targets photos that are already damaged or limited in quality rather than images that just need color or exposure tweaks. Its listed use cases include:

  • Enhancing overall photo quality
  • Restoring old photos
  • Increasing image resolution (upscaling small photos)
  • Fixing pixelated and blurry photos
  • Improving image details
  • Enhancing facial photos
  • Removing image resize artifacts

The technology is optimized for images containing faces, but the app states it also works with other kinds of photos.

How it works

The workflow is deliberately minimal:

  1. Import or capture — pick a photo from your gallery or take a new one with the camera.
  2. Tap to enhance — trigger the enhancement with a single button.
  3. Wait — the app processes the image using machine learning.
  4. Review and export — compare before/after, then save or share.

There is no mention of manual parameter tuning as a required step, which is the main distinction from conventional photo editors.

Features worth knowing

Feature What it gives you
Before/after slider Compare the original and enhanced image in real time
Zoom Inspect enhancement results in detail
Multiple enhancement options Different methods produce different results; you pick the best
Multiple result tabs Compare how the same photo looks under each enhancement method
Sharing Send results to social networks, messengers, photo editors, etc., or save to gallery
UI Simple interface, dark mode support, localized in several languages

The multiple-options design matters: because different enhancement methods can produce noticeably different outputs, the app lets you compare them side by side instead of committing to one automatic result.

Availability and cost

The app can be downloaded for free on mobile devices. The available information does not specify in-app purchase pricing, subscription terms, or any login requirement, so those details should be checked directly in the app store listing before you rely on them.

When ihancer is a good fit

  • You have a small, low-resolution photo and want it larger.
  • You have an old or degraded photo you want to restore.
  • You have a blurry or pixelated image, especially one containing faces.
  • You want a fast, one-tap result rather than manual editing.

When it may not be the right tool

  • You need precise control over exposure, color grading, or compositing — a full photo editor is more appropriate.
  • You need to compress an image for the web rather than enhance it; that is a different task with different tools.
  • You need desktop or batch processing workflows; the app is described as a mobile download.

If your photo problem is "it looks bad and I don't know why," ihancer's automatic approach is a reasonable first attempt. If your problem is "I need this exact adjustment," expect to move to a manual editor afterward.

Website Overview

Identifiable technologies and additional version or configuration signals make the service easier to fingerprint, which may help targeted scanners narrow their checks. An active inbound-mail setup with incomplete authentication may leave the domain more open to impersonation. Provider hosting alone does not close that gap.

Domain and Registration

Transfer-protection status is present, helping reduce the risk of unauthorized domain transfers. The domain has about 4 years of registration history; its current configuration provides more context than age alone. The registrar is NameCheap, Inc., a widely used domain service provider. The domain uses the common .com extension, which is not an independent safety signal.

DNS and Email

The observed email authentication setup is incomplete: DMARC is missing. Nameservers are provided by Namecheap, indicating managed DNS hosting. MX records point to the registrar-servers.com email service. No CNAME was found; the observed records resolve directly to addresses. DNSSEC signatures were not detected, so this additional DNS authenticity protection is not confirmed.

TLS and Certificates

The certificate uses an RSA 2048-bit public key, offering broad client compatibility. The server supplied a complete certificate chain. No organization name is present in the certificate; the available fields are consistent with domain validation. The certificate was issued by Let's Encrypt, commonly associated with automated certificate services. The certificate's total validity is about 89 days, consistent with a short renewal cycle.

HTTP and Browser Security

The Server header exposes the software version: nginx/1.18.0 (Ubuntu). This makes version-targeted checks easier, but is not proof of an exploitable vulnerability. The checked browser-security headers were not detected, leaving fewer explicit browser-side safeguards. No X-Powered-By header was found, reducing one common source of backend fingerprinting information. No obvious internal addresses or debug information were found in the headers. No explicit CDN or WAF marker was found in the response headers.

Technology Stack Analysis

The public page identifies nginx 1.18.0, with exact versions exposed for 1 technologies. These details can narrow vulnerability checks, although exposure alone is not a vulnerability.

Search and Social Sharing

No homepage canonical URL was detected. If duplicate URLs exist, consolidation may be less explicit. The title has 31 characters, within a common display range. A meta description is present, with 158 characters. The observed directives allow indexing and link following. No Generator meta tag is publicly exposed.

Hosting and Email

DNSNamecheap
HostingDigitalOcean, LLC
Emailregistrar-servers.com
Approximate IP geolocation (inferred; a CDN or proxy may differ from the origin server) Germany flagFrankfurt am Main, Hesse, Germany Inferred 46.101.134.225

Registration details

RDAP / WHOIS

RegistrarNameCheap, Inc.
Registered2022-03-30
Expires2027-03-30
Domain statusclient transfer prohibited
Nameserversdns1.registrar-servers.com、dns2.registrar-servers.com
DNSSECunsigned

DNS records

DNS

TypeNameValueTTLPriority
Aihancer.com46.101.134.2251799—
MXihancer.comeforward1.registrar-servers.com180010
MXihancer.comeforward2.registrar-servers.com180010
MXihancer.comeforward3.registrar-servers.com180010
MXihancer.comeforward4.registrar-servers.com180015
MXihancer.comeforward5.registrar-servers.com180020
NSihancer.comdns1.registrar-servers.com1800—
NSihancer.comdns2.registrar-servers.com1800—
TXTihancer.comv=spf1 include:spf.efwd.registrar-servers.com ~all1800—

TLS and certificates

TLS / SSL

AssessmentNormal configuration
Supported protocolsTLSv1.2、TLSv1.3
Negotiated protocolTLSv1.3
Certificate subjectihancer.com
IssuerLet's Encrypt
Valid until2026-11-21T08:58 · Remaining when checked: 50 days
Verification detailsCertificate trust: Passed · Hostname match: Passed

HTTP response headers

HTTP

HeaderValue
content-typetext/html
servernginx/1.18.0 (Ubuntu)

Identified technologies

nginx 1.18.0

Pages, Search and Sharing

Meta descriptionihancer is an AI photo enhancer app to enhance photo quality, upscale image resolution, restore old photos, fix pixelated and blurry photos in just a few taps
Canonical URLNot detected
LanguageEnglish (default)
Twitter CardNot detected

Unknown

No sitemaps found

User reviews (0)

  • No reviews yet.