

 Visit website
 Updated: 2026-09-27 03:50
 Language: English (default)
 Access: Normal
 Profile views 1
  Outbound visits 0
 Website Review
What is PicPick?
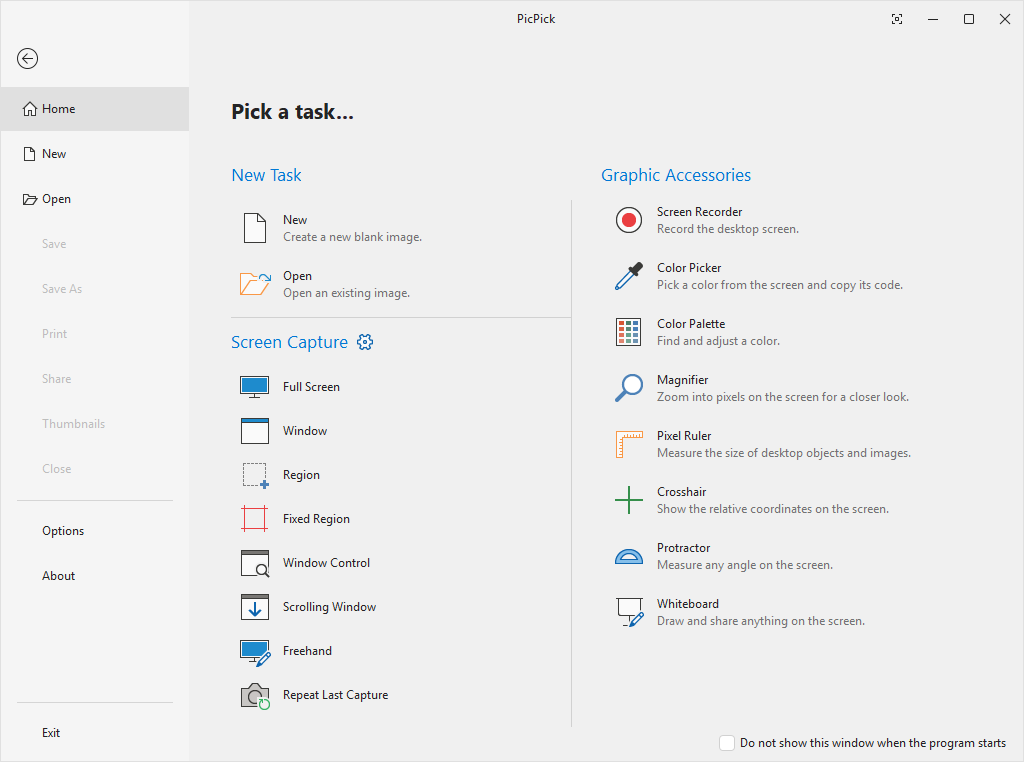
PicPick is a Windows screen-capture and image utility that bundles several everyday screen tools into one program. Rather than installing separate apps for grabbing a screenshot, measuring pixels, or picking a color, you get them in a single interface. The official site describes it as "every screen tool you need, in one place," covering capture, recording, editing, and sharing, plus an image editor, color picker, and pixel ruler: PicPick.
Who it tends to suit
- People who write documentation, tutorials, or bug reports and need annotated screenshots quickly.
- Designers and developers who want an on-screen color picker and pixel ruler without extra utilities.
- Anyone who prefers a lightweight desktop tool over browser-based or cloud screenshot services.
What "all in one" means in practice
The value is convenience: you capture, then edit and annotate in the same app instead of moving files between programs. The trade-off is that a bundled toolkit rarely matches a dedicated professional editor for deep image work, and it is a Windows-oriented desktop app rather than a cross-platform or browser tool.
A concrete scenario
Say you are documenting a UI bug. You capture the region, add arrows and a text callout in the built-in editor, sample the exact hex color of the faulty element with the color picker, and check spacing with the pixel ruler — all without leaving the program.
Next step
Decide based on your platform and depth of need: if you work on Windows and want fast capture-plus-annotation in one place, PicPick fits well; if you need advanced layered editing or macOS/Linux support, pair a simple capture tool with a full editor instead.
How do I capture a scrolling window or full webpage with PicPick?
PicPick handles scrolling capture through its Scrolling Window mode, which stitches a long page into a single image as it scrolls automatically. The usual flow is: open the scrolling capture option from the capture menu, switch to the target window or browser, let the tool scroll and stitch, then review the result in the built-in editor before saving.
A few practical points make it work reliably:
- Select the scrolling area first. Choose either the active window or a drawn region, since the tool needs to know the width and boundaries to stitch correctly.
- Use a browser window with a stable layout. Sticky headers, floating chat widgets, and lazy-loaded images often repeat or appear misaligned in the stitched output.
- Scroll manually if auto-scroll misfires. Some pages with custom scroll containers ignore simulated scrolling; capturing in overlapping sections and stitching manually in the editor is the fallback.
- Check the seam. Zoom into the joins in the editor — that is where duplicated or missing rows show up.
For a concrete scenario: a support agent documenting a long settings page can capture the whole thing in one pass, then use the editor's annotation tools to highlight the exact fields before attaching it to a ticket. Someone archiving a receipt or invoice page gets a single shareable image instead of several screenshots.
If scrolling capture fails on a particular page, the more dependable route is the browser's own full-page screenshot, or a dedicated capture extension — then bring the image into PicPick for editing and annotation. PicPick's strength is the combination of capture, editor, color picker, and ruler in one tool, so the editing step is where it adds value beyond a plain screenshot.
Next step: test scrolling capture on a simple, static page first to confirm your settings, then try the tricky page and inspect the seams.
How does PicPick's color picker work for grabbing exact screen colors?
PicPick's color picker is one of several screen tools bundled into a single utility, alongside capture, recording, editing, and measurement features. The way it works is straightforward: you activate the picker, hover over any pixel on your screen, and it reads the color value under your cursor. That lets you grab an exact color from a website, an image, a PDF, or any other on-screen element without needing the original file.
H3 Practical details worth knowing
- Magnifier-style targeting: Good screen pickers show a zoomed preview near the cursor so you can land on the precise pixel rather than the general area. This matters when you're sampling a thin border, a gradient, or anti-aliased text.
- Multiple color formats: Expect output in formats like HEX, RGB, and HSL. If you're handing a value to a developer, HEX or RGB is usually what they want; HSL is handier if you're adjusting lightness and saturation by hand.
- History and palettes: A picker that keeps a running list of recently sampled colors saves you from re-grabbing the same shades. Some tools let you save swatches for a project.
- Keyboard shortcuts: For repeated sampling, a hotkey that works globally is far more efficient than switching windows.
H3 A concrete scenario
Say you're rebuilding a client's brand assets and only have a screenshot of their logo. You open the picker, hover the magnifier over the logo fill, and read off the HEX value. You sample the accent color and the background separately, note them down, and paste them into your design file. The whole task takes seconds per color.
H3 What to weigh
The main trade-off is between a dedicated picker and an all-in-one suite like PicPick. A standalone picker is lighter, but if you also need screenshots, annotation, and a ruler, consolidating into one tool reduces the number of apps you install and the number of shortcuts you memorize. If you only ever sample colors, a browser extension or a simple picker may be enough.
For a quick comparison, dedicated pickers like ColorPicker or platform tools such as Apple's Digital Color Meter serve narrower needs, while suites like PicPick bundle the picker with capture and editing.
H3 Next step
Install PicPick, bind the color picker to a hotkey you'll remember, and test it on a gradient and on small text to confirm the magnifier gives you the precision you need. If it does, sample your three most-used brand colors and save them as swatches so future projects start faster.
Can I use PicPick to record my screen as a video?
Yes. PicPick includes screen recording alongside its screenshot and image-editing tools, so you can use it to capture your screen as video rather than only as still images.
What that means in practice
- Screen recording sits inside the same toolset as screenshots, the image editor, the color picker and the pixel ruler — you don't need a separate recorder for simple clips.
- A typical use is a short walkthrough: record a few steps in an app, then annotate a still frame in the built-in editor for written instructions.
- It suits quick demos, bug reports and tutorials where you want recording and light editing in one place.
When it may not be enough
If your main need is long-form recording, webcam overlays, streaming, or heavy post-production, a dedicated video editor or streaming tool will usually serve you better. PicPick's strength is bundling everyday screen utilities, not replacing a full video workflow.
Next step: check the recording options in the app — output format, audio capture and region selection — against what your project needs before committing to it. If you only need occasional short clips, PicPick's all-in-one approach is convenient; if video is central to your work, compare it with a dedicated recorder.
How do I edit a screenshot in PicPick's built-in image editor?
Open the screenshot in PicPick's editor after capturing it, then work through the toolbar and panels: crop and resize first, adjust color and exposure next, annotate with arrows, text, and shapes, and finally save or export in your preferred format.
A practical editing order
- Crop and straighten. Trim to the region that matters before anything else; every later adjustment applies to fewer pixels and stays easier to judge.
- Resize for the destination. A screenshot for a bug report, a slide, and a blog post need different dimensions. Decide the target size before annotating, so text and arrows stay legible.
- Fix tone and color. Use brightness, contrast, and saturation controls to make UI text readable, especially for dark-mode captures pasted into light documents.
- Annotate. Add arrows, boxes, highlights, and numbered callouts to point at the exact button or field you mean. Text labels work better than arrows alone when several elements are close together.
- Redact if needed. Blur or black out names, email addresses, tokens, or customer data before sharing.
- Save or export. Keep a lossless copy (PNG) for records and a compressed copy (JPG) when file size matters.
Who this suits
PicPick bundles capture, editing, and screen utilities in one program, so it fits people who take screenshots often and want to avoid switching between a capture tool and a separate editor. If you only annotate a screenshot once a month, a lighter built-in tool may be enough. If you need layered, non-destructive editing or team review workflows, a dedicated graphics editor will serve you better.
Example scenario
You are filing a bug report. Capture the error dialog, crop away the desktop, resize to a reasonable width, draw a red box around the failing field, blur the account email, and save as PNG. That single file communicates the problem without exposing data.
For a second opinion on general screenshot-editing habits, see PicPick and, if you want a comparison point for annotation-focused tools, Greenshot.
What screen tools does PicPick offer besides screenshots, like the pixel ruler?
PicPick's pitch is a single toolkit for everything you do on-screen, not just a screenshot button. Beyond capture and recording, PicPick bundles a set of everyday measurement and editing utilities, with the pixel ruler as one example.
Tools you'd typically find in this kind of suite
- Pixel ruler — measure distances and element sizes directly on screen, handy when checking layout spacing or image dimensions.
- Color picker — sample a color from anywhere on screen and get its value for reuse in design or CSS.
- Image editor — annotate, crop, resize, and add effects to a capture without leaving the app.
- Screen recorder — capture video of on-screen activity, not just stills.
- Sharing/export options — send or save captures to common destinations.
Who gets the most out of it
If you're a designer, developer, or support person who constantly checks pixel gaps, grabs exact hex values, or marks up a screenshot before sending it, keeping these in one app saves switching between separate utilities. A casual user who only needs the occasional screenshot may find a lighter tool sufficient.
A practical next step
Open the ruler and color picker side by side on a real task — for example, measuring a button's padding and grabbing its fill color — and see whether the workflow feels faster than your current combination of tools. That single test tells you more than a feature list.
For comparison, dedicated alternatives exist: ShareX leans heavily into automation and upload workflows, while Snagit focuses on polished capture and annotation.
 Hosting and Email
 NS1
NS1 Hosting
 Netlify
 Google Workspace
 Location
 Ashburn, Virginia, United States
 Pages, Search and Sharing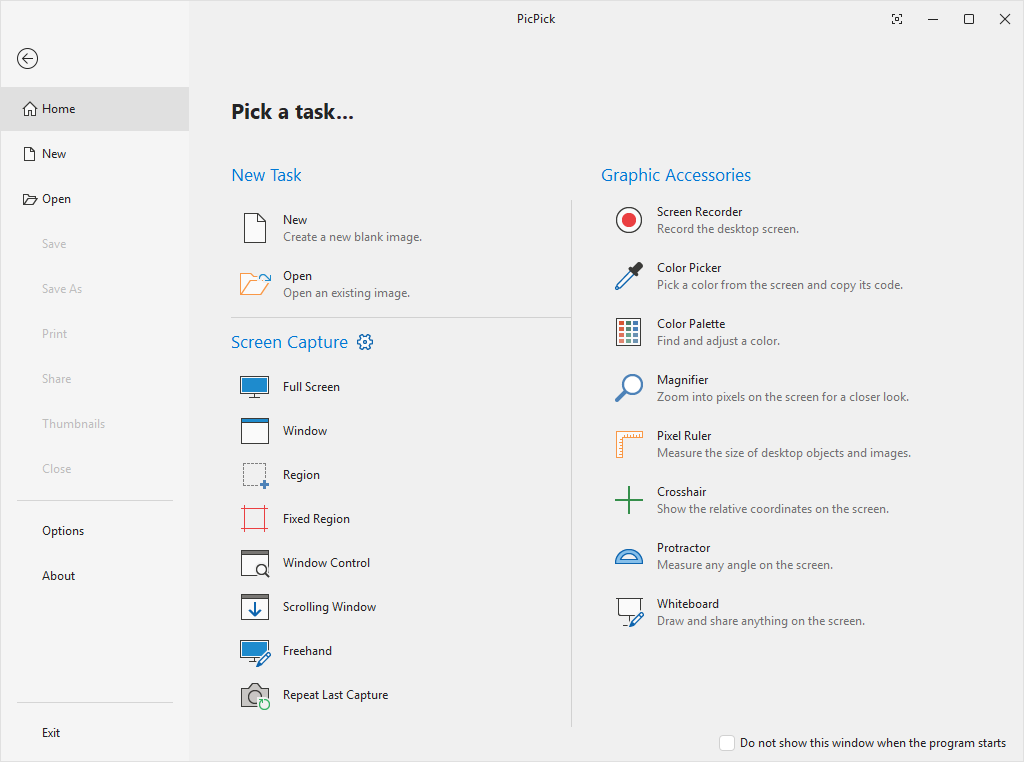



 All bots
 Registration details

 Identified technologies
User reviews (0)