Website profiles · Technology insights · Alternatives

pixel-converter.ameniwa.com

Convert images into pixel art with a retro Windows 95-style interface. 18 color palettes with dithering, a built-in pixel editor, 5 dialog styles, combinable FX, PNG & video export. No AI, no uploads — free, runs in your browser.

No paid content found Multilingual
Visit website
Profile views 2 Outbound visits 1 Normal
Sora's Pixel Converter - Retro Pixel Art Generator Full homepage screenshot

At a glance

Category
Resources & Utilities
Language
English
Paid-content signal
No paid content foundObserved
Registered
2025
Hosting
CloudflareInferred
HTTPS certificate trusted
PassedObserved
Last updated

Website review

This review may include AI-generated content and is not individually verified. Domain, certificate and other facts come from the observed data on this page.

What is Sora's Pixel Converter?

Sora's Pixel Converter is a free browser-based tool that turns ordinary images into retro pixel art. You drop in a photo or illustration, choose a pixel size (2–5 px) and a color palette, and it downsamples the image and maps each pixel to the nearest color in that palette. There is no AI involved, and all processing happens locally in your browser — images are never uploaded to a server.

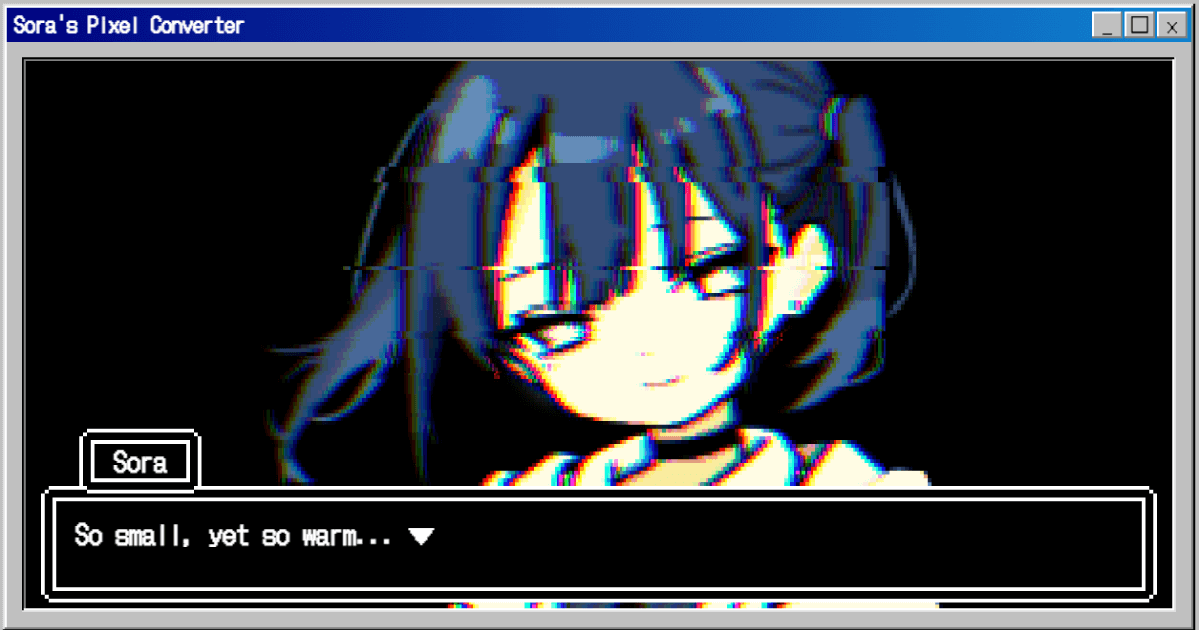
Its distinctive touch is the Windows 95-style interface, which suits the retro theme rather than being purely decorative. Beyond basic conversion, the page lists 18 palettes (including Game Boy, NES, C64, PICO-8 and CGA), Floyd-Steinberg dithering, brightness/contrast/saturation controls, a built-in pixel editor with pen, eraser, fill and eyedropper, five RPG-style dialog overlay styles, and combinable effects such as Glitch and CRT. Results can be saved as PNG or exported as MP4/WebM video, and it works offline as a PWA.

Who it suits

  • Game and pixel-art hobbyists who want quick palette-limited mockups, especially with the console palettes.
  • Creators making retro-styled visuals for thumbnails, social posts or short animated clips with dialog overlays.
  • Anyone who prefers not to upload personal images, since everything stays on the device.

Trade-offs to expect

Automatic palette mapping is fast but coarse; fine details and gradients can collapse, which is why the dithering and erosion controls and the manual editor matter. Output is stylized rather than faithful, so it is not the tool for preserving photographic detail.

A practical next step: start with a small, high-contrast source image, pick the palette that matches your target look (for example Game Boy for a monochrome handheld feel), then adjust pixel size and dithering before touching up in the editor.

How do I convert a photo into Game Boy or NES pixel art for a game project?

Use Sora's Pixel Converter's palette presets rather than hand-matching colors: drop your photo onto the page, choose a pixel size of about 2–5 px, then select the Game Boy or NES palette. The palette step maps each pixel to the nearest color in that set, so the hardware look comes from the palette itself, not from a filter. Adjust dithering and brightness/contrast afterward to control banding and detail.

A practical workflow for a game project

  1. Start from a clean, high-contrast photo. Busy backgrounds turn to noise at low resolution. Crop to the subject first.
  2. Pick the palette to match your target. Game Boy's four-tone green suits monochrome handheld assets; NES gives you a broader, era-correct range for sprites and tiles.
  3. Set pixel size by final display size. A 2–5 px setting is a good starting range; if the art will appear small in-game, favor fewer, larger pixels.
  4. Tune dithering deliberately. Floyd–Steinberg dithering preserves gradients but adds texture that can look muddy when scaled up. For clean sprite reads, reduce it; for backgrounds and skies, keep more.
  5. Touch up in the built-in editor. Use the pen, eraser, fill and eyedropper to fix stray pixels and enforce a readable silhouette—automatic conversion rarely produces animation-ready sprites.
  6. Export PNG for sprites and tiles. Video export is aimed at animated previews with effects and dialog overlays, not game assets.

Trade-offs to weigh

Choice Good for Watch out for
Game Boy palette Monochrome handheld style, cohesive limited art Very few tones; faces and detail collapse
NES palette Varied sprites, tiles, era-accurate color Still limited; gradients need dithering
Heavy dithering Skies, textures, soft shading Looks noisy when upscaled or animated
Light dithering Readable sprites and icons Flat areas can band

Two caveats: converted photos are reference material, not finished sprites—redraw or clean them at your game's native resolution. And check that your chosen palette matches the platform conventions your players expect, since a Game Boy palette on a modern engine reads as a stylistic choice rather than authenticity. Processing stays in the browser, so you can iterate on unreleased art without uploading it.

If you want to compare palette references or pixel-art guidance, Lospec hosts community palette lists you can eyeball against your results.

Can I edit individual pixels and add an RPG dialog overlay after converting an image?

Yes. After conversion, you can open a built-in pixel editor with pen, eraser, fill, eyedropper, and undo/redo, and you can add an RPG-style dialog overlay in one of five styles (Win95 Alert, Terminal, 8bit, 16bit, Retro RPG). You can also export a PNG or a video (MP4/WebM) that animates the effects and dialog.

How this fits a typical workflow

  • Touch-ups after conversion: Convert first, then fix stray pixels, redraw an eye or edge, or recolor a region with fill and eyedropper. This suits people who want a specific look rather than a purely automatic result.
  • Dialogs for scenes: An overlay works well for game mockups, character portraits, or social posts styled as retro RPG screens. Pick the style that matches the palette, since a Win95 Alert reads differently from an 8bit or Retro RPG box.
  • Video export: Use this when the dialog or effects need motion, such as a glitch or CRT look with an animated dialog. For a single still, PNG is the simpler choice.

Practical considerations

  • Pixel size matters for editing: A 2–5 px pixel size changes how much detail survives, so choose it before fine-tuning; otherwise small edits may disappear at a coarser setting.
  • Dithering versus clean edits: Floyd-Steinberg dithering adds texture that can make hand edits look inconsistent. If you plan to touch up many pixels, lower the dithering first, then edit.
  • Palette choice drives the result: With 18 palettes, including Game Boy, NES, PICO-8, C64, and CGA, the palette constrains which colors your edits can use. Pick it early.

A useful first step: convert a test image at your intended pixel size and palette, add the dialog style you like, make one or two edits, then export a short video to check that the dialog animation and effects look right before committing to a final image. The tool runs in the browser at Sora's Pixel Converter, with processing kept local and no uploads.

How do I export my pixel art as a video with CRT or glitch effects?

In Sora's Pixel Converter, the video export is the last step after you've set up the image, effects and any dialog overlay. The tool exports MP4 or WebM with your effects and dialog animation included, so the export captures what you see rather than a still frame.

Steps

  1. Load and convert. Drag an image onto the window (or paste with Ctrl+V / Cmd+V), then choose a pixel size and one of the 18 palettes.
  2. Apply the effects you want in the video. Combine Glitch, CRT, palette cycle, ghost trail or dither fade. If you want motion rather than a static look, palette cycle and ghost trail are the ones that change over time; CRT and Glitch are more about the visual texture.
  3. Add a dialog overlay if the scene needs one. There are five styles (Win95 Alert, Terminal, 8bit, 16bit, Retro RPG), and the dialog animation is included in the video export.
  4. Touch up if needed. The built-in editor (pen, eraser, fill, eyedropper, undo/redo) lets you fix stray pixels before exporting.
  5. Export. Choose video export and pick MP4 or WebM. Use PNG download instead if you only need a still with the pixel window frame.

Practical notes

  • Format choice: MP4 is the safer pick for sharing on social platforms and messaging apps; WebM is smaller and works well for web embedding, but some editors and older players handle it less smoothly.
  • Privacy: Processing runs in the browser and images aren't uploaded, per the tool's description, so you can use personal or client images without a server round-trip.
  • Offline use: It's described as a PWA, so after the first load you can work offline — useful when preparing assets on a laptop without reliable Wi-Fi.
  • Rights: The site states generated images are free to use commercially or non-commercially.

A concrete scenario: an indie developer making a short teaser for a retro-style game can convert a screenshot, apply CRT plus a Retro RPG dialog box, and export a few seconds of WebM for the itch.io page, while exporting MP4 for a social post.

If the export options don't behave as expected, check the tool's own How to Use and FAQ sections on Sora's Pixel Converter for the current wording, since the interface may have changed since this description.

Is it safe to convert private or client images without uploading them to a server?

Yes—with this tool, private or client images can be converted without uploading them to a server. Sora's Pixel Converter states that all processing happens entirely in your browser: images are never uploaded, and no data is stored. That makes it suitable for confidential material such as client photos, unreleased artwork or internal mockups, provided you are working on a device you trust.

What "no upload" actually means in practice

  • The image is read and converted locally by your browser, so the file does not travel to the site's servers.
  • The conversion is a deterministic color-mapping process (downsampling plus nearest-palette-color matching, optionally with Floyd–Steinberg dithering), not AI generation—so nothing is sent to a model service either.
  • Because it is a PWA, it can run offline once loaded, which further reduces network exposure during a session.

Practical caveats

  • Local processing protects the image from being transmitted, but not from everything: browser extensions, a shared or compromised computer, or a synced Downloads folder can still expose files. Use a clean browser profile and save exports to a location you control.
  • If a client contract requires an audited tool or a signed data-processing agreement, a free browser tool—even one that never uploads—may not satisfy that requirement. Check the contract first.
  • Exporting a video (MP4/WebM) keeps the same local-processing model, but the larger file is easier to misplace; name and store exports deliberately.

Decision criterion

If the concern is "does this image leave my machine," this tool's stated design answers it directly. If the concern is "can I prove to a client or auditor how their data was handled," rely on your own device and storage controls, and treat the tool's no-upload design as one supporting factor rather than the whole safeguard.

A useful next step: test with one non-sensitive image first, confirm the export looks right, then process client files in a dedicated browser window with extensions disabled.

Can I use the generated pixel art commercially and offline as a PWA?

Yes. The tool's own About section states that generated images are free to use for any purpose, commercial or non-commercial, and the site describes itself as a PWA that works offline. Both points are stated on the page rather than being conditions you need to apply for.

Commercial use in practice

The relevant permission is broad: no distinction is drawn between personal and paid work. That makes it usable for things like game sprites, stream overlays, shop graphics or client deliverables. Two practical caveats, offered as general advice rather than product rules:

  • Your source image still matters. The tool converts an image you supply; it does not grant rights to that underlying photo or artwork. If you feed in a stock photo or someone else's illustration, clear that separately.
  • Keep a record. For client or commercial work, save the original and the exported PNG together so you can show how the asset was produced.

Offline use as a PWA

Because the page describes the tool as a PWA that works offline, you can install it once while connected and then keep working without a network. That suits a laptop on a train, a studio machine kept off the internet, or a workshop where Wi-Fi is unreliable. Install it before you need it; a first visit still requires a connection.

A sensible next step: open the tool, convert one test image, export the PNG, then disconnect and repeat the process to confirm the palette, editor and export all behave the same offline on your device.

Related questions

More questions →
How to Use Ahrefs for Your First SEO Audit: A Step-by-Step Tutorial

If you're new to Ahrefs and want to run your first SEO audit, the fastest path is: open Site Explorer, enter your target URL, review the Overview for a health snapshot, then dig into Organic Keywords, Top Pages, and Site Audit to find specific problems. From there, build a short prioritized to-do list instead of trying to fix everything at once.

This tutorial walks through that workflow using a realistic starting scenario, explains what the numbers mean, and shows how to turn findings into actions.

Before You Start: Pick a Narrow Scope

A common beginner mistake is auditing an entire large website on day one. The reports become overwhelming, and you can't tell which issues matter.

Instead, choose one of these starting points:

  • A single important page (your homepage or a key product/service page)
  • A small site (under ~50 pages, e.g., a personal blog or small business site)
  • One section of a bigger site (e.g., /blog/)

For this tutorial, assume you're auditing a small business site with about 30 pages. The same steps scale up later.

You'll need an Ahrefs account to follow along. Ahrefs offers paid plans, and pricing and feature limits change over time, so check the current Pricing page for what's included in each tier before committing.

Step 1: Enter Your Target in Site Explorer

Site Explorer is Ahrefs' core tool for analyzing any website or URL.

  1. Open Site Explorer from the top navigation.
  2. In the search box, paste your domain (e.g., example.com).
  3. Choose the Exact URL or Domain mode depending on scope. For a full-site view, use Domain or Prefix; for a single page, use Exact URL.
  4. Press Enter.

You'll land on the Overview report. Don't try to absorb everything — focus on four numbers first.

Reading the Overview Snapshot

Metric What it tells you How to use it
Ahrefs Rank (AR) Relative strength of the site's backlink profile vs. others in the database Useful for comparing against competitors, not as a standalone goal
Organic traffic Estimated monthly visits from search A rough trend indicator, not exact analytics
Organic keywords Estimated number of keywords the site ranks for Shows breadth of visibility
Backlinks / Referring domains Total links and unique sites linking to you Referring domains matter more than raw backlink count

Important caveat: Ahrefs' traffic and keyword numbers are estimates based on its own data. They won't match Google Search Console or your analytics exactly. Treat them as directional, not absolute.

Step 2: See What You Already Rank For

Go to Organic Keywords in the left sidebar. This shows queries where your site appears in search results.

Sort by Traffic (descending) to see which pages bring the most estimated visitors. Then look for:

  • Keywords ranking in positions 4–15 — these are often the easiest wins. A small content or on-page improvement can push them onto page one.
  • Keywords with high volume but low position — potential opportunities if the topic is relevant.
  • Irrelevant keywords — if you rank for something off-topic, it may signal thin or mismatched content.

Write down 5–10 of the position 4–15 keywords. These become your first optimization targets.

Step 3: Find Your Best and Weakest Pages

Open Top Pages. This ranks your URLs by estimated organic traffic.

Look for two things:

  1. Your top performers — understand what topics and formats work. Can you create more content like this?
  2. Pages with traffic but poor rankings — these may need on-page fixes (title, headings, internal links).

If a page gets zero traffic and targets a topic you care about, it's a candidate for a rewrite or consolidation.

Step 4: Run a Technical Site Audit

Now move to Site Audit. This crawls your site and flags technical and on-page issues.

  1. Click Site Audit → New project.
  2. Enter your domain and set crawl settings (default is usually fine for a small site).
  3. Start the crawl and wait for it to finish.

Once complete, you'll see a Health Score and a list of issues grouped by category.

Which Issues to Fix First

Not all issues are equal. Prioritize in this order:

Priority Issue type Why it matters
1 Broken links (404s) Bad for users and crawl efficiency
2 Pages blocked from indexing They can't rank at all
3 Missing or duplicate title tags Directly affects click-through and relevance
4 Slow-loading pages Affects experience and rankings
5 Thin content Low value to users and search engines

Ignore low-impact warnings (like minor meta description length) until the big items are handled.

Step 5: Turn Findings Into a To-Do List

You now have raw data. Convert it into a short, actionable list. Example:

  1. Fix 3 broken links found in Site Audit.
  2. Rewrite title tags on 5 pages with duplicate titles.
  3. Improve 4 pages ranking in positions 6–12 by adding missing subtopics and internal links.
  4. Remove or update 2 thin pages with no traffic.

Keep the list to 5–10 items max for your first audit. Finishing a short list beats starting a long one.

Common Beginner Mistakes

  • Chasing every red flag. Site Audit flags many minor issues. Fix what affects rankings and users first.
  • Trusting estimates as exact numbers. Ahrefs data is modeled, not measured from your analytics.
  • Auditing a huge site too early. Start small to learn the interface.
  • Ignoring search intent. A page can be technically perfect but still fail if it doesn't match what searchers want.
  • Forgetting to re-crawl. After fixes, run Site Audit again to confirm improvements.

Where to Go Next

Once your first audit is done:

  • Compare with competitors using Site Explorer's Competing Domains and Content Gap reports.
  • Track keyword rankings over time with Rank Tracker.
  • Explore backlink opportunities in the Backlinks and Link Intersect reports.
  • Set up recurring Site Audit crawls so new issues surface automatically.

Your first audit isn't about perfection — it's about building a repeatable habit: enter a target, read the key reports, pick the highest-impact fixes, and act. Do that once a month and your site's health compounds.

Which Color Palettes and Dithering Options Does Sora's Pixel Converter Offer?

Sora's Pixel Converter offers 18 color palettes and adjustable Floyd-Steinberg dithering. The palette decides which colors your image can use; dithering decides how the tool blends between them. Together they set the overall look, and you can fine-tune further with line erosion and brightness, contrast, and saturation controls. All processing runs in your browser, and the tool is free to use.

The 18 Palettes

The palettes are named after classic hardware, print styles, and moods:

Palette Character
Sora The tool's default palette
Game Boy Green-tinted handheld look
NES NES-era console colors
CGA Early PC color set
C64 Commodore 64 colors
PICO-8 Fantasy-console palette
Sweetie 16 Soft 16-color set
Pastel Muted, light tones
Mono Single-tone grayscale
Sepia Warm brown tones
Sunset Warm orange/pink range
Ocean Blue/teal range
Earth Natural brown/green range
Sakura Pink blossom tones
Cyber Neon, high-contrast look
Horror Dark, desaturated tones
RISO Risograph-style print colors
CMYK Print-style four-color set

How the palette is applied

Each pixel in your downsampled image is mapped to the nearest color in the selected palette (color approximation). No AI is involved. This means a photo with smooth gradients will show visible banding once reduced to, say, the Game Boy palette — that is expected, and dithering is the main tool for softening it.

Dithering and Related Controls

Floyd-Steinberg dithering is adjustable. It scatters pixels between the nearest palette colors so gradients read as texture instead of hard bands. More dithering gives a grainier, more "retro print" feel; less keeps edges cleaner but shows more banding.

Two other controls change the result alongside dithering:

  • Line erosion thins or removes fine lines, which helps busy photos look cleaner at low resolution.
  • Brightness / contrast / saturation shift the image before palette mapping, so they change which palette colors get picked.

Choosing settings by goal

  • Clean, readable sprites or logos: low dithering, moderate erosion, a limited palette like Mono or Game Boy.
  • Photo-like pixel scenes: higher dithering, low erosion, a wider palette like Sweetie 16 or Sora.
  • Stylized moods: pick a themed palette (Cyber, Horror, Sakura, Sunset) and adjust saturation to push or pull the effect.

Trying It Out

  1. Drag and drop an image, click to select a file, or paste with Ctrl+V / Cmd+V.
  2. Set pixel size (2–5 px) and pick a palette.
  3. Adjust dithering, erosion, and brightness/contrast/saturation.
  4. Optionally add an RPG-style dialog overlay (5 styles), touch up pixels in the built-in editor, or combine effects like Glitch, CRT, and palette cycle.
  5. Download a PNG or export a video (MP4/WebM) with effects and dialog animation.

Because everything runs locally, you can experiment with palettes and dithering freely without uploading anything. The interface is available in 10 languages, including English, Japanese, Korean, and Simplified Chinese.

Can You Edit and Export Pixel Art Videos with Sora's Pixel Converter?

Yes. Sora's Pixel Converter includes a built-in pixel editor and can export both still images and video. After converting an image, you can touch up individual pixels with a pen, eraser, fill, and eyedropper tool (with undo/redo), add one of five RPG-style dialog overlays, and combine visual effects like Glitch and CRT. You can then download a PNG with a pixel window frame or export an MP4/WebM video that includes the effects and dialog animation. The site states that generated images are free to use for any purpose, commercial or non-commercial.

What the built-in editor lets you change

The editor works on the converted pixel art, not the original photo. Per the site's feature list, it provides:

  • Pen — draw individual pixels in the selected palette color
  • Eraser — remove pixels
  • Fill — flood an area with a color
  • Eyedropper — pick a color already in the image
  • Undo/redo — step backward or forward through edits

This is useful for fixing stray pixels from dithering or cleaning up edges before export. The editor is optional; you can skip it and export the automatic conversion directly.

Adding dialog overlays and effects before export

Two optional layers sit on top of the pixel art:

Layer Options Notes
Dialog overlays Win95 Alert, Terminal, 8bit, 16bit, Retro RPG RPG-style text boxes; animated in video export
Visual effects Glitch, CRT, palette cycle, ghost trail, dither fade Can be combined

Effects and dialog animation are what make the video export different from a static PNG — the site describes video export as including "effects and dialog animation."

Exporting: PNG vs. video

  • PNG — downloads the pixel art with a pixel window frame. Best for a single still, a sprite, or an avatar.
  • Video (MP4/WebM) — exports the image with effects and dialog animation applied. Best when you want motion, such as a glitch loop or an animated dialog box.

Choose PNG if you only need a static result; choose video if the effect or dialog animation is the point. The site does not list resolution, frame rate, or file-size limits for either format, so check the exported file if those matter for your use.

A practical workflow

  1. Drag and drop an image, click to select a file, or paste with Ctrl+V / Cmd+V.
  2. Set pixel size (2–5 px) and pick one of 18 palettes (e.g., Game Boy, NES, PICO-8).
  3. Adjust dithering (Floyd-Steinberg), line erosion, and brightness/contrast/saturation.
  4. Optionally add a dialog overlay and combine effects.
  5. Touch up pixels in the built-in editor.
  6. Download as PNG or export as MP4/WebM.

Privacy and usage terms

All processing happens in the browser; the site states images are never uploaded to a server and no data is stored. It also states generated images are free to use for commercial or non-commercial purposes. The tool is described as free and works offline as a PWA, and the interface is available in 10 languages, including English and Simplified Chinese.

What Is Sora's Pixel Converter and What Can You Do With It?

Sora's Pixel Converter (pixel-converter.ameniwa.com) is a free browser-based tool by Ameniwa that turns any image into retro pixel art. You drag in a photo, choose a pixel size and one of 18 color palettes, then fine-tune the result with dithering and color controls before exporting a PNG or a short video. It suits anyone who wants quick, stylized pixel art without installing software or sending files to a server — and it is not an AI image generator.

What the tool actually does

The conversion is a classic image-processing pipeline, not a generative model. Your image is downsampled to a coarser grid, and each resulting pixel is mapped to the nearest color in the palette you picked. Optional Floyd-Steinberg dithering mixes neighboring colors to fake in-between shades, which is why Game Boy or NES palettes can still show gradients.

Everything runs locally in your browser. According to the site, images are never uploaded and no data is stored, so it is a reasonable choice for personal photos you would rather not hand to a cloud service.

Core capabilities

Feature What you get
Pixel size Adjustable 2–5 px grid
Palettes 18 options, including Game Boy, NES, CGA, C64, PICO-8, Sweetie 16, Mono, Sepia, Cyber, Horror, RISO, CMYK
Tuning Floyd-Steinberg dithering, line erosion, brightness / contrast / saturation
Editor Built-in pixel editor with pen, eraser, fill, eyedropper, undo/redo
Overlays 5 RPG-style dialog styles (Win95 Alert, Terminal, 8bit, 16bit, Retro RPG)
Effects Glitch, CRT, palette cycle, ghost trail, dither fade — combinable
Export PNG with a pixel window frame; MP4/WebM video with effects and dialog animation
Offline Installable PWA that works without a connection

How to use it, step by step

  1. Load an image. Drag and drop it onto the window, click to browse for a file, or paste from the clipboard with Ctrl+V / Cmd+V.
  2. Set the pixel size between 2 and 5 px. Smaller values keep more detail; larger values give a chunkier, more readable retro look.
  3. Pick a palette. Start with Game Boy or PICO-8 for a recognizable console feel, or Mono and Sepia for a cleaner vintage print look.
  4. Tune the output. Raise dithering if flat areas look banded; use erosion to thin noisy outlines; adjust brightness, contrast, and saturation if the palette mapping crushes shadows.
  5. Add extras if you want them. Apply a dialog overlay, combine effects like Glitch and CRT, or touch up individual pixels in the editor.
  6. Export. Download a PNG, or render a video if you used effects or animated dialog.

How to check it worked: the preview should show hard-edged blocks of palette colors with no smooth gradients, and the exported PNG should match the preview at full size. If the image looks muddy, the usual culprits are too small a pixel size for a busy photo, or a palette with very few colors — try a larger pixel size or a richer palette such as Sweetie 16.

Who it is for — and when to look elsewhere

It fits well if you want a fast, private, no-signup way to make pixel-art versions of images, game-style dialog mockups, or short looping clips with CRT or glitch effects. The built-in editor means you can fix small artifacts without opening a second program.

It is a weaker fit if you need AI-style restyling, high-resolution output, batch processing of many files, or precise color management — the palette mapping is approximate by design, and the site describes no batch or color-profile features. The interface is in English by default but available in 10 languages, including Simplified and Traditional Chinese, Japanese, Korean, Spanish, French, German, Portuguese, and Indonesian.

The site presents the tool as free and states that generated images can be used for any purpose, commercial or not. No pricing page or account requirement is mentioned in the available material, so treat those terms as the site's own statement rather than a verified license.

How to Convert an Image into Pixel Art with Sora's Pixel Converter

Open pixel-converter.ameniwa.com in your browser, load an image by drag-and-drop, file picker, or Ctrl+V / Cmd+V paste, then pick a pixel size (2–5 px) and one of 18 palettes. Adjust dithering, line erosion, and brightness/contrast/saturation until the preview looks right, and download a PNG or export an MP4/WebM video. Everything runs locally in the browser — the site states images are never uploaded and no data is stored — so it works for any image you don't want to send to a server. No account or install is needed; the tool is a PWA and can run offline after it loads.

Before you start

  • A modern browser on desktop or mobile. The interface is styled like Windows 95, but it's a web app.
  • The image you want to convert, as a file or on your clipboard.
  • A rough idea of the look you want: chunky low-res sprite, Game Boy green, NES-limited colors, or a glitchy CRT screen. That decides your pixel size and palette.

Step-by-step conversion

1. Load the image

Three ways, per the site's How to Use section:

  1. Drag and drop the image file onto the window.
  2. Click to select a file from your device.
  3. Paste from the clipboard with Ctrl+V (Windows/Linux) or Cmd+V (Mac).

Expected result: the image appears in the editor canvas, ready to be downsampled.

2. Set pixel size and palette

  • Pixel size (2–5 px): smaller values keep more detail; larger values give a chunkier, more retro block look. Start at 3 px and adjust.
  • Palette: choose from 18 options, including Sora, Game Boy, NES, CGA, C64, PICO-8, Sweetie 16, Pastel, Mono, Sepia, Sunset, Ocean, Earth, Sakura, Cyber, Horror, RISO, and CMYK.

The conversion works by downsampling the image and mapping each pixel to the nearest color in the selected palette (color approximation). No AI is involved, so results are predictable and repeatable.

Expected result: the preview redraws in the chosen palette at the chosen block size.

3. Fine-tune the look

Use these controls to fix common problems:

Control What it changes When to reach for it
Floyd-Steinberg dithering Mixes palette colors in a pattern to fake in-between shades Gradients look banded or flat
Line erosion Thins or removes fine line detail Outlines get noisy or too heavy at low resolution
Brightness / contrast / saturation Overall tone before palette mapping The image reads too dark, washed out, or dull after conversion

Expected result: a cleaner pixel version with fewer stray colors and readable shapes.

4. Optional: edit pixels by hand

The built-in pixel editor has pen, eraser, fill, eyedropper, and undo/redo. Use it to clean up a face, fix a stray block, or redraw a small detail the automatic conversion got wrong.

5. Optional: add dialog overlays and effects

  • Dialog overlays (5 styles): Win95 Alert, Terminal, 8bit, 16bit, and Retro RPG — useful for game-style screenshots or social posts.
  • Combinable effects: Glitch, CRT, palette cycle, ghost trail, and dither fade. These can be stacked.

Expected result: the preview shows the overlay and effects composited on the pixel art.

6. Export

  • PNG: downloads the still image with a pixel window frame.
  • Video (MP4/WebM): exports with effects and dialog animation applied.

Expected result: a file saved to your device, ready to post or use in a project. The site states generated images are free to use for any purpose, commercial or non-commercial.

Verify it worked

  • Check the downloaded PNG at 100% zoom: blocks should be crisp, with no blurry resampling.
  • Confirm the palette matches what you selected (e.g., Game Boy output should be green-toned).
  • For video, play the file and confirm the dialog animation and effects move as previewed.

Common snags

  • Paste does nothing: click inside the page first so the browser routes the paste to the app, then try Ctrl+V / Cmd+V again.
  • Result looks muddy: raise contrast slightly and lower pixel size to 2 px, or switch to a palette with more colors (Sweetie 16, PICO-8).
  • Gradients look striped: that's dithering working as intended; reduce it if you want flatter bands.
  • Offline use: the app is a PWA, so load it once while online, then it can work offline — but a first visit still needs a connection.

When this tool fits — and when it doesn't

Choose Sora's Pixel Converter when you want a quick, private, browser-only conversion with strong retro palette control and no sign-up. It's less suited if you need AI upscaling or style transfer (it explicitly uses none), or if you need precise per-pixel control beyond the small built-in editor. For a one-off sprite, a game-jam asset, or a retro-styled social image, the drag-drop → palette → export flow takes a couple of minutes.

Website Overview

An active inbound-mail setup with incomplete authentication may leave the domain more open to impersonation. Provider hosting alone does not close that gap.

Domain and Registration

Transfer-protection status is present, helping reduce the risk of unauthorized domain transfers. The domain has about 1 years of registration history; its current configuration provides more context than age alone. The registrar is Cloudflare, Inc., a widely used domain service provider. The domain uses the common .com extension, which is not an independent safety signal.

DNS and Email

The observed email authentication setup is incomplete: DMARC is missing. Nameservers are provided by Cloudflare, indicating managed DNS hosting. MX records point to the ameniwa.com email service. No CNAME was found; the observed records resolve directly to addresses. TXT records include verification markers for Google. Such markers may also remain after a service stops being used.

TLS and Certificates

The public key uses EC with 256 bits. The server supplied a complete certificate chain. No organization name is present in the certificate; the available fields are consistent with domain validation. The certificate was issued within the Google Trust Services cloud or CDN ecosystem. The certificate's total validity is about 90 days, consistent with a short renewal cycle.

HTTP and Browser Security

The response lacks these common security headers: HSTS, CSP, Permissions-Policy, clickjacking protection. CORS permits any origin to read this response. This is common for public resources; sensitive responses need narrower handling. No X-Powered-By header was found, reducing one common source of backend fingerprinting information. The cf-ray response header indicates a CDN or caching proxy in the delivery path. No obvious internal addresses or debug information were found in the headers.

Technology Stack Analysis

The public page identifies Cloudflare without precise versions, leaving fewer clues for version-specific scanning.

Search and Social Sharing

The meta description has 229 characters and may be shortened in search results. Twitter Card metadata is configured. JSON-LD includes Product or Offer data, potentially supporting eligible product search features. The page declares 11 language or regional alternatives using hreflang. The title has 50 characters, within a common display range.

Hosting and Email

DNSCloudflare
HostingCloudflare
Emailameniwa.com
Approximate IP geolocation (inferred; a CDN or proxy may differ from the origin server) Location unknown Inferred 104.21.26.147

Registration details

RDAP / WHOIS

RegistrarCloudflare, Inc.
Registered2025-02-06
Expires2028-02-06
Domain statusclient transfer prohibited
Nameserversmarjory.ns.cloudflare.com、yew.ns.cloudflare.com
DNSSECunsigned

DNS records

DNS

TypeNameValueTTLPriority
Apixel-converter.ameniwa.com104.21.26.147300—
Apixel-converter.ameniwa.com172.67.136.132300—
AAAApixel-converter.ameniwa.com2606:4700:3033::6815:1a93300—
AAAApixel-converter.ameniwa.com2606:4700:3033::ac43:8884300—
MXameniwa.comdmail.ameniwa.com30010
NSameniwa.commarjory.ns.cloudflare.com86400—
NSameniwa.comyew.ns.cloudflare.com86400—
TXTameniwa.comgoogle-site-verification=9rVtZ3muEAn5ue_a52BjgYlF2_XXeKNjE6UpiurOURs300—
TXTameniwa.comv=spf1 include:kagoya.net ~all300—

TLS and certificates

TLS / SSL

AssessmentNormal configuration
Supported protocolsTLSv1.2、TLSv1.3
Negotiated protocolTLSv1.3
Certificate subjectpixel-converter.ameniwa.com
IssuerGoogle Trust Services
Valid until2027-01-07T17:08 · Remaining when checked: 81 days
Verification detailsCertificate trust: Passed · Hostname match: Passed

HTTP response headers

HTTP

HeaderValue
content-typetext/html; charset=utf-8
cache-controlpublic, max-age=0, must-revalidate
servercloudflare
x-content-type-optionsnosniff
referrer-policystrict-origin-when-cross-origin
access-control-allow-origin*

Identified technologies

Cloudflare

Pages, Search and Sharing

Meta descriptionConvert images into pixel art with a retro Windows 95-style interface. 18 color palettes with dithering, a built-in pixel editor, 5 dialog styles, combinable FX, PNG & video export. No AI, no uploads — free, runs in your browser.
Canonical URLhttps://pixel-converter.ameniwa.com/
LanguageEnglish (default) · Multilingual
Twitter Cardsummary_large_image
All bots 1 allowed · 0 disallowed
  • Allow/

User reviews (0)

  • No reviews yet.