Website profiles · Technology insights · Alternatives

screenshot-studio.com

Free browser editors for screenshots, code images, tweet images, and App Store screenshots, plus image tools that compress, convert, and resize without uploading. No signup, no watermark.

Resources & Utilities Image Editingscreenshot editor online freefree screenshot editoronline screenshot editorscreenshot beautifierscreenshot editor
More topics (68)
screenshot studiofree image editoronline image editorpika style alternativeshots.so alternativescreenshot mockup toolbrowser mockup generatorwindow mockup generatorscreenshot wrappermockup screenshotmockup onlinemockup screenmockups uimockup ui uxapp mockup generatorui mockup generatorshots app alternativeshots net alternativemoqups alternativepreviewed app alternativeappshots alternativegoodmockups alternativemockup me alternativebest screenshot editor onlinescreenshot editor without watermarkscreenshot editor online free without watermarkscreenshot editor no downloaduizard screenshot editor alternativemockup generatorfree mockup generatormockup generator freemockup online generatormockup online editormockup editor online freemockup design onlinemockup free onlinefree online mockup generator no watermarkfree mockup generator without watermarkwebsite mockup generatorfree website mockup generatorwebsite mockup generator from urllaptop mockup generatorproduct mockup generatorfree online 3d mockup generatorbest mockup generatorbest online mockup generatormockup appsocial media graphics makerimage background editorscreenshot animation makerbrowser frame screenshotscreenshot with gradient backgroundmac window screenshot mockupproduct screenshot toolSaaS screenshot makerapp screenshot makerdeveloper portfolio imagestwitter card generatorInstagram post creatorLinkedIn banner makerfree design tool no signupbeautify screenshots onlineadd background to screenshotscreenshot to video converterscreenshot padding and shadow toolscreenshot border radius editorfree online screenshot beautifierimage presentation maker
No paid content found
Visit website
Profile views 3 Outbound visits 0 Normal
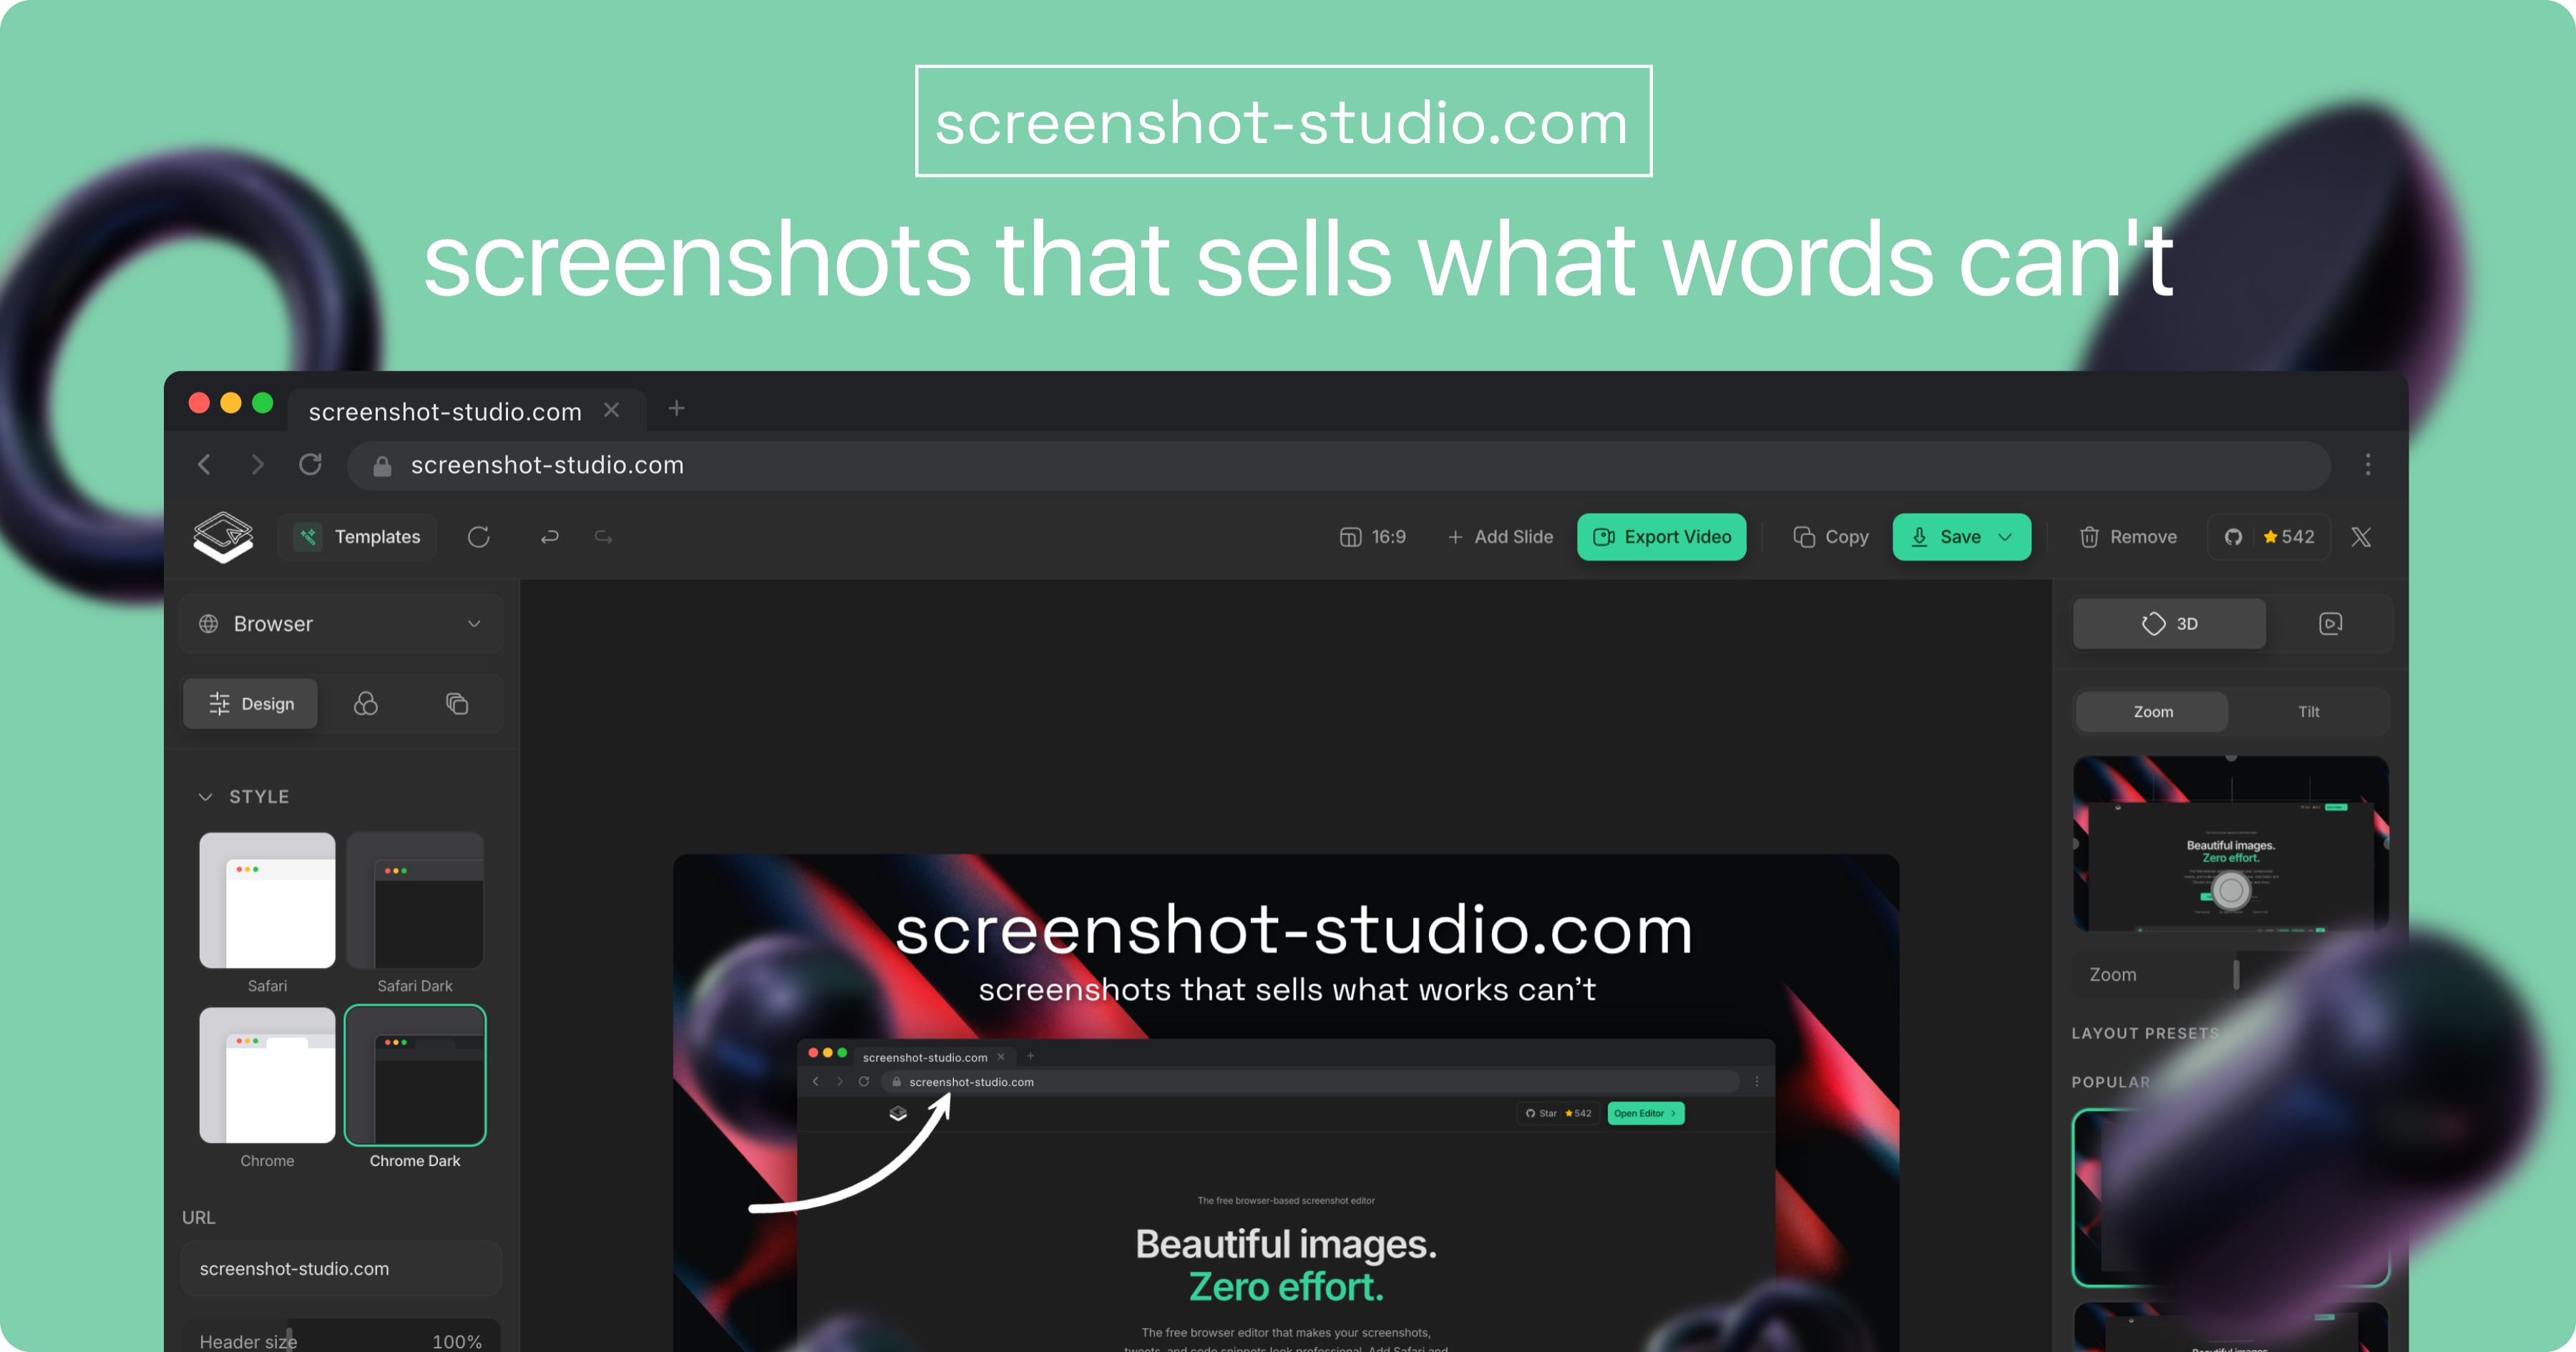
Screenshot Studio Full homepage screenshot

At a glance

Category
Resources & Utilities
Language
English
Paid-content signal
No paid content foundObserved
Registered
2026
Hosting
VercelInferred
HTTPS certificate trusted
PassedObserved
Last updated

Website review

This review may include AI-generated content and is not individually verified. Domain, certificate and other facts come from the observed data on this page.

What is Screenshot Studio?

Screenshot Studio is a free, browser-based image editor focused on turning plain screenshots into polished visuals. You drop in a screenshot, place it on one of 250+ backgrounds, wrap it in a browser or device frame (Safari, Chrome, iPhone, MacBook), tilt it in 3D, and export as PNG, JPEG, or WebP at up to 5× resolution. The same editor can animate the result and export MP4, WebM, or GIF.

It also bundles several focused editors and quick tools:

  • Screenshot editor — backgrounds, frames, shadows, 3D tilt, image or video export.
  • Code-to-image — paste code, pick from 14 themes across 20 languages, download a clean image.
  • Post-to-image — paste an X post link, choose light or dark, get a shareable image.
  • App Store screenshots — app screens in phone frames with short headlines, sized for the store.
  • Quick image fixes — compress, convert, resize, crop, rotate, and remove backgrounds.

Two things matter for most people deciding whether to use it. First, editing happens in your browser: imported images are read and drawn on a canvas in the tab rather than uploaded, and the quick tools run on the browser's own image APIs so files go from disk to downloads folder without touching a server. Second, every export is re-encoded from pixels, which strips EXIF data such as camera model and GPS location before you share. Some features, like capturing a screenshot from a URL, do need the network. There is no signup, no watermark, and no paid tier, and the project is open source under Apache 2.0.

A practical next step: if you write documentation or post developer content, start with the code-to-image editor — paste a snippet, pick a theme, and export. If you are preparing a landing page or slide, use the main editor and export at 2× or 3× so the image stays sharp on high-density displays. For a fair comparison, look at Shots.so and Pika, which occupy similar screenshot-beautifier territory; the trade-off here is that Screenshot Studio leans on local, no-account processing rather than cloud storage or team features.

How do I use Screenshot Studio to make a screenshot look professional for a landing page or social post?

Open the editor, drop in your screenshot, and work through four layers: background, frame, depth, then export size.

The workflow

  1. Background. Choose from the 250+ background options and set padding around the screenshot so it isn't edge-to-edge. A soft gradient or solid brand color reads as intentional; a busy photo competes with your UI.
  2. Frame. Wrap the shot in a Safari or Chrome window frame for web products, or an iPhone or MacBook mockup for mobile apps. Frames tell the viewer what they're looking at before they read a caption.
  3. Depth. Add a shadow, or tilt the image in 3D if you want a more dynamic social crop. Keep tilt subtle — on a landing page, a heavily rotated screenshot makes text harder to read.
  4. Export. PNG, JPEG, and WebP are available at up to 5x resolution. Use 2x for a landing page hero, and export a tighter crop for social where the image is viewed small.

Matching format to placement

Placement What to favor
Landing page hero Wide padding, browser frame, 2x PNG or WebP, minimal tilt
Feature section Cropped to the relevant UI area, light shadow, no frame needed
Social post Squarer crop, stronger background, 3D tilt works better here
README or docs Plain frame, light/dark background matching the repo theme

For social, the same editor exports MP4, WebM, and GIF, so a short screen recording can become a looping clip instead of a static image.

A concrete example

A product manager wants a hero image for a scheduling app. She captures the week view, drops it on a muted gradient, adds a Chrome frame, sets a soft shadow, exports at 2x WebP, then makes a second version with an iPhone frame and a slight tilt for the launch post.

Two things worth knowing

Editing happens in the browser tab — images are drawn to a canvas locally, and drafts stay in your own browser storage. Exports are re-encoded from pixels, which strips EXIF data like camera model and GPS location, so screenshots shared publicly don't leak that metadata. A few features, such as capturing a screenshot from a URL, do require a network connection.

If you want alternatives to compare against, Shots and Pika cover similar screenshot-beautifying ground.

Next step: decide your single most important placement first — landing page or social — and export one version sized for it rather than trying to make one image serve both.

Can I use Screenshot Studio without uploading my images to a server?

Yes. Screenshot Studio is built so that the image you import is read by your browser and drawn on a canvas inside the tab, rather than sent to a server for editing. Drafts are kept in your own browser storage. The quick tools — compress, convert, resize, crop and rotate — also run in the page using the browser's image APIs, so files move from your disk to your downloads folder without passing through a server. As a side effect, every export is re-encoded from pixels, which strips EXIF metadata such as camera model and GPS location. The site notes that a few features do require a network connection, one example being capturing a screenshot from a URL.

What this means in practice

A useful scenario: you have a dashboard screenshot containing customer names, internal hostnames or an API key in a corner. You want to drop it onto a background and add a browser frame for a slide deck. With a browser-local editor, the sensitive pixels stay on your machine, and the re-encode on export removes location and device metadata before the file is shared. That is a meaningful difference from tools that require an account and process uploads server-side.

Two caveats worth planning around:

  • Browser storage is not a backup. Drafts saved locally can disappear if you clear site data, use private browsing, or switch machines. Export finished images rather than relying on drafts.
  • URL-based capture is the exception. If a feature has to fetch a page, that request leaves your device. For anything confidential, use a screenshot you took yourself instead.

How to check any editor's privacy claim

The claim "no upload" is easy to verify in a minute. Open your browser's developer tools, switch to the Network tab, and watch requests while you import an image and export it. A local editor shows no request carrying your file; you may still see page assets loading. If you see a large POST as soon as you drop the file in, the edit is happening remotely regardless of what the page says.

For comparison, Squoosh is a well-known browser-based image compressor that likewise processes files locally. If your workflow is mostly screenshots for documentation, Carbon creates code images in the browser, though it renders text rather than editing your own captures. Screenshot Studio's distinguishing point is combining the framing and background work with the utility tools in one place, without a signup or watermark.

What tools does Screenshot Studio offer for turning code snippets or X posts into shareable images?

Screenshot Studio offers two focused, single-purpose editors for this: one that turns pasted code into a clean image, and one that turns a link to a post on X into a clean image. Both run in the browser, need no signup, and add no watermark.

Code-to-image editor

Paste your code, choose a color theme, and download a shareable image. The page describes 14 themes and 20 supported languages, which covers the common cases for README banners, documentation, slide decks and social posts.

Concrete use: a developer pasting a short function into a README or a conference slide wants the syntax highlighted and the surrounding whitespace controlled, without screenshotting an IDE and cropping it by hand. The theme picker is the main lever; a dark theme usually reads better on social feeds, a light theme on printed or light-background pages.

X post-to-image editor

Paste a link to a post on X, pick light or dark, and download a clean image. This is useful when you want to quote a post in a blog article, a newsletter or a slide without embedding a live widget that may load slowly, change, or get deleted.

One practical caveat: a static image freezes the post's numbers at the moment you capture it, so treat it as a snapshot rather than a live citation. If the post matters as evidence, keep the link alongside the image.

Which to use

Goal Editor Main choice you make
Share a snippet of code Code editor Color theme
Quote a post from X Post editor Light or dark
Both plus framing, backgrounds, mockups Main screenshot editor Background, frame, export format

The main editor is the fallback when you want more than a plain export: backgrounds, browser or device frames, 3D tilt, and export at up to 5x resolution in PNG, JPEG or WebP, or as MP4, WebM and GIF. Note that the code and post editors are the streamlined path; the main editor is where you go once you need styling or motion.

A quick decision rule: if the image only needs to be legible and on-brand, use the dedicated editor. If it needs to sit inside a product page, a device mockup or an animated demo, start in the main editor instead.

Next step: open the code editor with a short snippet first to check how the theme renders your language, then apply the same theme to longer excerpts for consistency across a README or slide deck.

How do I create App Store screenshots with phone frames and headlines using Screenshot Studio?

Open the Make App Store screenshots editor on Screenshot Studio, drop in a raw app screen, choose a phone frame, add a short headline above or below the device, then export at the size the App Store requires. The page describes this as a focused editor for putting app screens in phone frames with short headlines sized for the App Store, so you are not assembling frames and captions by hand in a general design tool.

A workable sequence

  1. Prepare the raw screens first. Capture the actual app UI at a clean state (no debug banners, no empty states unless intentional). The editor frames the image; it does not fix a cluttered screen.
  2. Open the App Store screenshot editor and add one screen per canvas rather than stacking several into one image.
  3. Pick the phone frame. This gives each screen a consistent device shell so a set of screenshots reads as one family rather than unrelated images.
  4. Write the headline. Keep it to a few words that name the benefit, not the feature. "Plan your week" tells a shopper what they get; "Calendar view" only describes the screen.
  5. Repeat with the same frame, type scale and background across every screenshot in the set. Consistency is what makes a store listing look deliberate.
  6. Export and check the result at thumbnail size. Store listings are often seen small, so if the headline is unreadable when scaled down, shorten it.

Decide before you start

If your goal is… Do this
A coherent set of store images Fix one frame, one background and one headline position, then only change the screen and the words
A single hero image for a landing page Use the same editor but allow a larger headline and more decorative background
Quick one-off capture Use the Edit a screenshot editor instead; the App Store editor is for structured sets

Practical notes

The page states the main editor supports 250+ backgrounds, browser and device frames, 3D tilt, and export to PNG, JPEG and WebP at up to 5x resolution, plus animated export to MP4, WebM and GIF. It also states images are edited on your device in the browser and that export re-encodes the pixels, which strips EXIF data such as camera model and GPS location. That matters for App Store work because you are handling unreleased UI: nothing is uploaded for editing, and drafts stay in your own browser storage. The page notes a few features do need the network, such as capturing a screenshot from a URL.

One trade-off worth knowing: a browser editor gives you speed and no signup, but you give up shared team libraries and version history that a paid design suite provides. For a small team shipping a handful of screens, that is usually a fair swap.

If you want to compare approaches, Apple's App Store publishes the current screenshot size requirements, and Shots and Pika are other browser-based screenshot beautifiers in the same category.

Is Screenshot Studio really free with no signup or watermark, and can I export at high resolution?

Yes. According to the site itself, Screenshot Studio is free with no signup, no watermark and no paid tier, and it exports PNG, JPEG and WebP at up to 5x resolution. The same editor also exports MP4, WebM and GIF for animated results.

What "free, no signup" actually means here

The practical value is not just the price. Because the editor runs in your browser and images are drawn to a canvas in the tab rather than uploaded for editing, you can drop in a client mockup, an internal dashboard screenshot or an unreleased app screen without it leaving your machine. Drafts are saved in your own browser storage, so a refresh does not necessarily lose your work. Note the one caveat the site gives: a few features do need the network, such as capturing a screenshot from a URL.

High-resolution export, in context

"Up to 5x" matters most when the output will be viewed on a retina display or scaled up in a slide deck or landing page. A 1x export of a 1200px-wide screenshot often looks soft when displayed at full width; exporting at 2x or 3x gives you headroom to crop, zoom or place the image on a background without visible blur. The trade-off is file size, so export at the highest multiplier only for the final asset and use a lower one for drafts.

A concrete workflow

Suppose you are writing a README for an open-source project. You capture a terminal or app window, open the screenshot editor, place it on a background, add a browser or device frame and a shadow, then export PNG at 2x for the README and a smaller WebP for the project page. If you also want a short looping demo, the same editor animates the result and exports MP4 or GIF, so you avoid a second tool.

When this fits, and when it does not

Your need Screenshot Studio's fit
Quick, good-looking screenshot for docs or social Strong: background, frames, shadows, high-res export
Privacy-sensitive or unreleased screens Strong: editing happens on your device
Code snippet or X post as a clean image Strong: dedicated editors for both
App Store screenshot set Strong: phone frames with short headlines, sized for the store
Full layered design work with precise typography control Weak: this is a focused screenshot tool, not a general design suite

Next step: open the editor with one real screenshot you need to publish, export it at 2x, and check it at actual display size before committing to a higher multiplier. If you want a second opinion on the same job, Figma and Canva cover broader design work, while remove.bg focuses on background removal.

Related questions

More questions →
What Can You Do with a Free Online Screenshot Editor?

A browser-based screenshot editor turns a plain screen capture into a share-ready image without installing software or creating an account. With Screenshot Studio, you drop in a screenshot, place it on a background, wrap it in a browser or device frame, add shadows or 3D tilt, and export at up to 5x resolution as PNG, JPEG, or WebP — or as MP4, WebM, and GIF if you want motion. Editing runs on your device, so files aren't uploaded for editing, and exports are re-encoded from pixels, which strips EXIF data like camera model and GPS location. This suits anyone producing images for landing pages, READMEs, slides, or social posts who wants control over the look without a signup or watermark.

What you can actually do

The editor covers two kinds of work: beautifying a screenshot, and fixing an image file.

Beautify a screenshot

  • Backgrounds — place your capture on one of 250+ backgrounds.
  • Frames and mockups — wrap it in a Safari or Chrome frame, or an iPhone or MacBook mockup.
  • Depth — add shadows or tilt the shot in 3D.
  • Export — PNG, JPEG, and WebP at up to 5x resolution; the same editor animates the result and exports MP4, WebM, and GIF.

Focused editors for specific formats

Editor What it does
Code snippets Paste code, pick a color theme (14 themes, 20 languages), download a clean image
X posts Paste a post link, choose light or dark, download a clean image
App Store screenshots Put app screens in phone frames with short headlines, sized for the App Store

Quick image fixes

Compress, convert, resize, crop, rotate, and remove backgrounds. These run inside the page using the browser's own image APIs, so files move from your disk to your downloads folder without touching a server.

How to make a share-ready screenshot

  1. Open the editor and drop in your screenshot. The browser reads the file and draws it on a canvas in the tab.
  2. Choose a background from the available set, or keep it transparent.
  3. Add a frame or mockup — Safari/Chrome for web captures, iPhone/MacBook for app screens.
  4. Adjust depth with shadows or a 3D tilt so the shot sits naturally on the background.
  5. Export. Pick PNG, JPEG, or WebP at your chosen resolution (up to 5x). If you want motion, export MP4, WebM, or GIF instead.

Verify it worked: open the downloaded file and confirm the background, frame, and any tilt are present, and that the resolution matches what you selected.

What happens to your images

  • Edited on your device — imported images are read by the browser and drawn on a canvas in the tab; they aren't uploaded to be edited, and drafts are saved in your own browser storage.
  • Tools without uploads — compress, convert, resize, crop, and rotate run in-page, so files go from disk to downloads without a server.
  • Metadata stripped on export — every image is re-encoded from pixels, dropping EXIF data such as camera model and GPS location before you share it.

One caveat: a few features do need the network, such as capturing a screenshot from a URL.

Common snags

  • Drafts live in browser storage. If you clear site data or switch browsers, saved drafts may not follow you.
  • Network-dependent features. Anything that fetches a page (like URL capture) won't work offline.
  • Animated exports are heavier. MP4, WebM, and GIF files are larger than a still PNG, so check size before posting.

When this fits — and when it doesn't

Choose a browser editor like this when you want quick, private, no-account beautification and basic fixes, and when your output is a still or short animation for web or social. Look elsewhere if you need layered, non-destructive editing across many sessions, print-grade color management, or team collaboration features — those aren't part of this tool's scope.

What Can You Do with a Free Online Screenshot Editor (and How Does It Compare)?

A free online screenshot editor like Screenshot Studio runs entirely in your browser and turns a plain screenshot into a share-ready image: you add a background, wrap it in a browser or device frame, apply shadows or a 3D tilt, and export PNG, JPEG, or WebP at up to 5x resolution. The same editor can also animate the result and export MP4, WebM, or GIF. It fits landing pages, README files, slides, and social posts. Choose it when you want a polished mockup without installing software; skip it when you only need to shrink, convert, or crop a file — the site's quick image tools handle that separately.

What a free online screenshot editor actually does

Screenshot Studio's main editor takes a screenshot as input and lets you compose it into a presentable image. According to the site, you can:

  • Drop in a screenshot and place it on one of 250+ backgrounds
  • Wrap it in a Safari or Chrome frame, or an iPhone or MacBook mockup
  • Tilt it in 3D and add shadows
  • Export PNG, JPEG, and WebP at up to 5x resolution
  • Animate the result and export MP4, WebM, and GIF

That last point is the main differentiator. Most free screenshot editors stop at a static image; this one produces short motion clips from the same canvas, which is useful for demo GIFs in a README or a looping social post.

When to use the general editor vs. the focused editors

The site splits its tools by what you're making, not by a single do-everything interface. Pick based on your source material:

Your input Tool to use What you get
A raw screenshot Main screenshot editor Background, frame, shadow, 3D tilt, image or video export
A code snippet Code image editor Clean shareable image, 14 themes, 20 languages
A post on X Post-to-image editor Clean image from a post link, light or dark, any background
App screens for a store listing App Store screenshot editor Screens in phone frames with short headlines, sized for the App Store
A file you just need to shrink or reformat Quick image tools Compress, convert, resize, crop, rotate, remove background

The practical rule: if the screenshot needs framing or styling, use the editor. If it only needs a technical fix (smaller file, different format, tighter crop), use the quick tools — they're faster and don't require you to think about layout.

Privacy and limits worth knowing before you start

These points come directly from the site's own description and are the ones most likely to affect your decision:

  • Editing happens on your device. Imported images are read by your browser and drawn on a canvas in the tab; they are not uploaded to be edited. Drafts are saved in your own browser storage.
  • Image tools run without uploads. Compress, convert, resize, crop, and rotate use the browser's own image APIs, so files go from your disk to your downloads folder without touching a server.
  • EXIF is stripped on export. Every image is re-encoded from pixels, which drops metadata such as camera model and GPS location before you share it.
  • Some features do need the network — for example, capturing a screenshot from a URL.
  • No signup, no watermark, and no paid tier are stated on the site. The project is open source under the Apache 2.0 licence.

If your screenshot contains sensitive on-screen content, local processing is a meaningful advantage over tools that upload your file to a server. Note that "no paid tier" is the site's own claim; if pricing matters to you, confirm it on the site before relying on it long-term.

How to edit a screenshot, step by step

  1. Open the editor from the "Edit a screenshot" option on the homepage.
  2. Add your screenshot — it's read locally by the browser, not uploaded.
  3. Choose a background from the 250+ options.
  4. Add a frame or mockup — Safari/Chrome frame, or an iPhone/MacBook device frame.
  5. Adjust depth with shadows or a 3D tilt.
  6. Export as PNG, JPEG, or WebP at up to 5x resolution, or export MP4, WebM, or GIF if you want motion.

Verify it worked: open the downloaded file and check that the frame, background, and any tilt are intact, and that the resolution matches what you selected. Because EXIF is stripped on export, the file should also be free of camera/location metadata.

Common snags: if a network-dependent feature (like capturing from a URL) fails, that's expected offline behavior — the core editing still works locally. If your export looks soft, raise the resolution multiplier before exporting rather than upscaling afterward.

Choosing between this and other free editors

Use the same dimensions to compare any free online screenshot editor:

  • Output types: static image only, or image and video/GIF? Screenshot Studio does both.
  • Framing options: backgrounds, browser frames, device mockups, 3D tilt — how many are offered?
  • Resolution ceiling: can you export above 1x for retina or print?
  • Privacy model: does editing happen locally, or is your file uploaded?
  • Account and watermark: signup required? Watermark added?
  • Specialized modes: separate editors for code, posts, and App Store screenshots, or one generic canvas?

Screenshot Studio's stated position on each: image + video export, 250+ backgrounds with frames and mockups, up to 5x, local editing, no signup or watermark, and dedicated editors for code, X posts, and App Store screenshots. If a competing tool matches those on the dimensions you care about, the tiebreaker is usually which specialized modes you actually need — a code-snippet editor with themes and language support saves real time if you publish code images often.

What Is a Screenshot Beautifier and How Do You Make Professional Mockups?

A screenshot beautifier is a tool that turns a plain screen capture into a polished, share-ready image by adding a background, shadow, tilt, padding, and sometimes a watermark — without opening a full design app like Figma. Use one when you need a clean visual fast for a product page, landing page, social post, or documentation, and you don't want to rebuild the layout by hand. Screenshot Beautifier Pro, a Chrome extension, is one example: it combines capture, styling, and export in a single browser workflow.

What a screenshot beautifier actually does

A raw screenshot is a flat rectangle of pixels. A beautifier wraps that rectangle in presentation layers:

  • Background — a gradient or solid color behind the screenshot
  • Shadow — depth so the screenshot appears to float
  • 3D tilt — a subtle perspective angle
  • Padding — controlled whitespace around the edges
  • Watermark — an optional footer with your name or brand

The output is a single composed image, not a layered design file. That trade-off is the point: you get a consistent look in seconds instead of managing artboards.

When to use one instead of a full design tool

Situation Screenshot beautifier Full design tool (e.g. Figma)
One-off product screenshot for a tweet Good fit Overkill
Batch of 20 screenshots needing the same style Good fit Possible but slower
Custom illustration or multi-element layout Not the right tool Good fit
No design skills or time to learn one Good fit Steep setup
Pixel-level control over every layer Limited Full control

If your goal is "make this screenshot look intentional and on-brand," a beautifier covers it. If you're composing something that isn't fundamentally a screenshot, reach for a design tool.

The three-step workflow

Screenshot Beautifier Pro describes its process as capture, edit, export — "the whole workflow," with no external apps required.

Step 1: Get the screenshot in

The extension supports four input methods, so it works with screenshots made anywhere:

  • Capture Tab — screenshots the active browser tab in full fidelity
  • Region Select — drag a custom selection to capture exactly the area you want
  • Upload Image — drop in any existing screenshot or image from your computer
  • Paste from Clipboard — pastes whatever image is on your clipboard, from any source

Pick based on where the image already lives. If it's on screen in the browser, capture it directly; if it came from a phone or another app, paste or upload.

Step 2: Style it

Adjust the controls until the mockup looks right:

  • Background — choose from a gradient library or a solid color; a one-click shuffle surfaces new combinations
  • Shadow — three shadow styles, each with adjustable blur, spread, and opacity
  • 3D tilt — add perspective depth
  • Padding — sliders control whitespace precisely
  • Watermark — toggle a footer with your name or brand on or off

The expected result at this stage is a composed image where the screenshot sits on a styled background with depth and breathing room.

Step 3: Export

Hit export and you get a 2× PNG. Aspect ratio options are 1:1, 16:9, 9:16, 4:5, or auto-fit — covering common social and product-page formats. Choose the ratio that matches where the image will live (for example, 16:9 for a wide landing-page hero, 9:16 for a vertical story).

Choosing the right export format

Destination Suggested ratio Why
Twitter/X post 16:9 or 1:1 Fits timeline previews
LinkedIn post 1:1 or 4:5 Larger in-feed footprint
Vertical story 9:16 Native full-screen format
Product page hero 16:9 or auto-fit Matches wide layouts

The 2× resolution matters because it stays sharp on high-density displays and when platforms re-scale the image.

What users report

Reviews on the product page highlight speed and simplicity. Roko Bojanic calls it a "really useful extension for making screenshots look cleaner fast," noting it "works well for product screenshots, landing page visuals, and social posts." Allwin Jeba says that "just with few clicks I was able to create a professional looking screenshot which is ready to be shared on different platforms." The recurring theme is few clicks, no design software.

Common sticking points

  • Wrong aspect ratio — an image cropped for 1:1 will look cramped in a 16:9 slot. Pick the ratio before styling so padding and tilt read correctly.
  • Overdone tilt or shadow — heavy blur and steep angles make text harder to read. Keep tilt subtle for screenshots containing UI text.
  • Forgetting the watermark toggle — if you want branding, turn it on before export; if you don't, confirm it's off.
  • Assuming it replaces a design tool — it produces a composed image, not an editable layered file. Plan edits before exporting.

FAQ

Do I need design skills? No — the product states "no design skills required."

Can it use screenshots I didn't take in the browser? Yes, via upload or clipboard paste.

What do I get at the end? A 2× PNG in your chosen aspect ratio, ready for social or a product page.

Is it free? The page advertises "Add to Chrome — It's Free" and "Free Always." Confirm current terms on the site before relying on it for ongoing work.

What Is an Online Image Editor and How Do You Pick a Safe, Free One?

An online image editor is a browser-based tool that lets you crop, resize, convert, compress, or remove the background from an image without installing desktop software. The key distinction to check before you use one is where the processing happens: client-side editors run entirely in your browser, so your files never leave your device, while server-side editors require you to upload them. If you handle confidential documents, ID photos, or anything you would not want stored on someone else's server, a client-side tool is the safer default. Pro Image Tool, for example, states that it uses HTML5 Canvas and JavaScript to process files directly in the browser, with no uploads and no server queues.

What an online image editor can actually do

Most free web utilities cluster around a handful of tasks. Knowing which category you need saves time:

Task What it solves Typical use case
Resize / crop Fits an image to exact pixel or KB dimensions Exam photo requirements, profile pictures
Format conversion Changes JPG ↔ PNG ↔ WebP etc. Compatibility with a form or platform
Background removal Produces a transparent or solid-background image Product photos, ID-style portraits
Compression Reduces file size to a target limit Upload caps on portals and email
PDF utilities Combines, splits, or converts documents Scanned documents, invoices

Pro Image Tool describes itself as offering 40+ utilities across these categories, including a GDS Photo Resizer built for government exam specifications and an AI-powered Background Remover.

Client-side vs. server-side: why it matters

This is the single most useful thing to understand when choosing a tool.

  • Client-side (in-browser): The file is read by your browser, edited using Canvas/JavaScript, and exported locally. Nothing is transmitted. This means no upload wait, no queue, and no copy of your image sitting on a third-party server.
  • Server-side (upload-based): Your file is sent to the provider's servers, processed there, and returned. This can be slower and raises the question of what happens to your file afterward.

Pro Image Tool explicitly positions itself against the upload model, stating that most free tools "force you to upload your personal photos to their servers" and that its own tools process files "directly inside your web browser" so files "never leave your device." If privacy or speed is your priority, look for this client-side claim on any editor you consider — and treat it as a claim to verify by testing with a non-sensitive file first.

How to evaluate a free editor before trusting it

Run through this checklist. Each item is something you can confirm in a minute or two:

  1. Watermarks. Export a test image and inspect it. Pro Image Tool states it never adds watermarks and exports in high-definition quality. If a tool's output carries a logo, it is not usable for professional or exam submissions.
  2. Export quality. Resize a detailed photo and zoom in. Some tools silently downscale or over-compress.
  3. File size and format limits. Try the format you actually need (PNG for transparency, JPG for photos). Note whether large files are rejected.
  4. Registration requirements. Check whether you can complete a task without creating an account. (The source material does not state whether Pro Image Tool requires login, so verify this yourself if it matters to you.)
  5. Exact-dimension support. For exam or document photos, you need precise pixel and KB targets, not just a slider. Pro Image Tool advertises "exam ready" resizers for GDS, RRB, and SSC requirements.
  6. Transparency handling. If you need a transparent background, confirm the tool exports PNG, since JPG cannot store transparency.

Common tasks and how to approach them

Resizing for an exam or official document

Use a tool with preset or exact-dimension inputs rather than a freeform crop. Enter the required pixel dimensions and target file size, export, then verify the output's actual dimensions and KB before submitting. If the portal rejects it, the usual causes are a mismatched format (JPG vs. PNG) or a file size just over the cap.

Removing a background

AI-based removal works well for clear subjects against contrasting backgrounds. It struggles with fine details like hair edges, transparent objects, or busy backgrounds — in those cases you still need manual touch-up. Always export as PNG to preserve transparency.

Compressing to a target size

Compression trades quality for size. Set your target, then visually check the result; if it looks soft, reduce the compression level and accept a slightly larger file, or resize the dimensions down first.

When exports fail or quality drops

  • Export does nothing or errors out: Often a browser memory limit on very large images. Try resizing in two steps, or use a desktop tool for very high-resolution files.
  • Output looks blurry: You may be upscaling (enlarging beyond the original resolution) or over-compressing. Check the original dimensions first.
  • Format not supported: Some tools only output JPG. If you need transparency or lossless quality, confirm PNG or WebP support before starting.
  • Colors look wrong: Usually a color-profile mismatch between input and export. Re-export and compare against the original.

A practical way to decide

If your image is sensitive — an ID photo, a confidential document, a client's product shot — start with a client-side editor and confirm the no-upload behavior with a throwaway file. If you just need a quick format swap on a public image, any reputable tool will do, but still check for watermarks and export quality before relying on it. Pro Image Tool is one option that markets itself on client-side processing, no watermarks, and exam-specific resizers; the checklist above lets you confirm whether it — or any alternative — actually meets your requirement.

How Do You Make a Device Mockup from a Screenshot for App Store, Web, and Social Posts?

You can turn a raw screenshot into a finished device mockup in a browser, without design software, by working in this order: pick the target canvas size first, choose a device frame or browser window, drop in the screenshot, then style and export. Device Shots is a free, no-sign-up mockup generator that runs entirely in the browser, with 76 phones, tablets, laptops and watches, 9 vector browser window styles, and templates sized for App Store, Instagram, YouTube, Open Graph, LinkedIn, TikTok and more. The steps below follow that tool because its workflow matches the task, but the sequence applies to any mockup generator.

Step 1: Pick the canvas size before anything else

The most common reason a mockup gets rejected or looks wrong is that it was designed at the wrong dimensions. Choose the destination first, then build inside it.

Destination Template shown on Device Shots Canvas size
App Store / Google Play Google Play Screenshot · Pixel pair 1080 × 1920
Instagram portrait Instagram Portrait · Galaxy S10 gradient 1080 × 1350
YouTube thumbnail YouTube Thumbnail · Bold review 1280 × 720
Website hero Website Hero · Safari with tabs 1920 × 1080
Link preview Open Graph Link preview · Arc window 1200 × 630
LinkedIn banner LinkedIn Banner · XPS laptop 1584 × 396
Notion cover Notion Cover · Edge window dark 1500 × 600
Dribbble shot Dribbble Shot · MacBook dark studio 1600 × 1200
Behance project Behance Project image · Surface Pro case study 1400 × 1050
Presentation slide Presentation 16:9 slide · iMac slide 1920 × 1080
Pinterest pin Pinterest Pin · Tall phone 1000 × 1500
TikTok cover TikTok Video cover · Neon stripes 1080 × 1920
Twitch offline banner Twitch Offline banner · Two windows 1920 × 1080

If your destination isn't listed, set a custom canvas up to 6000 px. Starting from a template is faster than starting blank because the device, background and text are already arranged — you swap the device, drop your screenshot, and you're done.

Step 2: Choose a device frame or a browser window

Two framing options cover most needs:

  • Device frames — phones, tablets, laptops and watches. Use these when the screenshot is a mobile app or a desktop app and you want the hardware to sell the context.
  • Browser windows — 9 vector styles in light or dark, each with an address bar you can type into. Options include Safari (compact bar, centred address), Safari with tabs, Chrome, Chrome for Windows (caption buttons, no traffic lights), Edge, Brave, and Arc (tinted, inset content). Use these when the screenshot is a website or web app and you want it to read as a live page.

Browser frames are vector, so they stay sharp at any export size. The address bar is editable, which matters for landing pages and Open Graph images — a real-looking URL is more convincing than a blank bar.

Step 3: Drop, paste, or upload the screenshot

With the frame in place, add your screenshot by dragging it in, pasting it, or uploading it. The screenshot fills the frame's screen area.

This is where most quality problems appear, and they're almost always aspect-ratio mismatches:

  • Blurry result — the source screenshot is lower resolution than the frame's screen area at your export size. Export at a higher multiplier (up to 4×) only helps if the source has the pixels; otherwise re-capture the screenshot at a larger window size.
  • Cropped or letterboxed result — the screenshot's aspect ratio doesn't match the device screen. A tall phone screenshot in a laptop frame will crop or leave bars. Match the source ratio to the frame: phone screenshot → phone frame, wide desktop capture → laptop or browser frame.
  • Stretched result — the frame is scaling a mismatched ratio. Switch to a frame with a closer ratio rather than forcing it.

Step 4: Style it so it looks intentional

A screenshot in a frame still looks like a screenshot. Add the finishing layer:

  • Background — a gradient or solid colour behind the device. Templates like "Galaxy S10 gradient" and "Neon stripes" show how much this changes the read.
  • Headline text — one short line above or beside the device. This is what makes a store listing or social post scannable.
  • Shadows — a soft drop shadow lifts the device off the background.
  • Icons — small marks for ratings, badges or feature callouts.

Keep the text short enough to read at thumbnail size. A YouTube thumbnail at 1280 × 720 and a LinkedIn banner at 1584 × 396 both get viewed small, so a long headline disappears.

Step 5: Export or copy

Export at up to 4× resolution, or copy straight to the clipboard. For App Store and Google Play listings, export at the template's native size or higher — store review processes reject undersized or wrongly proportioned screenshots. For social posts, the template size is already correct, so a 1× export is usually enough; use 2× or 4× when the image will be displayed large or on high-density screens.

A worked example: App Store screenshot from a phone capture

  1. Open the Google Play Screenshot · Pixel pair template (1080 × 1920) or set a custom 1080 × 1920 canvas.
  2. Choose an iPhone or Pixel frame.
  3. Drop your app screenshot into the frame. If it's a full-height phone capture, it should fill the screen without cropping.
  4. Add a one-line headline above the device, e.g. the app's core benefit.
  5. Set a background gradient that contrasts with your app's UI colours.
  6. Export at 2× (2160 × 3840) for a crisp store listing.

Common snags and what to do

  • The mockup looks empty. Add a headline and background — a bare device on white reads as unfinished.
  • The browser frame looks wrong for a mobile app. Switch to a phone frame; browser chrome implies a website.
  • Text is unreadable in the feed. Reduce the headline to a few words and increase its size relative to the canvas.
  • Export is huge or slow. Drop from 4× to 2×; 4× is only worth it when the source screenshot has the resolution to support it.

The whole process — size, frame, screenshot, style, export — takes a few minutes per image once you've done it once, and the template library means you rarely start from a blank canvas.

Website Overview

Several search or sharing settings need attention. Together they may make snippets, preview images or preferred URLs less consistent across platforms. An active inbound-mail setup with incomplete authentication may leave the domain more open to impersonation. Provider hosting alone does not close that gap.

Domain and Registration

The domain was registered less than a year ago and has limited historical evidence to assess. Transfer-protection status is present, helping reduce the risk of unauthorized domain transfers. The registrar is NameCheap, Inc., a widely used domain service provider. The domain uses the common .com extension, which is not an independent safety signal.

DNS and Email

The observed email authentication setup is incomplete: DMARC is missing. Nameservers are provided by Cloudflare, indicating managed DNS hosting. MX records point to the registrar-servers.com email service. No CNAME was found; the observed records resolve directly to addresses. TXT records include verification markers for Google. Such markers may also remain after a service stops being used.

TLS and Certificates

The public key uses EC with 256 bits. The server supplied a complete certificate chain. No organization name is present in the certificate; the available fields are consistent with domain validation. The certificate was issued within the Google Trust Services cloud or CDN ecosystem. The certificate's total validity is about 90 days, consistent with a short renewal cycle.

HTTP and Browser Security

The response lacks these common security headers: CSP, clickjacking protection. CORS permits any origin to read this response. This is common for public resources; sensitive responses need narrower handling. No X-Powered-By header was found, reducing one common source of backend fingerprinting information. The cf-ray response header indicates a CDN or caching proxy in the delivery path. No obvious internal addresses or debug information were found in the headers.

Technology Stack Analysis

The public page identifies Next.js, Google Analytics, Cloudflare, Vercel without precise versions, leaving fewer clues for version-specific scanning.

Search and Social Sharing

The meta description has 187 characters and may be shortened in search results. The homepage has an indexing or crawling restriction, which may limit search visibility. Twitter Card metadata is configured. JSON-LD includes Organization data, helping describe the organization as an entity. The title has 56 characters, within a common display range.

Hosting and Email

DNSCloudflare
HostingVercel
Emailregistrar-servers.com
Approximate IP geolocation (inferred; a CDN or proxy may differ from the origin server) Location unknown Inferred 104.26.0.83

Registration details

RDAP / WHOIS

RegistrarNameCheap, Inc.
Registered2026-02-15
Expires2027-02-15
Domain statusclient transfer prohibited
Nameserverschase.ns.cloudflare.com、kehlani.ns.cloudflare.com
DNSSECunsigned

DNS records

DNS

TypeNameValueTTLPriority
Awww.screenshot-studio.com104.26.0.83300—
Awww.screenshot-studio.com104.26.1.83300—
Awww.screenshot-studio.com172.67.72.244300—
AAAAwww.screenshot-studio.com2606:4700:20::681a:153300—
AAAAwww.screenshot-studio.com2606:4700:20::681a:53300—
AAAAwww.screenshot-studio.com2606:4700:20::ac43:48f4300—
MXscreenshot-studio.comeforward1.registrar-servers.com30010
MXscreenshot-studio.comeforward2.registrar-servers.com30010
MXscreenshot-studio.comeforward3.registrar-servers.com30010
MXscreenshot-studio.comeforward4.registrar-servers.com30015
MXscreenshot-studio.comeforward5.registrar-servers.com30020
NSscreenshot-studio.comchase.ns.cloudflare.com86400—
NSscreenshot-studio.comkehlani.ns.cloudflare.com86400—
TXTscreenshot-studio.comgoogle-site-verification=MtgwaFpFEEa1VkU3r4WUWVvw8cp-51UMbJ2yfmeZYx0300—
TXTscreenshot-studio.comv=spf1 include:spf.efwd.registrar-servers.com ~all300—

TLS and certificates

TLS / SSL

AssessmentNormal configuration
Supported protocolsTLSv1.2、TLSv1.3
Negotiated protocolTLSv1.3
Certificate subjectscreenshot-studio.com
IssuerGoogle Trust Services
Valid until2027-01-07T15:15 · Remaining when checked: 86 days
Verification detailsCertificate trust: Passed · Hostname match: Passed

HTTP response headers

HTTP

HeaderValue
content-typetext/html; charset=utf-8
cache-controlpublic, max-age=0, must-revalidate
servercloudflare
strict-transport-securitymax-age=63072000
x-content-type-optionsnosniff
referrer-policystrict-origin-when-cross-origin
permissions-policycamera=(), microphone=(), geolocation=()
access-control-allow-origin*

Identified technologies

Next.jsGoogle AnalyticsCloudflareVercel

Pages, Search and Sharing

Meta descriptionFree browser editors for screenshots, code images, tweet images, and App Store screenshots, plus image tools that compress, convert, and resize without uploading. No signup, no watermark.
Canonical URLhttps://www.screenshot-studio.com
LanguageEnglish (default)
Twitter Cardsummary_large_image
All bots 1 allowed · 4 disallowed
  • Allow/
  • Disallow/api/
  • Disallow/_next/
  • Disallow/static/
  • Disallow/svc/
googlebot 1 allowed · 0 disallowed
  • Allow/
mediapartners-google 1 allowed · 0 disallowed
  • Allow/
adsbot-google 1 allowed · 0 disallowed
  • Allow/
bingbot 1 allowed · 0 disallowed
  • Allow/
yandex 1 allowed · 0 disallowed
  • Allow/
baiduspider 1 allowed · 0 disallowed
  • Allow/
naverbot 1 allowed · 0 disallowed
  • Allow/
gptbot 1 allowed · 0 disallowed
  • Allow/
chatgpt-user 1 allowed · 0 disallowed
  • Allow/
claudebot 1 allowed · 0 disallowed
  • Allow/
anthropic-ai 1 allowed · 0 disallowed
  • Allow/
perplexitybot 1 allowed · 0 disallowed
  • Allow/
google-extended 1 allowed · 0 disallowed
  • Allow/
applebot 1 allowed · 0 disallowed
  • Allow/
applebot-extended 1 allowed · 0 disallowed
  • Allow/
oai-searchbot 1 allowed · 0 disallowed
  • Allow/
claude-user 1 allowed · 0 disallowed
  • Allow/
claude-searchbot 1 allowed · 0 disallowed
  • Allow/
claude-web 1 allowed · 0 disallowed
  • Allow/
perplexity-user 1 allowed · 0 disallowed
  • Allow/
deepseekbot 1 allowed · 0 disallowed
  • Allow/
mistralai-user 1 allowed · 0 disallowed
  • Allow/
cohere-ai 1 allowed · 0 disallowed
  • Allow/
meta-externalagent 1 allowed · 0 disallowed
  • Allow/
meta-externalfetcher 1 allowed · 0 disallowed
  • Allow/
amazonbot 1 allowed · 0 disallowed
  • Allow/
ora-agent 1 allowed · 0 disallowed
  • Allow/
duckassistbot 1 allowed · 0 disallowed
  • Allow/
youbot 1 allowed · 0 disallowed
  • Allow/
ahrefsbot 1 allowed · 0 disallowed
  • Allow/
  • IntervalCrawl delay 10 seconds
semrushbot 1 allowed · 0 disallowed
  • Allow/
  • IntervalCrawl delay 10 seconds
dataforseobot 1 allowed · 0 disallowed
  • Allow/
  • IntervalCrawl delay 10 seconds
mj12bot 0 allowed · 1 disallowed
  • Disallow/
dotbot 0 allowed · 1 disallowed
  • Disallow/
blexbot 0 allowed · 1 disallowed
  • Disallow/
petalbot 0 allowed · 1 disallowed
  • Disallow/
megaindex 0 allowed · 1 disallowed
  • Disallow/
bytespider 0 allowed · 1 disallowed
  • Disallow/

User reviews (0)

  • No reviews yet.