
 简体中文
简体中文 English
Website review
This review may include AI-generated content and is not individually verified. Domain, certificate and other facts come from the observed data on this page.
What is Blockmatic?
Blockmatic is a browser-based tool for making Minecraft pixel art. It does two main jobs: converting an existing image into a block-by-block layout, and giving you an editor to design pixel art from scratch. The results are meant to be built in a Minecraft world, so the output is a grid of blocks rather than a normal picture file.
Blockmatic
Who it is for
- Players who want to turn a photo, logo or drawing into a buildable wall or floor design.
- Server owners and map makers adding decorative murals, signs or spawn-area art.
- Anyone who wants a quick pixel-art sketch without installing desktop software.
What you would actually do
- Upload or import the image you want to reproduce.
- Let the converter map colours to Minecraft blocks and produce a grid.
- Adjust the result in the editor — fix edges, swap blocks, simplify detail.
- Use the layout as a build guide in your world.
H3. Trade-offs to expect Image-to-block conversion always loses detail, because Minecraft's palette is limited and each block is large. Photos with smooth gradients or fine texture need the most cleanup; bold logos and high-contrast drawings convert far more cleanly. A smaller grid is faster to build but reads as abstract, while a larger grid preserves likeness at the cost of many more blocks and build time.
If you are starting out, pick one simple, high-contrast image, convert it at a modest size, and tidy it in the editor before committing to a large build.
How do I convert an image into Minecraft pixel art with Blockmatic?
Upload your image to Blockmatic, let it map the picture's pixels to Minecraft block colors, then export the result as a schematic or block-by-block guide you can rebuild in-game. The tool is aimed at players who want a recognizable image — a portrait, logo, or meme — turned into a wall or floor mosaic without plotting every block by hand.
A typical workflow
- Pick a clean source image. High contrast and simple backgrounds convert far better than busy photos, because each pixel becomes roughly one block.
- Set the size. Larger canvases preserve detail but multiply the block count quickly. A 64×64 build already needs 4,096 blocks.
- Choose your palette. Restricting to blocks you can actually gather (wool, concrete, terracotta) keeps the build realistic.
- Generate and preview. Check the preview for banding or muddy areas before committing.
- Export and build. Use the output as a layer-by-layer plan rather than trying to eyeball it.
What to watch for
- Dithering mixes two block colors to fake a shade. It looks good from a distance but noisy up close — a trade-off between accuracy and tidiness.
- Color matching is approximate. Minecraft's palette is finite, so gradients and skin tones will shift.
- Survival vs. creative. In survival, block availability should drive your palette choice; in creative, you can prioritize fidelity.
Next step
Start with a small test image (32×32) to learn how the converter handles your picture, then scale up once the palette and dithering settings look right.
Which block types and color palettes can I use for my design?
Blockmatic’s page description presents it as a Minecraft pixel-art editor and image converter, but it does not list the exact block types or color palettes available. So the practical answer is: the palette depends on the blocks the tool supports, and that list is not specified in the supplied page information. You can still plan a design around the standard Minecraft building palette and then match it to whatever blocks the editor offers.
What to expect from a Minecraft pixel-art palette
Most Minecraft pixel-art tools work from a fixed set of placeable blocks, each with one dominant color or a few visual variants. Common palette families include:
- Wool: the widest single-block color range, useful for flat, clean pixel art.
- Concrete: strong, saturated colors; good for bold, high-contrast designs.
- Terracotta and glazed terracotta: muted earth tones and patterned variants.
- Stone family: stone, andesite, diorite, granite, deepslate, blackstone, basalt, and their polished or brick forms.
- Wood planks and logs: warm browns and tans, with distinct light and dark options.
- Metals and minerals: iron, gold, copper, emerald, diamond, lapis, redstone, quartz, amethyst.
- Nature blocks: grass, leaves, moss, dirt, sand, gravel, clay, snow, ice, prismarine.
- Nether and End blocks: netherrack, soul sand, crimson and warped stems, end stone, purpur.
How to choose blocks for your design
- Decide the mood first: bright and cartoonish favors concrete and wool; weathered or natural favors terracotta, stone and wood.
- Limit yourself to roughly 10–20 blocks. Too many similar shades makes the image muddy, especially at small sizes.
- Check contrast at final scale. A palette that looks varied in a list can collapse into one tone when each pixel is one block.
- Keep lighting in mind. Blocks facing different directions or placed in shadow will read differently in-game, so test a small section before building the whole piece.
Practical next step
Open Blockmatic and convert a small test image, then look at the block list it generates. That list is your actual palette. If you want a broader reference for Minecraft blocks and their colors, the official Minecraft wiki at Minecraft Wiki is the most reliable place to check block names, variants and appearances. For community-made pixel-art palettes and examples, Planet Minecraft hosts many builds you can inspect block by block.
Can I preview how my pixel art will look in Minecraft before building it?
Yes. Blockmatic is built around that preview step: you load an image, it converts the picture into a block-by-block layout, and you see the block grid on screen before you place a single block in your world. That visual check is the whole point of using a converter rather than counting blocks by eye.
What a preview actually lets you check
- Silhouette and readability — whether your subject still reads clearly once it is reduced to square blocks.
- Palette choice — which Minecraft blocks stand in for each colour, and whether the substitutes look muddy or too noisy together.
- Scale — a preview at 32×32 blocks looks very different from 128×128; you can judge how big the build needs to be.
- Detail loss — fine lines, text and gradients are the first things to disappear, and you will see it immediately.
A concrete workflow
Say you want a 64×64 portrait on a wall. Convert the image, set the width in blocks, then look at the result at full size on your monitor. If the face turns into a blur of similar greys, either simplify the source image (higher contrast, fewer colours) or increase the block count. Only when the on-screen grid looks right do you start gathering materials — which also tells you roughly how many blocks of each type you need.
Limits worth knowing
A preview shows the layout, not the final lighting. In-game, block shading, shadows from nearby builds and the direction of light will change how it reads, so a flat preview can look better or worse than the finished wall. Very large builds are also hard to judge on a small screen; zoom out or view the grid in sections.
Next step
Pick one small test image first — something 32 blocks wide — and run it through the converter to see how the block substitution behaves before committing to a large project. If you want to compare tools, Blockmatic is the one described here; other options exist, but check their preview features yourself rather than assuming they match.
What image formats and sizes work best for conversion?
For Blockmatic-style Minecraft pixel-art conversion, the most reliable input is a small, high-contrast image in a standard web format. PNG is usually the best choice because it preserves sharp edges and transparency; JPG works for photos but compression artifacts can create stray blocks. GIF is fine for simple graphics, and WebP is generally supported by modern browsers but is a less predictable upload format.
Formats at a glance
| Format | Best for | Trade-off |
|---|---|---|
| PNG | Logos, sprites, pixel art, transparency | Larger file size |
| JPG | Photos, gradients | Artifacts become misplaced blocks |
| GIF | Simple flat-color images | Limited color palette |
| WebP | Modern web images | Inconsistent support in some tools |
Sizes that convert well
- Keep the subject roughly square or crop it before converting; Minecraft builds are usually square grids.
- Match the image's pixel dimensions to your intended block grid. A 32×32 block mural needs about a 32×32 pixel source; anything larger is downscaled and detail is lost.
- Avoid very large uploads. A 4000-pixel photo downscaled to a 64-block wall will look muddy; crop to the important area first.
- Use a clean background or transparent PNG so the converter doesn't fill empty space with unwanted blocks.
Practical next step: decide your block grid first (for example, 64×64), then resize and crop the source image to that size in an image editor before uploading. This gives you control over which details survive, rather than letting the converter guess. If you want a quick test, start with a simple two- or three-color icon and compare the preview against your original.
Is Blockmatic free to use, and do I need an account?
Blockmatic is a browser-based Minecraft pixel art editor and image converter. The available page information does not list any pricing, subscription tiers, or payment platforms, and it also shows no login or account requirement. In practice, that points to a tool you can open and start using directly, without creating a profile first.
Treat that as a reasonable expectation rather than a guarantee: free tools sometimes gate saving, exporting, or higher-resolution conversions behind an account. The quickest check is to load an image, make a small edit, and try to export it — if the export completes without a prompt to sign in or pay, the core workflow is open.
Who this suits
- Casual builders who want to turn a photo or drawing into a block layout for a single build.
- Teachers or club organizers running a short session where asking everyone to register would waste time.
- Players who want to test an idea before committing hours to placing blocks by hand.
What to watch for
- Whether exported schematics or block lists are limited in size on a free tier.
- Whether your work is stored in the browser only, which means clearing site data could lose it.
- Whether an account is needed later for sharing or collaboration features.
If you need guaranteed permanence or team sharing, confirm the export and storage behavior before relying on it for a long project. For one-off conversions and quick sketches, the no-account path is usually the fastest route.
 Cloudflare
 Zoho Mail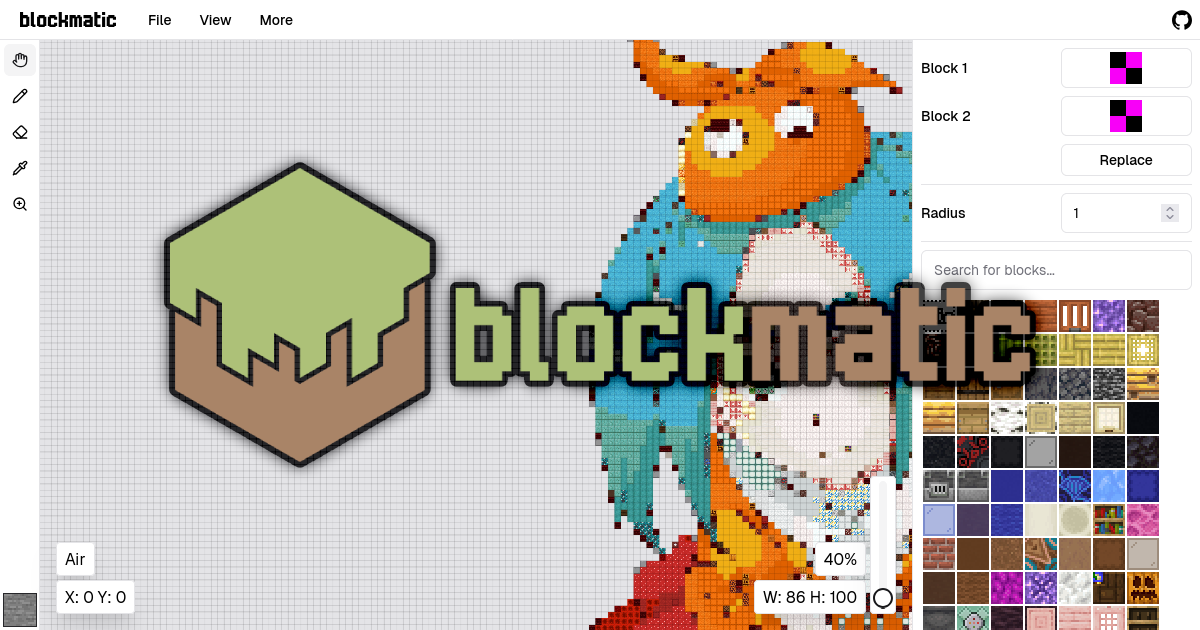

User reviews (0)