Website profiles · Technology insights · Alternatives

spoo.me

Open-source link management with advanced analytics and an API-first core. Free short links, click analytics and QR codes. Self-hostable in one command.

No paid content found
Visit website
Profile views 9 Outbound visits 1 Normal
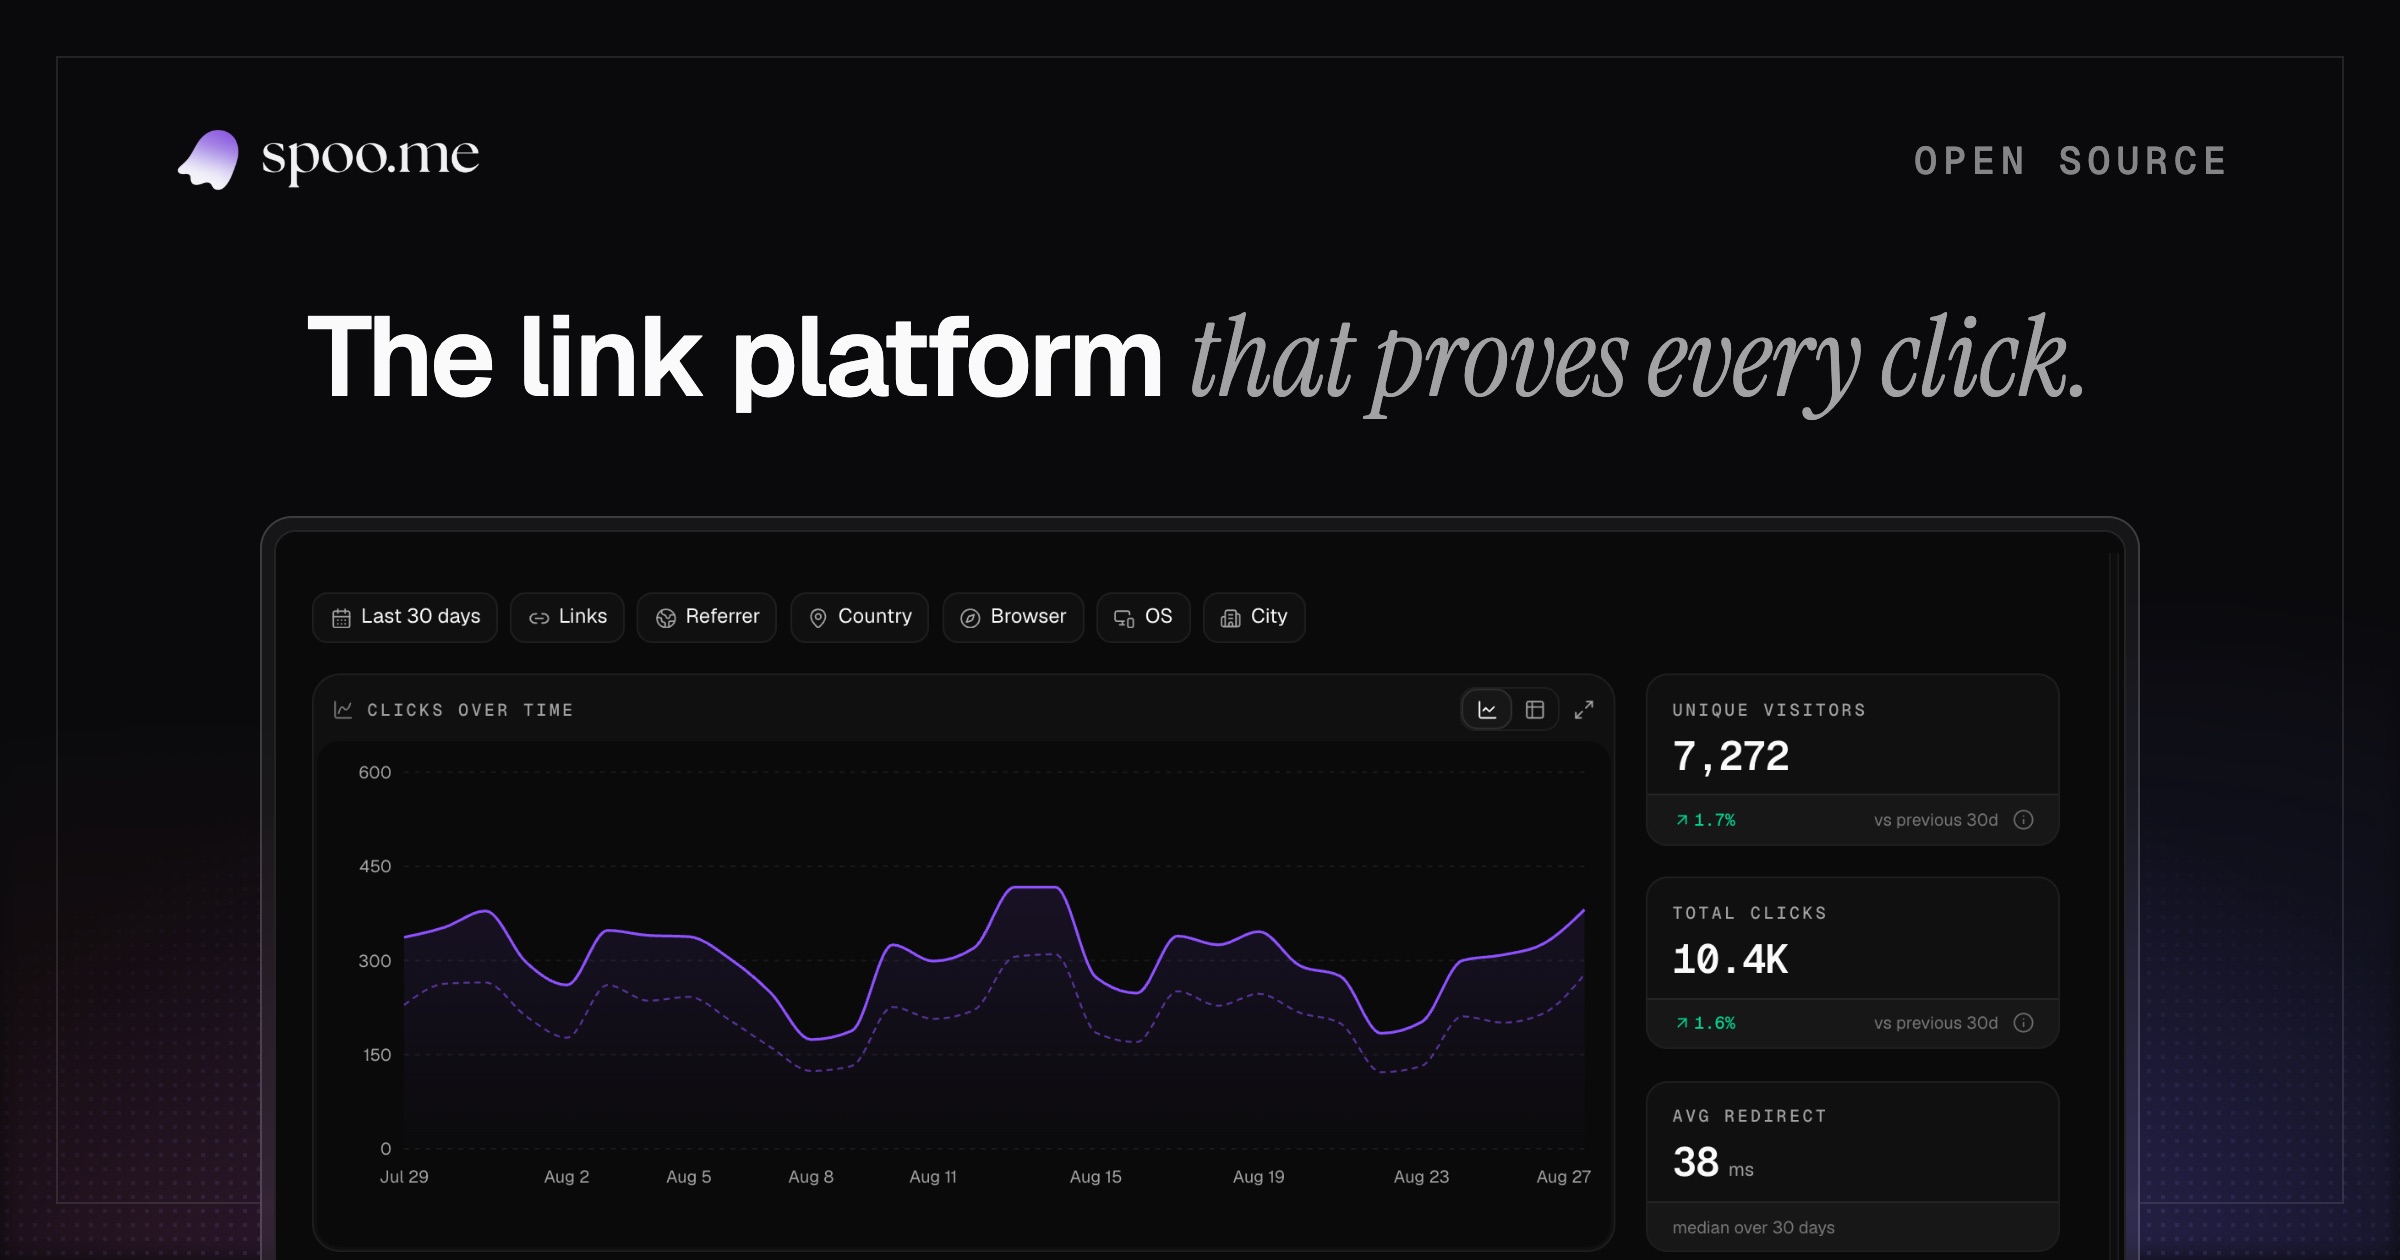
spoo.me Full homepage screenshot

At a glance

Category
Data & Analytics
Language
English
Paid-content signal
No paid content foundObserved
Registered
2023
Hosting
CloudflareInferred
HTTPS certificate trusted
PassedObserved
Last updated

Website review

This review may include AI-generated content and is not individually verified. Domain, certificate and other facts come from the observed data on this page.

What is spoo.me?

spoo.me is an open-source link management platform built around short links, click analytics, and an API-first core. You shorten a URL, optionally put it on your own domain, and then get a per-link analytics dashboard covering clicks, unique visitors, referrers, country, city, browser, and OS. It also generates QR codes and can be self-hosted in one command, which is the main reason a team would pick it over a closed SaaS shortener.

What you actually get

  • Per-link dashboards. Each short link has its own time series for clicks and unique visitors, with period comparison so you can see drift rather than just a total.
  • Custom domains. Apex or subdomain, with a guided setup, so links carry your brand instead of the platform's.
  • Routing rules. Country-based destination routing, so one link can send different regions to different pages.
  • Access controls. Passphrase-gated links, click caps or expiry dates, and A/B splits across destinations by weight.
  • Developer surface. An API-first core plus apps and SDKs, so link creation and analytics can live inside your own tooling.
  • Notifications. A feed that fires when a link crosses a click threshold, gets its first visit from a new country, expires, or delivers a webhook.

Who it suits

A developer or small product team already comfortable running a service, or anyone who wants click data they control without adding a third-party tracking script. The self-hosting path matters most if data residency, cookie banners, or vendor lock-in are real constraints for you. If you just need a handful of short links and never look at the numbers, the analytics depth is wasted effort.

Trade-offs to weigh

Self-hosting trades convenience for control: you own the data and the uptime. The feature set is deliberately narrow — links, analytics, routing, QR — so if you need a full marketing suite with landing pages and email, this is one piece rather than the whole stack.

Next step

Open the live demo and click into a single link's dashboard. If the referrer and country breakdown answers a question you currently can't answer, it's worth a trial link on your own domain; if not, a plain shortener will do.

How do I self-host spoo.me on my own server?

Self-hosting spoo.me means running the open-source link shortener and analytics stack on infrastructure you control, rather than using the hosted service. The site describes it as "self-hostable in one command," which is the key promise: you get the same link management, per-link click analytics, QR codes and API-first core, but on your own machine or cloud instance.

What you actually get when you host it yourself

  • Short links with your own domain (apex or subdomain), so links carry your brand.
  • Per-link dashboards: clicks over time, unique visitors, repeat behavior, referrers, country, city, browser and OS.
  • Geo maps, filters and chart types without third-party tracking scripts.
  • Rules-based routing (for example, different destinations by country), private/passphrase links, click caps or expiry dates, A/B split testing, and webhooks.
  • An API and ecosystem of apps/SDKs, which is the main reason a developer team would self-host instead of renting.

The one-command claim, in practice

The site says self-hosting is a one-command operation, so the realistic path is:

  1. Pick a host — a small VPS, a home server, or a container platform.
  2. Run the documented self-host command (check the project's GitHub repository for the current Docker/Compose instructions, since these change).
  3. Point your domain or subdomain at the instance and complete the guided domain setup.
  4. Configure storage and a database if the default setup expects them, then create your first link.
  5. Test analytics, redirects and webhooks before moving production traffic over.

Who should consider it

Situation Self-hosting makes sense Hosted service makes more sense
You handle sensitive or internal links Yes — data stays on your infrastructure Less control
You need deep API/SDK integration Yes — API-first core is the point Also possible
You have no server admin capacity No — you own uptime, backups, upgrades Yes
You want quick setup with zero maintenance No Yes
You need custom routing, private links, A/B tests Yes Usually available too

Trade-offs to weigh

You gain control, no third-party analytics scripts and the ability to keep click data in-house. You take on patching, backups, TLS certificates, database maintenance and monitoring. The "one command" gets you running; keeping it running is the ongoing cost. Budget for a small always-on instance if you want reliable redirects.

A useful next step

Before committing, run it locally first: start the stack, shorten a link, click it a few times from different networks, and check that the dashboard records referrer and country correctly. If that works, repeat on your target server with your real domain. The project's GitHub repository is the authoritative source for current install steps, environment variables and upgrade notes — the marketing page is the overview, not the manual. For a broader look at the category, see GitHub for the source and issues, and Docker if you plan to run it as a container.

How can I use the spoo.me API to programmatically create and manage short links?

The spoo.me API is designed as an API-first core, meaning link creation and management are intended to be driven from scripts, apps or backend services rather than only through the dashboard. The page evidence confirms an API-first positioning and an “API your team will actually enjoy” message, but it does not publish endpoint paths, authentication details or request/response schemas. So the practical answer is: use the API for the same link operations you see in the product, and get the exact syntax from spoo.me's own API documentation.

What you can do programmatically

Based on the features the site describes, the API is the natural way to:

  • Create short links on your own domain, including apex or subdomain setups.
  • Attach analytics expectations to each link, since every link gets its own dashboard with clicks, unique visitors and repeat behaviour.
  • Apply per-link rules such as country-based routing, A/B weight splits, click caps, expiry dates and passphrase gating.
  • Configure social previews per link: title, description, image and theme colour.
  • Register webhooks so your system is notified when a link crosses a click threshold, gets its first visit from a new country, expires or fires an event.
  • Read click data for reporting: referrer, country, city, browser, OS and time series.

A realistic workflow

A marketing engineer wants one link per campaign, routed by region, with alerts when a link takes off:

  1. Create the link via the API against your branded domain.
  2. Add routing rules so EU visitors go to the EU store and Japan to the JP page, with a fallback destination.
  3. Set an expiry date or click cap so stale links retire themselves.
  4. Register a webhook for threshold and new-country events.
  5. Pull analytics on a schedule to feed your own dashboard, filtering by browser, country, city, referrer or OS.

That mirrors the filtering model shown on the site, where a widget can answer a question like “Chrome users from Germany who came through Discord.”

How to choose between API, dashboard and self-hosting

Need Best fit
One-off link, quick check Dashboard or no-sign-up shortener
Repeatable links from CI, CRM or CMS API
Custom domain and routing rules at scale API plus branded domain
Data must stay on your infrastructure Self-hosted deployment
Analytics without third-party scripts Built-in dashboards, API for exports

The trade-off is straightforward: the API gives you automation and control, but you take on the work of storing keys, handling errors and deciding how much click data to retain. Self-hosting adds operational responsibility in exchange for data ownership.

Next step

Open spoo.me's documentation or GitHub repository from the site and look for the API reference and authentication section, then make one test call that creates a link on a non-critical domain and reads its analytics back. That single round trip will tell you whether the API fits your stack faster than reading every feature page.

How do I set up a custom domain for my spoo.me short links?

You set up a custom domain in spoo.me from the dashboard by adding a domain you own (apex or subdomain) and then pointing its DNS records at spoo.me's servers, so the platform can serve short links under your brand. spoo.me describes this as a guided two-minute setup, and once it's connected every short link uses your domain instead of theirs.

A typical flow looks like this:

  1. In your spoo.me dashboard, add the domain you want to use (for example go.example.com or example.com).
  2. spoo.me will show you the DNS records to create — usually a CNAME for a subdomain, or A/AAAA or similar records for an apex domain.
  3. Add those records at your DNS provider (Cloudflare, Namecheap, Route 53, etc.).
  4. Return to spoo.me and verify the domain; propagation can take a few minutes to a few hours depending on TTL.
  5. Create links against that domain and confirm a redirect works in a browser and with a curl -I check.

A few practical notes:

  • Subdomain vs. apex: go.yourbrand.com is usually simpler because CNAME records are allowed there. Apex domains often need provider-specific flattening or A records, which is where most setup friction comes from.
  • HTTPS: your custom domain should serve over TLS for links to be trusted in email and social posts. Check whether spoo.me provisions the certificate or whether you need one on your side.
  • Analytics stay attached: per-link dashboards, referrer and country breakdowns, and geo maps continue to work on custom-domain links, so you don't lose click data by branding the URL.

For the exact DNS values and any certificate steps, follow the records shown in your spoo.me dashboard rather than generic instructions, since they depend on your domain type and DNS host. If you want a second reference on the trade-offs of branded short domains, Cloudflare documents CNAME and apex-domain behavior well, and spoo.me is the authoritative source for the current setup steps.

How does spoo.me's click analytics compare to using a separate analytics tool?

spoo.me folds click analytics directly into the link itself, so you see the data on the same platform that creates and redirects the short URL. The page presents this as a real analytics product bundled with every link, rather than a lightweight counter bolted on. In practice that means a per-link dashboard with clicks, unique visitors and repeat behavior, plus a board you can arrange with chart types like donut, treemap and calendar heatmap, and world-level geo maps.

Where the built-in approach wins

  • No third-party scripts on the destination page. The page states analytics come with the link and no cookie banners are involved. If your landing pages are on a domain you don't fully control, that removes a common reason you can't instrument them.
  • Per-link context is native. Each short link gets its own time series, and you can ghost a previous period under any chart to read the drift. A general analytics tool usually treats a URL as one dimension among many, so a per-link view takes configuration.
  • Filters are built into the widgets. Browser, country, city, referrer and OS filters apply to any chart, which supports questions like "Chrome users from Germany who came through Discord" without exporting data.
  • Routing and analytics live together. Country-based destination rules and the geo breakdown come from the same source, so testing a regional redirect and reading its results don't require stitching tools.

Where a separate analytics tool still earns its place

  • On-site behavior. spoo.me reports clicks and redirects. It does not describe scroll depth, form abandonment, session paths or revenue attribution. If those questions matter, you still need a web analytics product.
  • Cross-channel funnels. If your traffic arrives from search, email and ads and you want one funnel across all of them, a dedicated tool with a shared data model is simpler than reconciling link-level dashboards.
  • Consent and compliance workflows. A bundled, script-free approach reduces one kind of overhead, but it doesn't replace whatever consent or data-governance process your organization requires for visitor data generally.
  • Long-term warehousing. For multi-year analysis joined to CRM or product data, exporting link clicks into a warehouse and querying there is usually the more durable path.

A practical decision rule

Choose the built-in analytics when your main question is "which link, from where, on what device, and how did that change over time" — campaign links, social posts, QR codes, regional redirects. Add a separate analytics tool when the question moves past the click into what happened after the visitor landed, or when you need one funnel across channels that aren't all short links.

A useful next step: open a live demo link and check whether the per-link board answers a question you currently assemble by hand. If it does, the trade-off is mostly about giving up cross-tool joins, not about losing depth on the click itself.

Can I route a short link to different destinations based on the visitor's country?

Yes. spoo.me supports country-based routing: one short link can send visitors to different destination URLs depending on where they are. The page describes it with a Japan/EU example — the EU going to an EU store, Tokyo to a JP page, and everyone else to a fallback — with the rules presented as an editable table.

How to think about the setup

  • Order matters. Put specific country rules above the catch-all. A visitor in Japan should match /shop-jp before the fallback rule is ever evaluated.
  • Always keep a fallback. Country detection is usually based on IP address, which can be wrong for VPN users, corporate proxies, and travellers. A default destination prevents a dead end.
  • Decide what "country" means for you. If you sell regionally, routing by country is often close enough, but legal or pricing differences sometimes need a different signal (account region or a language selector) rather than IP alone.

A concrete scenario

A small e-commerce team runs one link in a launch post. Readers in Germany land on the German storefront, readers in Japan on the Japanese page, and everyone else on the international store. The team then opens that link's dashboard and filters clicks by country and referrer to see whether the launch traffic actually reached the intended storefronts — useful when a campaign is promoted in several communities at once.

Where it fits and where it doesn't

Situation Country routing a good fit?
Regional storefronts or localized landing pages Yes — one link, several destinations
Campaigns posted in multiple countries Yes — avoids separate links per market
Compliance-driven content differences Partly — verify the detection signal is reliable enough
A/B tests on messaging No — use weighted split testing instead

Next step

Create the link, add your country rules in the order you want them evaluated, set the fallback last, then test it yourself with a VPN or a proxy in one of the target countries before publishing. If you would rather not depend on a hosted service, the page notes the project is open-source and self-hostable in one command, so you can run the same routing logic on your own infrastructure.

Related questions

More questions →
What Does Self-Hosted Mean, and When Should You Run Software on Your Own Server?

Self-hosted means the software runs on hardware you control — your own server, a spare PC, or a rented machine — instead of on a vendor's cloud. You get direct control over the data and the running environment; in exchange, you take on setup, storage, backups, and updates. It's a good fit when privacy, data ownership, or long-term control matter more to you than zero-maintenance convenience, and a poor fit when you want something that works in five minutes with no upkeep.

Self-hosted vs. cloud/SaaS

The core difference is where the software and data live, and who is responsible for keeping them running.

Dimension Self-hosted Cloud / SaaS
Where it runs Hardware you control (own server, spare machine, VPS) Vendor's infrastructure
Who maintains it You (setup, updates, backups) The vendor
Data ownership You hold the files and the database Vendor holds them on your behalf
Access Whatever you expose (LAN, VPN, public URL) Vendor's app and login
Upfront effort Higher — install, configure, secure Minimal — sign up and go
Ongoing effort Updates, monitoring, backups, disk space Usually none

Neither is universally better. The trade is control and responsibility versus convenience.

What "privacy-first" actually means here

A self-hosted app keeps your files on your own infrastructure, so they aren't sitting in a third party's account by default. PhotoPrism describes itself as "AI-powered, privacy-first" and states it was "built from the ground up to run wherever you need it, without compromising freedom, privacy, or functionality." It also says your data "will never be shared with Google, Amazon, Microsoft or Apple unless you intentionally upload files to one of their services."

That last clause is the important nuance: self-hosting removes the default dependency on a big cloud, but it doesn't stop you from choosing to send files somewhere else. Privacy here is a property of where the software runs, not an automatic guarantee about everything you do with it.

What you actually need to run it

Self-hosting a photo library is a concrete checklist, not an abstract idea:

  • A machine to run it on — a home server, a spare computer, or a rented virtual private server.
  • Storage — enough disk for your photos and videos, plus room to grow. Photo libraries get large fast, especially with RAW files and video.
  • Backups — a self-hosted library is only as safe as your backup plan. Losing the disk means losing the library unless you've copied it elsewhere.
  • Updates and monitoring — someone has to apply updates and notice when something breaks. That someone is you.
  • Network access — decide whether it's reachable only on your local network, through a VPN, or over the internet, and secure it accordingly.

What the software handles for you

The point of picking a capable self-hosted app is that the hard parts of organizing a library are automated. PhotoPrism's feature set illustrates what a self-hosted photo manager can do once it's running:

  • Browse everything without format friction — "Browse all your photos and videos without worrying about RAW conversion, duplicates or video formats."
  • Search — "Quickly find specific pictures using powerful search filters."
  • Places — "Includes six high-resolution world maps to bring back memories of your favorite trips."
  • Live Photos — "Play Live Photos by hovering over them in albums and search results."
  • People — "Recognizes the faces of your family and friends."
  • Automatic classification — "Automatic classification of pictures based on their content and location."

So the effort you spend on setup buys you a private library with search, face recognition, maps, and automatic tagging — the same category of features people expect from a cloud photo service, running on your hardware.

The trade-offs, stated plainly

In favor of self-hosting:

  • Your files and database stay on infrastructure you control.
  • No dependency on a vendor's account or continued goodwill.
  • You can run it "wherever you need it," as PhotoPrism puts it.

Against it:

  • Setup takes real time and some technical comfort.
  • You own the maintenance: updates, disk space, backups, and troubleshooting.
  • If your server goes down, your library is unavailable until you fix it.

When self-hosting is the right call

Self-hosting tends to fit when several of these are true:

  • You have a machine you can dedicate (or already run a home server).
  • You're comfortable with basic installation, updates, and backups — or willing to learn.
  • Your library is large enough that you want long-term control over storage and formats.
  • Privacy and data ownership are priorities, not nice-to-haves.
  • You're replacing a cloud photo service and want to keep the features without the account.

It tends to be the wrong call when you want zero maintenance, have no spare hardware, or aren't prepared to own backups. In those cases a cloud service is the more honest choice.

A concrete example: photo management

PhotoPrism is a clear illustration of the self-hosted model in practice. It's an "AI-powered, privacy-first, self-hosted app for browsing, organizing, and sharing photos and videos" — a self-hosted alternative in the photo-management and digital-asset-management space. You run it on your own infrastructure, point it at your library, and get browsing, search, maps, face recognition, and automatic classification without uploading your collection to a third party.

For teams and organizations, PhotoPrism also offers a Pro tier: "PhotoPrism® Pro provides your organization with access to additional configuration and deployment options — all fully GDPR-compliant, hosted on your own infrastructure, and backed by our team." Note the structure — even the paid tier stays self-hosted on your own infrastructure, which is the defining trait of this model. The site does not list prices, so check current plan details directly if cost matters to your decision.

How to decide

Ask three questions:

  1. Do I have the hardware and the willingness to maintain it? If no, self-hosting will become a chore.
  2. Does data ownership or privacy outweigh convenience for this use case? If yes, self-hosting is worth the effort.
  3. Can I commit to backups? If not, don't put your only copy of anything important on a self-hosted server.

If you answered yes to all three, self-hosting — with something like PhotoPrism for photos — gives you control and privacy in exchange for setup and upkeep. If you answered no to any of them, a cloud service is the more practical fit.

What Is Link Management and What Should a Link Management Platform Do?

Link management is the ongoing practice of creating, branding, routing, and tracking short links over their whole lifetime, not just shortening a URL once. You need a link management platform when links are more than disposable redirects: when you want your own domain on every link, per-link click data, destination rules that change by country or audience, and an API your team can build on. A basic free shortener is enough for occasional one-off links; a management platform earns its place when links carry campaigns, run in production, or need to be audited.

The core capabilities to expect

Branded links on your own domain

Instead of a shared shortener domain, you point your own domain or subdomain at the platform and every link carries your name. spoo.me describes this as a guided two-minute setup, with apex or subdomain support, so a link reads as forma.io/launch rather than a third-party host.

Per-link analytics

Analytics is where a shortener and a management platform diverge most. A management platform should give each link its own dashboard, not just a global click counter. From the spoo.me dashboard, the metrics shown per link include:

  • Clicks over time and unique visitors
  • Repeat behavior, with the ability to compare periods
  • Top referrers (direct, search, social, chat tools)
  • Country, city, browser, and OS breakdowns
  • Average redirect time (shown as a median over 30 days)

The practical test is whether you can scope a chart to one question — for example, "Chrome users from Germany who came through Discord" — by filtering on browser, country, city, referrer, or OS. If the platform only reports totals, you will end up exporting data to answer anything specific.

QR codes

QR codes belong in the same system as the link itself, so a printed code and its short link share one destination and one analytics view. Treat QR generation as a baseline feature, not a differentiator.

Advanced routing and control

Once links are managed centrally, the platform can decide what a click does. Capabilities worth checking for:

Capability What it does When it matters
Geo routing Sends visitors to different destinations by country Regional stores, localized landing pages, compliance-driven redirects
A/B testing Splits traffic across destinations by weight, scored by clicks Testing headlines, offers, or landing pages without a separate tool
Private links Gates a link behind a passphrase Internal docs, pre-release content, gated downloads
Self-destruct / expiry Caps total clicks or sets an end date Time-limited campaigns, one-time invites
Threshold alerts Notifies when a link crosses a click count, gets its first visit from a new country, expires, or fires a webhook Campaigns where you need to know before someone asks

Geo routing is the clearest example of why management beats shortening: one link can send the EU to an EU store, Tokyo to a JP page, and everyone else to a fallback, with the rules expressed as a simple table.

API-first and self-hosted: who each fits

An API-first platform treats the API as the primary interface, with dashboards and apps built on top of it. That fits teams that create links programmatically — from a CMS, a CI pipeline, a support tool — or that need to pull analytics into their own reporting.

Self-hosting means running the platform on your own server. It fits when data ownership, network isolation, or customization requirements rule out a hosted service, and it requires someone to operate and maintain it. spoo.me states it is open-source, self-hostable in one command, and API-first, with an ecosystem of apps and SDKs — a combination that suits developer teams shipping production traffic.

Criteria for choosing a platform

  • Analytics depth: per-link dashboards, period comparison, and filters by referrer, geography, and device — not just a total click count.
  • Data ownership: whether analytics are collected first-party (no third-party scripts or cookie banners) and whether self-hosting is an option.
  • Routing rules: geo targeting, weighted A/B splits, password protection, and expiry or click caps.
  • Integration surface: an API and SDKs, plus webhooks for events like threshold crossings.
  • Branding: custom domain support at the apex or subdomain level.
  • Operational cost: a hosted service needs no maintenance; self-hosting trades that for control and responsibility.

If your links are occasional and untracked, a plain shortener covers you. If links are part of campaigns, products, or internal workflows — and you need to prove what each click did — the capabilities above are the checklist to evaluate against.

What Is OpenAPI-Generated API Documentation and How Does It Work?

OpenAPI-generated API documentation is reference documentation that is produced automatically from an OpenAPI description file rather than written by hand. You write (or generate) a machine-readable specification of your API — endpoints, parameters, request bodies, responses, schemas, and auth — and a documentation tool reads that file and renders a browsable, often interactive reference site. The spec becomes the single source of truth; the docs become a build artifact.

This differs from manually written docs in one fundamental way: with hand-written docs, the prose is the source of truth and the API is described separately. With spec-driven docs, the API description is the source, and every page, table, and code sample is derived from it.

How the workflow actually runs

A typical spec-driven documentation pipeline has five stages:

  1. Author or generate the spec. You either write an OpenAPI document by hand (YAML or JSON), or generate it from code annotations, framework metadata, or a design-first editor. Design-first means the spec is written before implementation; code-first means it is extracted from existing code.
  2. Validate and lint. The spec is checked against the OpenAPI schema and against style rules — consistent naming, required descriptions, no undocumented 4xx responses, no orphaned schemas.
  3. Bundle and transform. Multi-file specs are combined, $ref pointers are resolved, and the document is optionally split into per-tag or per-version outputs.
  4. Render. A documentation tool converts the spec into HTML: an endpoint list, a sidebar of operations, parameter tables, response schemas, and a "try it" console.
  5. Publish and version. The rendered site is deployed, and each API version gets its own snapshot so consumers can read docs matching the version they call.

Steps 2 through 5 are usually automated in CI. If the spec fails validation, the docs build fails — which is the point.

Spec-driven vs. hand-written documentation

Dimension OpenAPI-generated Hand-written
Source of truth The spec file The prose
Consistency with the API High, if the spec is accurate Drifts as the API changes
Effort per endpoint Low after setup Repeated for every endpoint
Narrative and tutorials Weak; needs separate pages Strong
Code samples Generated per language from schemas Written and maintained manually
Customization Bounded by the tool's templates Unlimited
Failure mode Accurate spec, poor docs, or stale spec Beautiful docs that describe an API that no longer exists

The practical conclusion most teams reach: generate the reference, write the guides. Reference material is repetitive and mechanical, which is exactly what generation is good at. Conceptual explanations, migration notes, and tutorials carry judgment that a spec cannot express.

What you get out of the box

Generated reference pages commonly include:

  • An operation list grouped by tag or path, with HTTP method and path.
  • Parameter tables showing name, location (path, query, header, cookie), type, required flag, and description.
  • Request and response schemas rendered as expandable trees, including nested objects and arrays.
  • Authentication details pulled from the securitySchemes section.
  • Interactive request consoles that let a reader send a real call from the browser.
  • Generated code samples in several languages, derived from the same schemas.
  • Multiple output formats, such as a static site, a single HTML file, or a mock server.

Because all of these come from one document, changing a field name in the spec updates the parameter table, the schema tree, and every code sample at once.

Where spec-driven documentation breaks down

Generation is not free. The trade-offs are real:

Spec quality becomes documentation quality. A field with no description produces a table row with an empty cell. A vague summary produces a vague heading. Tools can enforce presence of descriptions via linting, but they cannot enforce that the description is useful.

Customization has limits. If you need a page that does not map to an OpenAPI concept — a conceptual overview, a pricing explanation, a comparison of two endpoints — you write it outside the generator and link to it.

Not everything is expressible. Webhooks, streaming responses, long-polling behavior, and complex multi-step flows are awkward or impossible to describe fully in OpenAPI. Those need prose.

The spec can go stale. If the spec is maintained separately from the implementation, it drifts just like hand-written docs. The mitigation is to generate the spec from code, or to test the implementation against the spec in CI.

Interactive consoles need care. A "try it" button that hits a production API with real credentials is a security and rate-limit problem. Point it at a sandbox, or disable it.

Deciding whether to adopt it

Adopt spec-driven reference documentation if most of these are true:

  • Your API has more than a handful of endpoints, or changes frequently.
  • You ship client SDKs or code samples in more than one language.
  • Multiple teams consume the API and need a consistent, always-current reference.
  • You already have, or are willing to maintain, an OpenAPI description.

Stay with hand-written docs, or a hybrid, if:

  • Your API is small and stable, and the reference fits on one page.
  • Your documentation is mostly conceptual and contains little endpoint-level detail.
  • You cannot commit to keeping the spec in sync with the implementation.

A reasonable middle path: generate the reference from the spec, and hand-write the getting-started guide, authentication walkthrough, and error-handling page. Link the two directions so readers can move from concept to endpoint and back.

A minimal starting checklist

  1. Produce one valid OpenAPI document for a single API version.
  2. Add a linter with rules for descriptions, operation IDs, and error responses.
  3. Wire the docs build into CI so a failing spec fails the build.
  4. Render the reference and review it as a reader, not as the author.
  5. Write the two or three conceptual pages the generator cannot produce.
  6. Version the published docs alongside the API version.

The core idea is simple: describe the API once, in a format both machines and humans can read, and let the reference documentation fall out of that description. Everything else — tooling, hosting, interactivity — is a detail on top of that decision.

What Is a URL Shortener and How Do Branded Short Links Work?

A URL shortener takes a long web address and produces a shorter one that redirects to the original destination. You use one when a link is too long to share cleanly, when you want a link you can track, or when you want the link to carry your own brand instead of a generic domain. Branded short links go one step further: they replace the shortener's default domain with a custom domain you control, so yourbrand.com/sale points to a full product page. Tools like Jmpy.me combine short links, branded domains, QR codes, and click analytics in one place.

What a URL shortener actually does

At its core, a shortener stores a mapping between a short code and a destination URL. When someone visits the short link, the service looks up the code and sends the visitor to the destination.

That mapping is what makes the following possible:

  • Shorter, cleaner links — easier to paste into posts, emails, or print.
  • A stable link you can change later — with a dynamic short link, you can update the destination without reprinting or re-sharing the short URL.
  • Click tracking — every visit passes through the shortener, so it can record the click before redirecting.

A static short link points permanently at one destination. A dynamic short link lets you edit where it points after it's been shared, which matters when a campaign URL changes or a page moves.

Branded short links and custom domains

A branded short link uses your own domain as the shortener's domain. Instead of a generic-looking short URL, the link reads as part of your brand.

Why this matters:

  • Trust — recipients see a domain they recognize rather than an unfamiliar one.
  • Consistency — the same branded domain can be used across campaigns, channels, and print materials.
  • Reputation control — Jmpy.me frames this as protecting your reputation and keeping links delivering, since the visible domain is yours.

Jmpy.me advertises free branded domains as part of its platform. If owning a specific custom domain is a requirement for you, confirm the current terms on the pricing page before committing, since domain availability and plan limits can change.

QR codes from short links

A QR code can encode a short link, which gives you a scannable code that behaves like any other tracked link. This is useful for print materials, packaging, event signage, or anywhere a person can't easily type a URL.

The practical advantage of pairing QR codes with short links rather than raw long URLs:

  • The QR pattern stays simpler and easier to scan when the encoded URL is short.
  • If you use a dynamic short link, you can change the destination without regenerating the printed QR code.
  • Scans flow through the same analytics as clicks.

Jmpy.me includes a QR code generator alongside its short links, and offers a payment QR code generator as a specific use case.

Click analytics and link tracking

Because traffic passes through the shortener, it can log data about each visit. Typical click analytics cover how many times a link was clicked, when, and from where.

Use analytics to answer questions like:

  • Which channel or campaign drove the most clicks?
  • Is a printed QR code actually being scanned?
  • Did a link's performance change after you updated its destination?

This is the main reason to route links through a shortener even when the original URL isn't especially long: the tracking is the point.

How to choose a URL shortener

Compare tools on the dimensions that affect your actual workflow:

Dimension What to check
Custom domain Can you use your own branded domain, and is it included or an upgrade?
Link type Static only, or dynamic links you can edit after sharing?
QR codes Included, and can they be generated from your short links?
Analytics What click data is captured and how it's presented?
Volume Any limits on links or clicks at your usage level?
Pricing What's free versus paid — check the current plans page, since terms change

Jmpy.me positions itself as a Bitly alternative with free branded short links, dynamic QR codes, and click analytics, and states it's built for modern marketing teams and any volume. Treat those as the vendor's claims and verify specifics against the current pricing page for your use case.

Quick example

Suppose you're printing 5,000 flyers for a product launch. You create a branded short link on your own domain, generate a QR code from it, and print the code on the flyer. When the launch date shifts, you update the dynamic link's destination — the printed QR codes still work, and your analytics show how many scans came from the flyers versus your other channels. That combination of a branded domain, a dynamic link, a QR code, and click tracking is the practical case for using a shortener rather than sharing the raw URL.

What Are Open-Source UI Element Libraries and How Do They Differ From UI Frameworks?

An open-source UI element library is a collection of individual, ready-made interface pieces—buttons, cards, inputs, toggles, loaders—that you copy into your own project and adapt. A UI framework, by contrast, is a structured system of components, conventions, and often a theming layer that governs how your whole interface is built. The practical difference: an element library gives you a snippet; a framework gives you a way of working. If you need a polished button in ten minutes, reach for the element library. If you're building a 40-screen product with a team, you probably want the framework.

What "open-source UI element library" actually means

The term gets used loosely, so it helps to separate the parts:

  • Open-source: the code is publicly available, and the license tells you what you may do with it—copy, modify, redistribute, or use commercially.
  • UI element: a single, self-contained piece of interface, usually small enough to read in one sitting. A button with hover states, a pricing card, a search field.
  • Library: a browsable, searchable collection of those elements, typically contributed by many different people.

On a site like Uiverse, elements are shared by a community and written in plain CSS or Tailwind. You find one you like, copy the markup and styles, paste them into your project, and adjust colors, spacing, and text to fit. There's no package to install and no build step required—which is exactly the appeal, and also the source of most of the confusion.

Element library vs. UI framework: the core differences

Dimension Open-source UI element library UI framework / design system
Unit of reuse A single snippet you copy A component you import or call
Installation None; paste into your code Package install, config, sometimes a provider
Consistency Depends on you; each element may look different Enforced by shared tokens and APIs
Theming Manual edits per element Central theme/config file
Updates You own the copy; no upstream updates Version bumps bring fixes and changes
Accessibility Varies per contributor; must be checked Usually tested and documented
Best for Prototypes, landing pages, small sites, one-off needs Multi-page apps, teams, long-lived products
Learning curve Low—read the CSS Higher—learn the API and conventions

The table isn't a verdict. It's a map of trade-offs. Element libraries win on speed and freedom; frameworks win on consistency and maintenance.

Licensing and attribution: what to check before you paste

This is where people get into trouble, and it's worth slowing down for.

  1. Find the license. Every element or collection should state one. Common open-source licenses include MIT, Apache-2.0, and BSD. Some projects use copyleft licenses like GPL, which can impose obligations if you redistribute your code.
  2. Understand what the license permits. MIT and Apache-2.0 are permissive: you can typically use the code in commercial and closed-source projects. Copyleft licenses may require you to release derivative source under the same terms.
  3. Check attribution requirements. Permissive licenses usually require you to keep the copyright notice and license text somewhere in your project. That's a real obligation, not a formality.
  4. Look for per-element terms. On community sites, the site's overall terms and the individual contributor's stated wishes may differ. If a contributor asks for credit, honor it.
  5. When in doubt, ask or avoid. If a snippet has no license at all, you don't have clear permission to reuse it. Treat "no license" as "not open source," even if the code is publicly visible.

This article is general information, not legal advice. For commercial products with real exposure, have someone qualified review the licenses you're relying on.

How to use a community element in your project: a practical workflow

Here's a repeatable process that avoids most of the usual mess.

1. Start from a real need, not a browsing session

Decide what you need first—"a compact primary button with a loading state"—then search. Browsing aimlessly produces a pile of pretty snippets that don't fit together.

2. Copy the smallest version that works

Take the markup and the styles. Strip anything you don't need: demo wrappers, extra animations, decorative layers. Less code means fewer surprises.

3. Convert it to your conventions

If your project uses design tokens or CSS variables, replace hard-coded values:

/* Before: hard-coded */
.button { background: #4f46e5; border-radius: 8px; }

/* After: token-based */
.button { background: var(--color-primary); border-radius: var(--radius-md); }

This one step is what keeps a copied element from looking like a foreign object in your UI.

4. Check accessibility before you ship

Community elements vary widely here. Verify at minimum:

  • Keyboard focus is visible and the element is reachable by Tab.
  • Color contrast meets WCAG AA (4.5:1 for normal text).
  • Interactive elements use semantic HTML (<button>, not a clickable <div>).
  • Form inputs have associated labels.
  • Motion respects prefers-reduced-motion.

5. Test in context

Paste it into a real page with real content. Long labels, small screens, and dark mode break more copied elements than anything else.

6. Note where it came from

Keep a short comment or an internal credits file: source, license, date. Future you—and your legal reviewer—will be grateful.

Where element libraries genuinely shine

  • Prototypes and demos: you need something clickable today, not a design system.
  • Landing pages and marketing sites: a handful of distinctive elements, each custom.
  • Filling gaps: your framework lacks one specific component, and you don't want to build it from scratch.
  • Learning: reading well-made CSS is one of the fastest ways to improve.
  • Small projects: a personal site doesn't need a theming architecture.

Where they fall short

  • Consistency at scale: ten elements from ten contributors rarely look like one product.
  • Maintenance: you own every copy. When your design changes, you edit each one.
  • Accessibility debt: you inherit whatever the contributor did or didn't do.
  • No upstream fixes: a bug fixed in the original won't reach your copy.
  • Integration friction: different naming conventions, different units, different assumptions about resets.

When to choose which

Choose an element library when the scope is small, the timeline is short, or you need a few distinctive pieces rather than a whole system.

Choose a framework or design system when multiple people build multiple screens over months, when consistency is a product requirement, or when accessibility and theming need to be guaranteed rather than checked.

A hybrid works well for many teams: adopt a framework for the structural components—forms, navigation, layout—and borrow individual elements for the places where you want personality. Just route every borrowed element through the same token and accessibility checks, so it lands as part of your system rather than beside it.

The short version: open-source UI element libraries are a fast, flexible way to get good-looking interface pieces into a project. They are not a substitute for a design system, and the license and accessibility details are the part worth reading carefully.

Website Overview

Page metadata, canonical configuration and social previews work together to provide more consistent search and sharing presentation.

Domain and Registration

Transfer-protection status is present, helping reduce the risk of unauthorized domain transfers. The domain has about 3 years of registration history; its current configuration provides more context than age alone. The registrar is NameCheap, Inc., a widely used domain service provider. The domain uses the common .me extension, which is not an independent safety signal.

DNS and Email

Nameservers are provided by Cloudflare, indicating managed DNS hosting. MX records point to the Zoho Mail email service. No CNAME was found; the observed records resolve directly to addresses. SPF and DMARC are configured. DKIM status is unknown. TXT records include verification markers for Google. Such markers may also remain after a service stops being used.

TLS and Certificates

The public key uses EC with 256 bits. The server supplied a complete certificate chain. No organization name is present in the certificate; the available fields are consistent with domain validation. The certificate was issued within the Google Trust Services cloud or CDN ecosystem. The certificate's total validity is about 90 days, consistent with a short renewal cycle.

HTTP and Browser Security

The response lacks these common security headers: CSP, X-Content-Type-Options, Referrer-Policy, Permissions-Policy, clickjacking protection. No X-Powered-By header was found, reducing one common source of backend fingerprinting information. The cf-ray, via response header indicates a CDN or caching proxy in the delivery path. No obvious internal addresses or debug information were found in the headers. The Server header identifies cloudflare without an exact version.

Technology Stack Analysis

The public page identifies Next.js, Cloudflare without precise versions, leaving fewer clues for version-specific scanning.

Search and Social Sharing

Twitter Card metadata is configured. JSON-LD includes Organization data, helping describe the organization as an entity. The title has 61 characters, within a common display range. A meta description is present, with 152 characters. The observed directives allow indexing and link following.

Hosting and Email

DNSCloudflare
HostingCloudflare
EmailZoho Mail
Approximate IP geolocation (inferred; a CDN or proxy may differ from the origin server) Location unknown Inferred 104.21.84.220

Registration details

RDAP / WHOIS

RegistrarNameCheap, Inc.
Registered2023-07-06
Expires2027-07-06
Domain statusclientTransferProhibited https://icann.org/epp#clientTransferProhibited
Nameserverscourtney.ns.cloudflare.com、zac.ns.cloudflare.com
DNSSECunsigned

DNS records

DNS

TypeNameValueTTLPriority
Aspoo.me104.21.84.220300—
Aspoo.me172.67.197.99300—
AAAAspoo.me2606:4700:3032::ac43:c563300—
AAAAspoo.me2606:4700:3036::6815:54dc300—
MXspoo.memx.zoho.in30010
MXspoo.memx2.zoho.in30019
MXspoo.memx3.zoho.in30050
NSspoo.mecourtney.ns.cloudflare.com86400—
NSspoo.mezac.ns.cloudflare.com86400—
TXTspoo.megoogle-site-verification=6Bg3LeMmriQj9laiMgDh775Pi8Rb5QU5x4CcH7wb4xY300—
TXTspoo.mepadqdi3z8z300—
TXTspoo.mev=spf1 include:zoho.in ~all300—
TXTspoo.mezoho-verification=zb53613327.zmverify.zoho.in300—
DMARC_dmarc.spoo.mev=DMARC1; p=quarantine; rua=mailto:[email protected]; ruf=mailto:[email protected]; sp=quarantine; adkim=s; aspf=s; pct=100300—

TLS and certificates

TLS / SSL

AssessmentNormal configuration
Supported protocolsTLSv1.2、TLSv1.3
Negotiated protocolTLSv1.3
Certificate subjectspoo.me
IssuerGoogle Trust Services
Valid until2026-12-29T08:59 · Remaining when checked: 85 days
Verification detailsCertificate trust: Passed · Hostname match: Passed

HTTP response headers

HTTP

HeaderValue
content-typetext/html; charset=utf-8
cache-controls-maxage=31536000
servercloudflare
strict-transport-securitymax-age=15552000; includeSubDomains; preload

Identified technologies

Next.jsCloudflare

Pages, Search and Sharing

Meta descriptionOpen-source link management with advanced analytics and an API-first core. Free short links, click analytics and QR codes. Self-hostable in one command.
Canonical URLhttps://spoo.me
LanguageEnglish (default)
Twitter Cardsummary_large_image
All bots 1 allowed · 5 disallowed
  • Allow/
  • Disallow/dashboard
  • Disallow/onboarding
  • Disallow/api/
  • Disallow/relay/
  • Disallow/_error/

User reviews (0)

  • No reviews yet.